Building A Zoetrope Using Kinect, Processing, And A Laser Cutter

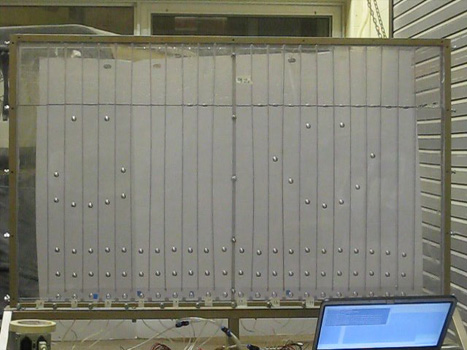
A zoetrope is a device that contains a disk full with a series of images that make up and animation. A couple of different methods can be used to trick the eye into seeing a single animated image. In the past this was done by placing the images inside of a cylinder with slits at regular distances. When spun quickly, the slits appear to be stationary, with the images creating the animation. But the same effect can be accomplished using a strobe light.

The disk you see above uses the strobe method, but it’s design and construction is what caught our eye. The animated shapes were captured with a Kinect and isolated using Processing. [Greg Borenstein] takes a depth movie recorded while someone danced in front of a Kinect. He ran it through a Processing sketch and was able to isolate a set of slides that where then turned into the objects seen above using a laser cutter.

You can watch a video of this particular zoetrope after the break. But we’ve also embedded the Pixal 3D zoetrope clip which, although unrelated to this hack, is extremely interesting. Don’t have a laser cutter to try this out yourself? You could always build a zoetrope that uses a printed disk.

Continue reading “Building A Zoetrope Using Kinect, Processing, And A Laser Cutter”

LCD Twofer

Inexpensive character LCDs are a popular choice for outputting data on many projects. Easily controlled , often back lit, and compact. If you have not found a reason to get one yet, here are a couple.

First up is a Programmable digital timer switch. Based around a PIC15f628A micro controller this handy little device allows you to set both on and off times to switch (light duty) devices through its relay. A standard 16×2 LCD , piezo buzzer, and 4 push buttons offer the device’s I / O. The four buttons are assigned to on / off time, select, enter, and start / stop making it easy for anyone to use. All this and sporting a clean perf-board layout which often goes out the window when using jumper wire.

Next for the AVR crowd is a LCD Name badge. Powered by a Attiny 2313 and using another 16×2 LCD, this time in blue this large, but functional name badge is ready to give out all the information people need on you while boasting your nerd credit.

Source and schematics are available for both, and yes we know these little gadgets are not exactly earth shattering so that is why we invite you to share your LCD projects on quite possibly the most awesome forum ever, the Hack A Day forums, we even have a little spot setup just for project logs.

But first join us after the break for a couple quick videos.

Continue reading “LCD Twofer”

PWM-controlled LED Display Is Truly A Gift From The Heart

led_heart_panel

Instructables user [Simon] admits he addicted to electronics. Lucky for him, his wife of 15 years is pretty cool with, or at least tolerant of his need to fiddle with anything that plugs in. As a gift for their wedding anniversary, he decided it would be neat to combine his love for his wife with his love for electronics. The result is the the RGB LED “Love Heart” you see above. He built an RGB LED circuit controlled by a PIC12F683 microcontroller, which shines into a hand-etched plexi-glass panel.

The LED color is controlled using PWM, as you would expect. What you might not expect however, is the lengths [Simon] would travel to ensure nearly perfect color and brightness matching across the 5 LEDs he used in his project. Since RGB LEDs do not have a uniform output brightness, he used a Lux meter to precisely measure the white balance of each LED. He then plotted the results in Excel before coding the PWM driver. Now that’s devotion! Once the LEDs were settled, he went about constructing the rest of the LED panel.

If you are interested in building one for your sweetheart, [Simon] has you covered – he provides all of the schematics, templates, and source code required to get the job done.

Continue reading to see a video of his heart panel in action.

Continue reading “PWM-controlled LED Display Is Truly A Gift From The Heart”

Cooking Up Piezo Crystals At Home

piezo_crystal

[Collin] loves piezos – and why not?

According to him, they are about as close to magic as you can find in the world. We can’t really disagree on that one – there’s something oddly enchanting about piezoelectric materials.

Most commercially used piezoelectric devices that you find today are constructed out of man-made ceramic materials such as Lead zirconate titanate, and can be found in grill starters, gas-powered water heaters, etc. While they are common, it’s not exactly easy to synthesize these sorts of ceramic materials at home.

You can however, create piezoelectric crystals in your kitchen, using just a few simple ingredients. In his video, [Collin] shows us how to create Rochelle Salt, one of the first known materials found to exhibit piezoelectricity. The recipe calls for three ingredients, cream of tartar, sodium carbonate (soda ash), and water – that’s it. The procedure is quite simple, requiring you to heat a solution of water and cream of tartar, adding the soda ash a little at a time once it reaches the proper temperature. The solution is filtered after it turns clear and then left to sit overnight while the crystals form.

Take a look at the video embedded below to see how his Rochelle Crystals turned out, and be sure to try this out with your kids if they are interested in electronics. Making crystals that generate electricity when tapped is far cooler than making rock candy any day, trust us on this.

Continue reading “Cooking Up Piezo Crystals At Home”

Animated Paper

What if you could make paper react on physical input. Maybe you want it to shy away and close up if someone reaches for it too fast, or maybe you want some realistic paper flowers? Moving on to that great first step is Animated Paper, which is simply nitinol memory wire bonded to paper via our favorite tool, duct tape.

Memory wire is first bent to its desired shape, and in order for it to hold that shape it needs to be heated to about 540 degrees Celsius, which is a easy task for a propane torch. Once it has its memory shape the wire can be bent into any shape desired, and when heated to about 70 degrees Celsius will return to its original set shape.

Taped down to a sheet of paper and letting some current from a battery run though it the wire quickly warms up and animates the paper, which could be exactly what one needs in a more artsy robot or electronic display. Join us after the break for a short video.

Continue reading “Animated Paper”

Personal Soundboard Recounts Years Of Clever One-liners

personal_soundboard

[Antibore’s] friend was just wrapping up his Ph.D. Degree and he wanted to build him something special to commemorate the accomplishment. After thinking about it awhile, he realized that his friend was quite gregarious and known to make off-the-wall comments at parties and such. A ton of these one-liners were documented on video over a span of 10 years, so [Antibore] got the idea to make his friend a soundboard featuring his own witticisms.

He found a breakout board capable of playing back OGG files and got to work loading it up with his friend’s random sayings. The board was connected to a small amplifier and speaker, then everything was installed into a black plastic case. Four arcade-style buttons were mounted on the front of the case, along with a picture of his friend. Up to 16 different sayings can be played, depending on which combination of buttons are being held at a particular time.

It’s sounds like a really cool project, and certainly makes for a one of a kind gift. Currently there is no video or audio of the box in action, but here’s hoping we’ll see some soon.

DIY Flower Bouquet Guaranteed To Get You Dumped On Valentine’s Day

led_flower_bunch

[Erik] is a broke engineer.

When this past Valentine’s day rolled around he didn’t have any cash to buy a gift for his girlfriend, so he had to get creative. Every girl likes flowers, but unless he was going to give his lady some day old daises from the grocery dumpster, he would have to make them himself.

He started by bundling together and bending some T-shirt hangers into stems. He then wrapped them in the green & green/white wire pairs from some Cat-5 cable to give them some color. An old keyboard was sacrificed to create the flower petals and leaves, which were presumably colored with markers before being glued to the end of the hangers. He added a reed switch to the flower pot, which illuminates the LEDs he installed under the petals when a magnet-bearing cardboard placard reading “Love Erik” was placed near it.

How did his girlfriend like them?  Well, let’s just say she’s no longer in the picture. He didn’t tell us if the bouquet was the reason, only that she’s gone. (though we happen to think it’s pretty cool).


Keep reading to see a quick video demonstration of the light-up bouquet.

Continue reading “DIY Flower Bouquet Guaranteed To Get You Dumped On Valentine’s Day”