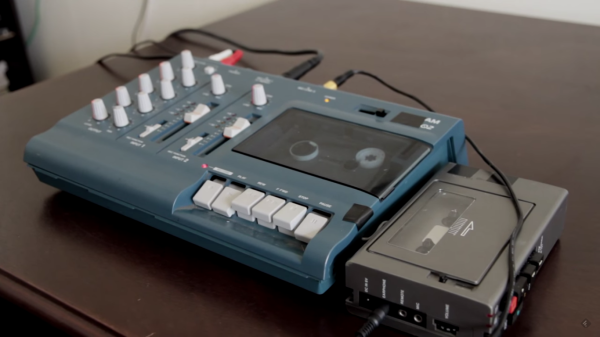
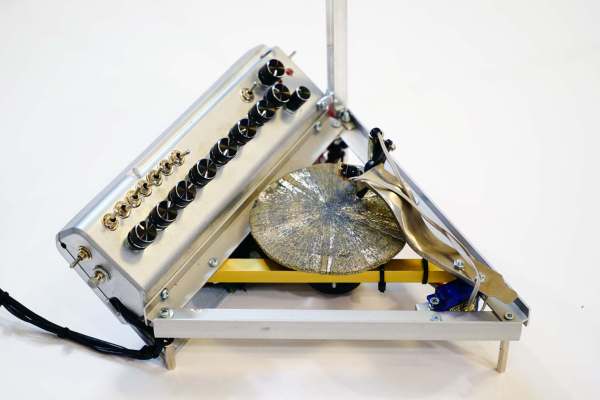
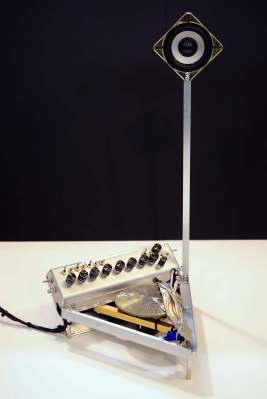
[Tymkrs] Tombstone Guitar Amplifier

tymkrsTombstone

[Atdiy and Whisker], the team behind [The Tymkrs] YouTube channel, are at it again with a tombstone guitar amp project.(YouTube playlist link) Their amp began life as a Philco Tombstone radio which had seen better days. By the time [Tymkrs] got their hands on it, it was just a shell of its former self, as someone had already stripped all the electronics.

The amplifier itself is a disused Leslie tube amp [Tymkrs] had on hand. An LM386 serves as the pre-amp, making this a hybrid solid and vacuum state machine.

The tombstone speaker is especially interesting. [Tymkrs] went with an electrodynamic field coil speaker. Field coil speakers have no magnets, instead using a high voltage (approx 90V DC) coil to create a magnetic field for the voice coil to push against. This sort of speaker was commonplace in the 1930’s, as large magnets couldn’t be made lightweight enough to be used in a speaker. As magnet technology improved, permanent magnets became a staple in speakers.

[Tymkrs] paid special attention to the finish of the amplifier. They brought the tired old radio back to a high shine, then added a Metropolis inspired overlay from aged copper-clad board. The result is an amp that looks great and sounds great!

Continue reading “[Tymkrs] Tombstone Guitar Amplifier”

Wait, THAT’S An Electric Guitar?

Mechatronic Guitar

What you’re looking at above is a six-stringed mechatronic slide guitar, where each string and associated servos is assigned its own MIDI channel.

It’s a project [Jim Murphy] has been working on for a while now, and technically, it’s the second iteration — he’s calling it the Swivel 2. The original Swivel was more of a proof of concept, using bulky stepper motors and solenoids — in this one he’s upgraded to hobby style servos, using four per string. One to change the pitch, one to clamp the pitch shifter, and two to pick and dampen the strings.

He’s designed the PCB control boards himself utilizing an Arduino bootloader-equipped ATMEGA328, which takes in the MIDI signal from a computer and moves the servos accordingly — to produce the audio signals he’s been using Ableton Live to write the patterns.

The entire setup was designed in 3D CAD and is designed to be completely modular. He’s even made the guitar pickups himself using 3D printed spools, and hand wrapping the coils with copper enamel wire. Lend an ear after the break to hear it in action.

Continue reading “Wait, THAT’S An Electric Guitar?”

DIY Foot Pedal Controller For Guitar Rig 5

DIY Modeling Software Control Pedal

Back in the old days, it took external guitar effects pedals to modify a guitar’s sound. As computer processing power has been growing at an exponential rate, software-based effects modelers have been becoming more common. [Matthew]’s dad is running Guitar Rig 5 modeling software on his Lenovo tablet. Although it works well, it is a hassle to change effects and amp models while playing. That’s where [Matthew] comes in. He’s built a foot pedal controller so his old man can change up those sweet sounds on the fly.

Guitar Rig 5 has the ability to change presets with key presses. Even so, it would still be a hassle tapping a keyboard while playing, whether it be physical or on-screen. Since an Arduino-compatible board with an ATMEGA32U4 chip can be used to simulate an HID device, [Matthew] decided to use one as the basis for his project. Standard push buttons mounted in a project box indicate to the microcontroller which keyboard commands to send to the tablet. There are 4 buttons for 4 presets on this build but any number can be used. When a button is pushed, the associated keyboard command is sent to the tablet via a USB cable and Guitar Rig 5 responds to that command by changing the preset. And just so you know where you are, an indicator light adjacent to each button shows which preset is current.

Continue reading “DIY Foot Pedal Controller For Guitar Rig 5”

An ARM-Based DSP Modelling Synth

synth

The great analog synths of Moog, Oberheim, Sequential Circuits, and more modern version from Doepfer are renouned for their sound, the sheer majesty of a rack full of knobs and plugs, and of course the price. Analog synths are simply expensive to build, and given that aficionados even scoff at digitally controlled oscillators, require a lot of engineering to build. [Jan]’s DSP-G1 isn’t like those analog synths – it uses microcontrollers and DSP to generate its bleeps and boops. It is, however, extremely cheap and sounds close enough to the real thing that it could easily find a home between a few euroracks and CV keyboards.

plugThe heart of the DSP-G1 is a micro from NXP modeling an analog synthesizer with 15 digitally controlled oscillators with Sine, Triangle, Pulse and Saw outputs, a low frequency oscillator, two envelope filters, and a low pass filter, or about the same accouterments you would find in a MiniMoog or other vintage synth from the 70s. Since this is basically a synth on an NXP LPC-810, [Jan] has packaged it in something akin to a MIDI to 3.5mm cable adapter: Plug a MIDI keyboard into one end, an amp into the other, and you have a synth smaller than the MIDI Vampire, an already impossibly small music creation tool.

[Jan] has a few more versions of his little DSP device with varying amounts of knobs available on his indiegogo campaign. The DSP-Gplug is the star of the show, though, provided you already have a MIDI keyboard with a few knobs for the required CC messages. Videos and sound demos below.

Continue reading “An ARM-Based DSP Modelling Synth”

Tempo Keeping Drummer Leaves Viking Ship, Now Inspires Pedallers

Bike Controlled Drum Machine

[Serdef] wrote in to tell us about a project he has recently created. It’s a drum beat generator that changes tempo depending on how fast you pedal your bike. This flies directly in the face of using music to keep your pedal timing consistent and up to speed.

The project started out with a tap-tempo drum rhythm pedal that [Serdef] had previously built. This device will generate a drum beat at a tempo corosponding with the time between 2 input signals. This type of device allows someone, say a guitarist, to quickly and easily specify the speed of the drumbeat that they are playing along with.

With the meat and potatoes of the project already figured out, the next part was to make the speed of the bike trigger the tempo of the drum beat. For the signal input, a magnet mounted on the wheel triggers a reed switch mounted on the bike fork once per wheel revolution. This is the same method of information gathering that a bicycle speedometer/odometer uses.

The business part of this project includes an Arduino that measures the speed of the wheel via the magnetic switch, adjusts the speed of the drum beat, and then sends the drum beat to a synthesizer via MIDI protocol. The synthesizer converts the MIDI signal into drum sounds amplified through a powered speaker that the rider can hear. The entire system is powered by a 9v battery and housed in a project box strapped to the bike’s handlebars.

All of the design files and Arduino code are available via [Serdef’s] excellent write up on hackaday.io in case you’re interested in making one for yourself.

MIDI Melodies Make Moody Milieu

MIDI piano lights

In this beautiful, well-documented, cat-assisted hack, [capricorn1] adds visual dimension to his impressive piano skills by using his keyboard’s MIDI output to drive Edison bulbs.

He hung them from a rod of electrical conduit pipe and threaded the wires through it to a DB25 connector. The lights are controlled by an Arduino Mega plus a custom shield with an optocoupler to handle zero cross detection. He happened to already have a board with 12 SSRs on it from another project. All of the electronics are in a re-purposed switch box—the switches control four different modes: classic, velocity, scrolling, and automatic. You’ll see the scrolling mode in the video after the jump.

[capricorn1] used a small sampling of the Arduino MIDI Library, namely the note on/off functions and the control change function to handle his sustain pedal. He’s listed the full code for the project, which includes usage of the ipMIDI module for automation over WiFi.

If you don’t have a MIDI keyboard or any Edison bulbs, you could make a MIDI floor piano. You’re required to play both “Chopsticks” and “Heart and Soul” on it, though. Those are like the Hello, World for floor pianos.

Continue reading “MIDI Melodies Make Moody Milieu”

Soda Can Theremin Made In Minutes

Looking for a fun weekend project? How about building your very own sci-fi Theremin using just a soda can and a few simple components you probably already have.

Not familiar with Theremins? It’s an electronic instrument that can be played without any physical contact. Essentially, the antenna (soda can) acts as half of a capacitor — your hand acts as the other. By varying the distance of your hand to the soda can, you change the capacitance, which can then be used to modulate a sound. It was invented in 1928 by the Russian inventor [Leon Theremin], and you can actually see a video of him playing it on YouTube — we’ve never seen this before, but we must say it’s actually quite impressive!

Anyway, back to the hack. All you need are some op-amps, a few capacitors, some resistors, a diode, a breadboard, and of course — a speaker. [Will’s] gone into great detail in how each circuit works with both schematics and diagrams of the breadboard configuration — it’s a great little project even kids can follow along.

Take a listen after the break.

Continue reading “Soda Can Theremin Made In Minutes”