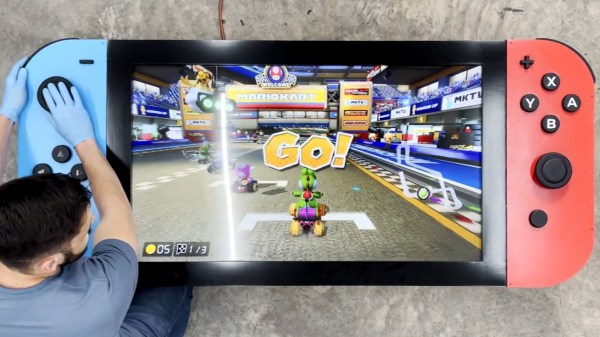
Dumping A N64 Development Cartridge Safely

Retro gaming enthusiasts have always had great interest in rarities outside the usual commercial titles. Whether they be early betas, review copies, or even near-complete versions of games that never made it to release, these finds can be inordinately valuable. [Modern Vintage Gamer] recently came across a pre-release version of Turok 3 for the Nintendo 64, and set about dumping and preserving the find. (Video, embedded below.)

With one-off cartridges like these, it’s important to take the utmost care in order to preserve the data onboard. Simply slapping it into a regular console might boot up the game, but carries with it a non-zero chance of damaging the cart. Instead, the first step taken was to dump the cart for archival purposes. When working with a prototype cart, commodity dumpers like the Retrode aren’t sufficient to do the job. [Modern Vintage Gamer] notes that a Doctor V64 or Gameshark with a parallel port could work, but elects to use a more modern solution in the form of the Ultrasave and 64drive.

With the cartridge backed up and duplicated onto the 64drive, the code can be run on a real console without risk of damage to the original. At first glance, the game appears similar to the final retail version. Analysis of the dump using a file comparison tool suggests that the only differences between the “80% Complete” ROM and the retail edition are headers, leading [Modern Vintage Gamer] to surmise that the game may have been rushed to release.

While in this case the dump didn’t net an amazing rare version of a retro game, [Modern Vintage Gamer] does a great job of explaining the how and why of the process of preserving a vintage cartridge. We look forward to the next rare drop that shakes up the retro world; we’ve seen efforts on Capcom arcade boards net great results. Video after the break.

Continue reading “Dumping A N64 Development Cartridge Safely”

N64 Power Adapter Works Around The World

Modern electronics such as phone and laptop chargers are pretty versatile no matter where you find yourself in the world. Capable of running off anything from 100-250V, all you need is a socket adaptor and you’re good to go. Video game consoles of the 1990s weren’t so flexible however. [MattKC] was tired of messing around with step down transformers to run his US market N64, and decided to rectify this, building a universal adapter to run the console instead.

It’s a proper hacked build, assembled out of a jumble of old parts. An broken N64 power adapter was harvested for its case and unique DC plug, which carries 12V and 3.3V to the console. Few compact power supplies exist delivering this pair of voltages, so [MattKC] got creative. An old router was sourced for its 12V 2A supply, and was combined with a 3.3V buck converter to supply both rails. With some creative bodging and plenty of mounting tape, the supplies were crammed inside the original case and wired up to the original jack and a figure 8 cable, allowing easy socket changes in different countries without the use of ugly adapters.

While few of us routinely travel with 25 year old Nintendo consoles, for those that do, the convenience of a single universal supply can’t be overstated. Fitting a step-down transformer into carry-on luggage simply isn’t practical, after all. We’ve featured similar hacks as far back as 2006, or more recently, a project seeking to rebuild a new PSU for the venerable Amiga 500. Video after the break.

Continue reading “N64 Power Adapter Works Around The World”

Cube64 Puts The Good Controllers On The GoldenEye Console

The Nintendo 64 was lauded for bringing quality 3D graphics and analog stick controls to the console realm, way back in 1996. Unfortunately, those analog sticks were never very good; if you’ve ever played four player Mario Kart 64, you know how it feels to be stuck with that controller. For a superior experience, consider building an adapter and upgrading to the GameCube controller instead.

Cube64 is a project that allows GameCube controllers to work with the original Nintendo 64 hardware. Using a PIC18F14K22 in its DIY version, or a PIC18F24Q10 in the SMD version, it’s the product of much work by [scanlime] and [darthcloud] to reverse engineer the N64 and GC controller protocols. The GameCube’s many buttons and sticks allow for easy mapping to the N64’s original button layout, and the hardware provides plenty of calibration options and maps to get things working exactly the way you like for the game you’re playing.

Given that original N64 controllers are getting hard to come by, a GameCube upgrade is a great way to go. They’ll likely be in production for years yet, thanks to the commercial influence of Super Smash Bros. Of course, the two consoles have been fine friends for years, as evidenced by this mashup console we featured back in the distant, peaceful past of 2013.

New Controllers On Old Nintendos With USB64

The Nintendo 64 made a big splash when it launched in 1996, not least of all for its innovative controller. Featuring a never-before-or-since seen trident design, and with an analog stick smack bang in the center, it changed what gamers expected from consoles from that day forward. Of course, those controllers are now much worse for wear, and technology has moved on somewhat. The latest development from [Ryzee119] aims to rectify this somewhat.

The result of that work is USB64, a tool designed to allow the use of USB controllers on the Nintendo 64. Using a Teensy 4.1, it builds upon earlier work to get the Xbox 360 controller working on the platform. However, the feature set has been greatly expanded, covering almost any use case imaginable. Mempacks are now efficiently emulated, and save files can be backed up to a PC via SD card. Additionally, the GameBoy Transferpak is emulated, meaning data can be transferred between GameBoy ROMs on an SD card and games on the N64. Even the N64 mouse is supported, and can be emulated with a regular USB mouse. Capable of doing all this for all four players, work is ongoing to increase the number of compatible aftermarket controllers for the utmost flexibility. [Ryzee119] also coded up a useful test ROM for the N64, which is invaluable when debugging controller hardware.

Console controllers take a lot of punishment, particularly from serious gamers, so we’re always eager to see projects that allow modern replacements to be used with old hardware. We’ve featured other great projects in this area before, too!

Orbital Tracking On The NES

It’s easy to dismiss the original Nintendo Entertainment System as just, well, an entertainment system. But in reality the 6502 based console wasn’t so far removed from early home computers like the Apple II and Commodore 64, and Nintendo even briefly flirted with creating software and accessories geared towards general purpose computing. Though in the end, Mario and friends obviously won out.

Still, we’re willing to bet that nobody at Nintendo ever imagined their plucky little game system would one day be used to track the course of a space station in low Earth orbit. But that’s precisely what [Vi Grey] has done with his latest project, which is part of his overall effort to demonstrate the unexpected capabilities of the iconic NES. While you’ll need a bit of extra hardware to run the program on a real console, there’s no fundamental trickery that would have kept some developer from doing this in 1985 if they’d wanted to.

Raspberry Pi Zero and TAStm32

If you want to see your own 8-bit view of the International Space Station, the easiest way is with an emulator. In that case, [Vi] explains how you can load up his Lua script in Mesen or FCEUX to provide the ROM with the necessary tracking data from the Internet.

To run it on a real NES you’ll not only need some type of flash cart to get the ROM loaded, but also a TAStm32 board that’s used for tool-assisted speedruns. This allows the computer to essentially “type” the orbital data into the NES by emulating rapid controller button presses. That might seem like a tall order, but it’s important to note that neither device requires you to modify the original console; the code itself runs on a 100% stock NES.

If tracking spacecraft isn’t your thing, perhaps you’d be more interested in the some of the work [Vi] has previously done on the NES. We’re particularly fond of his polyglot ROM that is a ZIP file of its own source code.

Continue reading “Orbital Tracking On The NES”

Nintendo Headquarters Plaques

3D Print A Piece Of Nintendo History Before The Real One Is Gone

Nintendo wasn’t always in the videogames business. Long before Mario, the company was one of the foremost producers of Hanafuda playing cards in Japan. From 1930 until 1959, Nintendo ran its printing business from a four-story art deco style building that featured distinctive plaques at the front entrance. We now have a chance to print those former Nintendo HQ plaques at home thanks to [Mr. Talida] who shared some 3D models on Twitter. Talida, a self-described “retro video game archivist”, recreated the plaques via photogrammetry from a number of reference photos he took from a visit to the Kyoto site late last year.

These 3D models come at a crucial time as the old Nintendo HQ building, which sat dormant for years, is set to be turned into a boutique hotel next year. According to JPC, the hotel will feature twenty rooms, a restaurant, and a gym and is expected to be completed by summer 2021 (although that estimate was from the “before” times). The renovation is expected to retain as much of the original exterior’s appearance as possible, but the Nintendo plaques almost assuredly will not be included. For a first-person tour of the former Nintendo headquarters building, there is a video from the world2529 YouTube channel provided below.

It is encouraging to see examples of this DIY-style of historical preservation. Many companies have proven themselves to be less-than-stellar stewards of their own history. Though if his Twitter timeline is any indication, [Mr. Talida] is up to something further with this photogrammetry project. A video export exhibiting a fully textured 3D model of the old Nintendo headquarters’ entrance was published recently along with the words, “What have I done.”

Continue reading “3D Print A Piece Of Nintendo History Before The Real One Is Gone”

Controlling A Broken Super Nintendo With MIDI

A Super Nintendo that has trouble showing sprites doesn’t make for a very good game system. As it turns out, Super Mario World is a lot less fun when the titular hero is invisible. So it’s no surprise that [jwotto] ended up tossing this partially functional SNES into the parts bin a few years back.

But he recently came up with a project that may actually benefit from its unusual graphical issues; turning the glitched console into a circuit bent video synthesizer. The system was already displaying corrupted visuals, so [jwotto] figured he’d just help things along by poking around inside and identifying pins that created interesting visual effects when shorted out.

Installing the new electronics into the SNES.

Once he mapped out the pins, he wired them all up to a transistor switching board that he’d come up with for a previous project. That would let an Arduino short out the pins on command while still keeping the microcontroller relatively isolated from the SNES. Then it was just a matter of writing some code that would fire off the transistors based on MIDI input.

The end result is a SNES that creates visual glitches along with the music, which [jwotto] can hook up to a projector when he does live shows. A particularly neat feature is that each game responds in its own way, so he can swap out the cartridge to show completely different visuals without having to change any of the MIDI sequencing.

A project like this serves as a nice introduction to both circuit bending and MIDI hacking for anyone looking to get their digital feet wet, and should pair nicely with the MIDI Game Boy Advance.

Continue reading “Controlling A Broken Super Nintendo With MIDI”