Raspberry Pi Keeps Tabs On Your Solar Power Setup

raspberrypi-solarlogger

[Brian Dorey] has been adding green power solutions to his home for some time now, and as things have progressed, he has experimented with several different iterations of data loggers. The latest system watching over his solar power setup is a Raspberry Pi armed with a custom-built I2C analog/digital converter.

The Rasp Pi is responsible for monitoring several different temperature sensors related to his solar water heating and storage system, but that’s just the beginning. It also keeps watch over his roof-mounted solar electric panels, his battery bank, and its charge controller. For good measure, he also monitors his home’s temperature and his water tank’s recirculation pump because, why the heck not?

All of the collected data is relayed to his web server where it is handsomely displayed for his perusal and analysis. [Brian] has made his code available here, so you can monitor your home in the same fashion with little fuss.

Raspberry Pi Case Roundup

raspberry-pi-case-roundup

If you haven’t heard of it yet, the [Raspberry Pi] is all the rage on [HAD] these days, so why not a round up of some of the excellent cases available?

[Nhslzt] wrote in to tell us about his laser cut Bramble Pi finger jointed case.  These are available for only 12 Euros, or roughly $14.95 in the US. Sure, the exchange rate may not be in America’s favor these days, but it’s cheaper than a trip to Dresden, Germany where some of the profits from this are to go towards setting up a makerspace there!

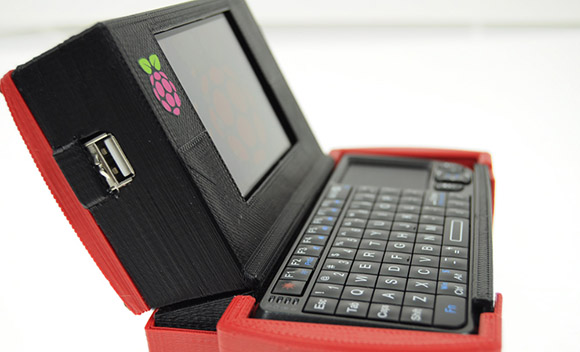
If you’re feeling more into the additive 3D printing DIY process, why not just download one and make it on your printer? [Thingiverse] has an excellent selection of cases many featuring, as you may have guessed, a picture of a Raspberry on the top!  (Here’s the printed case pictured).

Finally for something more colorful (see the pic after the break), you can’t get much better than the [Pibow]. If you’re looking for something colorful, and very solid (as described) this may be the case for you! You can order one here or use the unique design to inspire your own case (Thx Brian!).

As for stuff that we’ve already written about at HAD, this case looks quite slick made out of black acrylic, as does this one, combining the use of a laser cutter and 3D printer. Of course, if you’re going for the strictly utilitarian model, you can always go with one held together with rubber bands and tape!

Continue reading “Raspberry Pi Case Roundup”

The Proper Way To Put An Arduino In A Raspberry Pi

For all their hoopla, the GPIO pins on the Raspberry Pi aren’t terribly useful on their own. Sure, you can output digital data, but our world is analog and there just isn’t any ADCs or DACs on these magical Raspi pins.

The AlaMode, a project designed by [Kevin], [Anool], and [Justin] over at the Wyolum OSHW collaborative aims to fix this. They developed a stackable Arduino-compatable board for the Raspberry Pi.

Right off the bat, the AlaMode plugs directly into the GPIO pins of the Raspberry Pi. From there, communication with the ATMega of the Arduino is enabled, allowing you to send and receive data just as you would with an Arduino. There’s a real-time clock, servo headers, plenty of ways to power the board, and even a breakout for this GPS module.

A lot of unnecessary cruft is done away with in the AlaMode; There’s no USB port, but it can be programmed directly over the GPIO pins of the Raspberry Pi. Pretty neat, and we can’t wait to grab one for our Raspi.

Real Life Subtitle Glasses

[Will Powell] sent in his real-time subtitle glasses project. Inspired by the ever cool Google Project Glass, he decided he would experiment with his own version.

He used two Raspberry Pi’s running Debian squeeze, vuzix glasses, microphones, a tv, ipad, and iphone as the hardware components. The flow of data is kind of strange in this project. The audio first gets picked up by a bluetooth microphone and streamed through a smart device to a server on the network. Once it’s on the server it gets parsed through Microsoft’s translation API. After that the translated message is sent back to a Raspberry Pi where it’s displayed as subtitles on the glasses.

Of course this is far from a universal translation device as seen in Star Trek. The person being translated has to talk clearly into a microphone, and there is a huge layer of complexity. Though, as far as tech demos go it is pretty cool and you can see him playing a game of chess using the system after the break.

Continue reading “Real Life Subtitle Glasses”

Sending A Raspberry Pi To 130,000 Feet

We knew this wouldn’t take long. [David] sent a high altitude balloon into the upper atmosphere last weekend using a Raspberry Pi as the brains of the payload.

[David]’s payload consisted of a Raspberry Pi, natch, with a Logitech webcam, GPS receiver, and six AA batteries wired into a LDO regulator with a monstrous heat sink to keep everything in the EPX foam enclosure relatively warm in the frigid rarefied air of near space.

A high altitude balloon isn’t much fun without some real-time data coming down from the upper atmosphere, so [David] used a Radiometrix NTX2 transmitter module (anyone know of an equivalent part for the USA?) that transmits a measly 10 milliwatts. Even though the transmitter has an ‘official’ range of 500 meters, [David] got word of image data being received in Northern Ireland, over 500 km away.

We’re pretty impressed with [David]’s flight  – and the fact that his flight is now 12th place on the list of UK balloon altitude records – but now we’re wondering what could be done with another Raspi flight to near space. [David] had a lot of computing horsepower up there, enough to get images from a webcam and send them down to earth. Now we’re wondering what else could be done with a Raspberry Pi in space.

You can check out the GoPro video of the very fast decent after the break, or check out the received images on [David]’s Flickr.

Continue reading “Sending A Raspberry Pi To 130,000 Feet”

Raspi Contest To Get The Kids Programming

The Raspberry Pi was originally conceived as an educational platform. Much like the BBC Micros and Apple ][s of yore, the Raspi is designed to get kids into programming by giving them a very tiny but still useful computer. Truth be told, we haven’t seen any educational hacks involving the Raspberry Pi, most likely because makers and tinkerers like us have been buying up all the available boards. The Raspi team is trying to correct this problem by holding a summer programming contest aimed at kids under 18 years of age.

The rules are simple: there are two age brackets, under 13, and ages 14-18. The kid who writes the best piece of software for the Raspberry Pi gets $1000, with five $200 runners-up in each category.The contest will run for eight weeks, timed perfectly to coincide with summer vacation.

There will be a few more weekly contests the Raspi team will be holding in the future, but with eight weeks to complete a project we can’t wait to see all the neat stuff kids are going to make.


Refurbing A C64 With A Raspberry Pi

When [Carl] first heard of the Raspberry Pi, he immeidatly though how freakin tiny this board is compared to a Mini ITX motherboard. After ordering a Raspi, [Carl] decided to put his barely-larger-than-a-credit-card computer inside a Commodore 64.

[Carl]’s updated C64 functions exactly like the original – the 30-year-old keyboard works thanks to the help of a Keyrah keyboard and control port adapter. This adapter was soldered to a stripped USB cable, allowing [Carl] to keep the finished project looking very clean and tidy. Of course, the composite, HDMI, and Ethernet ports are broken out, allowing for this computer to connect to any network or TV.

For a final touch, [Carl] painted the case. He originally wanted to spray on a black, red, and purple motif to match the Raspi, but he eventually settled on a beige and red style. [Carl] really put together an awesome build, and for much, much less money than the rereleased C64 Windows-powered monstrosity goes for. You can check out the build log video after the break.

Continue reading “Refurbing A C64 With A Raspberry Pi”