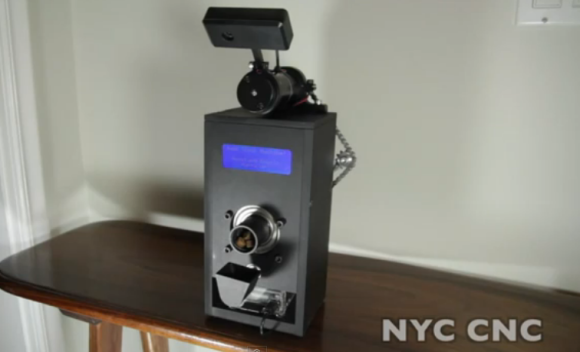
EVE Radio Breakout Board For The Raspberry Pi

The Raspberry Pi is an excellent tool to build the ‘Internet of things’ we’ve been hearing about, but there’s still the issue of connecting the Raspi to other devices. The EVE Alpha – a breakout board for several wireless radio modules for the Raspberry Pi – hopes to change that with their Kickstarter campaign.

The idea behind the EVE is to provide a link between low-power radio modules found in a few of the microcontroller projects we’ve seen and the Raspberry Pi. It does this by simply serving as a breakout board, taking the GPIO pins on the Raspi and connecting them to solder pads for a few of the many radio modules currently available.

Already the EVE supports the RFM12B wireless tranciever, a Z-Wave module, 868-915Mhz SRF modules, and has a breakout for an XBee module, allowing the EVE to communicate using one of the many different XBee boards. There’s also a battery-backed real-time clock and temperature sensor thrown in for good measure making this board the perfect building block for an outdoor weather station or solar array.

It’s an awesome idea, and if you already have a few radio modules, incredibly cheap; just the PCB is only £6, and a board with all the SMD components is only £20.

Raspberry Pi Driven Polargraph Exhibits High Precision Drawing Ability

This polar graph draws some amazing shapes on a dry erase board. Part of that is due to the mounting brackets used for the two stepper motors and the stylus. But credit is also due for the code which takes velocity into account in order to plan for the next set of movements.

The Go language is used to translate data into step commands for the two motors. This stream of commands is fed over a serial connection between the RPi board and an Arduino. The Arduino simply pushes the steps to the motor controllers. The inclusion of the RPi provides the horsepower needed to make such smooth designs. This is explained in the second half of [Brandon Green’s] post. The technique uses constant acceleration, speed, and deceleration for most cases which prevents any kind of oscillation in the hanging stylus. But there are also contingencies used when there is not enough room to accelerate or decelerate smoothly.

You can catch a very short clip of the hardware drawing a tight spiral in the video embedded after the break.

Continue reading “Raspberry Pi Driven Polargraph Exhibits High Precision Drawing Ability”

Mesh Networking With Multiple Raspberry Pi Boards

Since he’s got several Raspberry Pi boards on hand [Eric Erfanian] decided to see what he could pull off using the robust networking tools present in every Linux installation. His four-part series takes you from loading an image on the SD cards to building a mesh network from RPi boards and WiFi dongles. He didn’t include a list of links to each article in his post. If you’re interested in all four parts we’ve listed them after the break.

He says that getting the mesh network up and running is easiest if none of the boards are using an Ethernet connection. He used the Babel package to handle the adhoc routing since no device is really in charge of the network. Each of the boards has a unique IP manually assigned to it before joining. All of this work is done in part 3 of the guide. The link above takes you to part 4 in which [Eric] adds an Internet bridge using one of the RPi boards which shares the connection with the rest of the mesh network.

If the power of this type of networking is of interest you should check out this home automation system that takes advantage of it.

Continue reading “Mesh Networking With Multiple Raspberry Pi Boards”

Developing A Thermostat For A Heat Pump That Only Has A Timer

The heat pump which cools [Chris LeBlanc’s] home lacks the sort of control he was looking for. It’s just got a timer, which switches it off automatically. He wanted to the ability to schedule the cooling cycle like you would with a thermostat-driven arrangement. He ended up build his own controller to automate the cooling process.

The heat pump came with an IR remote control which provides the access point for the project. [Chris] set out to emulate the remote protocol which saved him the trouble of having to crack open the unit and wire in a controller. He went with the IR Toy from Dangerous Prototypes as this device is able to record and transmit IR signals — it’s basically a universal remote for your USB port. His Raspberry Pi, seen to the left, controls the system. It’s connected to the red IR Toy board via a USB hub which is used to interface a WiFi dongle as well. The system works alongside Google Calendar to allow [Chris] to schedule his home’s cooling just by adding an appointment. A Python script queries the calendar, then selects and sends the appropriate IR command. He shows off the build in the clip after the break.

Continue reading “Developing A Thermostat For A Heat Pump That Only Has A Timer”

Raspberry Pi Gets RISC OS, Can Now Play Elite

The processor in the Raspberry Pi – an ARM11 built by Broadcom – actually has a long and storied history. Much as how the Intel i7 in a top-of-the-line desktop can still run code written for the original IBM PC, the ARM chip in the Raspberry Pi is also based on decades-old technology.

The first ARM-based computer was the Acorn Archimedes, a mid-80s computer with 512kB of RAM and no hard drive. The Archimedes ran RISC OS, a very nice graphical operating system written explicitly for the ARM architecture. RISC OS is now available for the Raspberry Pi, finally bridging the gap between educational computers from 1987 and 2012.

Of course, a very much updated version of 25-year-old operating system running on a Raspberry Pi doesn’t mean much without a ‘killer app,’ does it? For the original Acorn Archimedes the killer app – and one of the best video games of the 80s – was Elite, a space trading and combat game that featured vector-style ships. [Pete Taylor] downloaded the Raspi RISC OS image and got Elite running using an Archimedes emulator and, of course, the Archimedes port of Elite.

It’s a pretty neat development if you’re in to alternative OSes and one of the best space-based games ever made. Well worth a download, at the very least.

Turning The Raspberry Pi Into A Cocktail MAME Coffee Table

Ah, the cocktail arcade cabinet. With the right design, its able to blend right in to any living room decor, much more than any traditional stand-up cabinet, at least. [graham] over on Instructables didn’t tear apart a 30-year-old arcade cabinet for his new coffee table. Instead, he built one from scratch, connected it to a Rasberry Pi, and brought hundreds of arcade classics right in front of his couch.

The build began by cutting up some wood to house the 24″ LCD screen, Raspi, and arcade controls. The LCD screen is supported with a rather clever system of cross braces screwed into the VESA mount, and of course a piece of perspex protects the screen from the inevitable spills and scratches.

The joystick two blue ‘player’ buttons and the player 1 and player two buttons are wired directly to the GPIO pins of the Raspberry Pi. The Raspi boots up into a selection of MAME games, but there’s also an option for opening up the window manager and browsing the web.

It’s a very neat build that’s a lot smaller (and easier to build) than a traditional cocktail cabinet. As [graham] is using it for a coffee table, it might get more use than a regular MAME build, to boot.

Controlling Google TV From A Raspberry Pi (or Other Networked Devices)

Google TV is a network connected television. It does what you would think: plays television programs, streams media from the internet, and allows you to open URLs on your TV. But one nice feature is that it can also be controlled over the network rather than just via an IR remote. Google publishes apps which make this simple with a smartphone. But the communications protocols are open source, so [Leon Nicholls] wrote a Google TV remote control library in Java.

The video after the break shows him pairing a Raspberry Pi with his television. The image above is the pairing verification code you must enter on the remote hardware before control is authorized. Apparently this is a step that needs to happen every time if using Google’s Anymote library. [Leon] improved that, by saving the pairing data so that the first authorization is all that it takes.

He figures this could be used for home automation. We’re not sure what we’d use it for but we’d love to hear your ideas in the comments.