Hackaday Prize Entry: Reverse GPS

Every time you watch a SpaceX livestream to see a roaring success or fireball on a barge (pick your poison), you probably see a few cubesats go up. Everytime you watch a Soyuz launch that is inexplicably on liveleak.com before anywhere else, you’re seeing a few cubesats go up. There are now hundreds of these 10 cm satellites in orbit, and SatNogs, the winner of the Hackaday Prize a two years ago, gives all these cubesats a global network of ground stations.

There is one significant problem with a global network of satellite tracking ground stations: you need to know the orbit of all these cubesats. This, as with all Low Earth Orbit deployments that do not have thrusters and rarely have attitude control, is a problem. These cubesats are tumbling through the rarefied atmosphere, leading to orbits that are unpredictable over several months.

[hornig] is working on a solution to the problem of tracking hundreds of cubesats that is, simply, reverse GPS. Instead of using multiple satellites to determine a position on Earth, this system is using multiple receiving stations on Earth’s surface to determine the orbit of a satellite.

The hardware for [hornig]’s Distributed Ground Station Network is as simple as you would expect. It’s just an RTL-SDR TV tuner USB dongle, a few antennas, a GPS receiver, and a Raspberry Pi connected to the Internet. This device needs to be simple; unlike SatNogs, where single base station in the middle of nowhere can still receive data from cubesats, this system needs multiple receivers all within the view of a satellite.

The modern system of GPS satellites is one of the greatest technological achievements of all time. Not only did the US need to put highly accurate clocks in orbit, the designers of the system needed to take into account relativistic effects. Doing GPS in reverse – determining the orbit of satellites on the ground – is likewise a very impressive project, and something that is certainly a contender for this year’s Hackaday Prize.

The HackadayPrize2016 is Sponsored by:

Hackaday Prize Entry: BLE Beacon Library

While faking BLE advertising beacons using an nRF24L01+ module is nothing new, it’s become a heck of a lot easier now that [Pranav Gulati] has written some library code and a few examples for it.

[Pranav]’s work is based on [Dmitry Grinberg]’s epic bit-banging BLE research that we featured way back in 2013. And while the advertisement channel in BLE is limited in the amount of data it can send, a $1 nRF24 module and a power-thrifty microcontroller would be great for a battery-powered device that needs to send small amount of data infrequently for a really long time.

We’re not 100% sure where [Pranav] is going to take this project. Honestly, the library looks like it’s ready to use right now. If you’ve been holding off on making your own BLE-enabled flock of birds, or even if you just want to mess around with the protocol, your life has gotten a lot easier.

The HackadayPrize2016 is Sponsored by:

Hackaday Prize Entry: DIY Automatic Tool Changer

Choosing between manually changing endmill bits on a CNC machine and investing in an expensive automated solution? Not for [Frank Herrmann], who invented the XATC, an eXtremely simple Automated Tool Changer. [Frank’s] ingenious hack achieves the same functionality as an industrial tool changer using only cheap standard hardware you might have lying around the workshop.

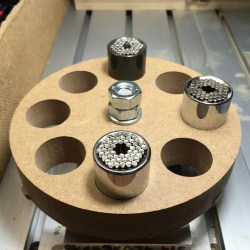
xatc_carouselLike many ATCs, this one features a tool carousel. The carousel, which is not motorized, stores each milling bit in the center bore of a Gator Grip wrench tool. To change a tool, a fork wrench, actuated by an RC servo, blocks the spindle shaft, just like you would do it to manually change a tool. The machine then positions the current bit in an empty Gator Grip on the carousel and loosens the collet by performing a circular “magic move” around the carousel. This move utilizes the carousel as a wrench to unscrew the collet. A short reverse spin of the spindle takes care of the rest. It then picks another tool from the carousel and does the whole trick in reverse.

The servo is controlled via a WiFi connected NodeMCU board, which accepts commands from his CNC controller over HTTP. The custom tool change sequences are provided by a few JavaScript macros written for the TinyG workspace on chilipeppr.com, a browser-based G-code host. Enjoy the video of [Frank Herrmann] explaining his build!

Thanks to Smoothieboard creator [Arthur Wolf], who is currently working on a similar project, for the tip!

The HackadayPrize2016 is Sponsored by:

Become A Peer Reviewer For Citizen Scientist

One of the keys to our scientific community is the concept of Peer Review. When important discoveries are made, the work is reviewed by others accomplished in the same field to test the findings. This can verify the work, but it can also open up new questions and lead to new discoveries.

We’re adding Peer Review to the Hackaday Prize. It’s a new way to apply your skills for the benefit of all. The current challenge is Citizen Scientist; calling for projects that help make scientific research more widely available. A set of independent eyes giving constructive feedback to these entries can be a huge end run to success. After all, you don’t know what you don’t know. Having help recognizing stumbling points, or just receiving a second opinion that you’re on the right track makes a big difference when treading in unknown territory.

Becoming a Peer Reviewer is simple. Pick a project you are interested in, review it thoroughly while making notes in a respectful, positive, and constructive way. When you’re ready, submit your Peer Review using this form. We will privately share your review with the project creator.

Hackaday.io is the most vibrant hardware collaboration platform in the world. Peer Review is yet another interesting way to get more brilliant minds in our community involved in building something that matters.

The HackadayPrize2016 is Sponsored by:

Hackaday Prize Entry: A Very Small Password Keeper

One of the more popular security builds in recent memory is USB password vaults. These small thumb drive-sized devices hold all the passwords you have to deal with, and are locked behind a authentication code on the drive itself. For their Hackaday Prize entry, [Miguel] and [Noel] asked how inexpensively one of these devices could be made. The answer, coming in the form of their Memtype project, is very inexpensively.

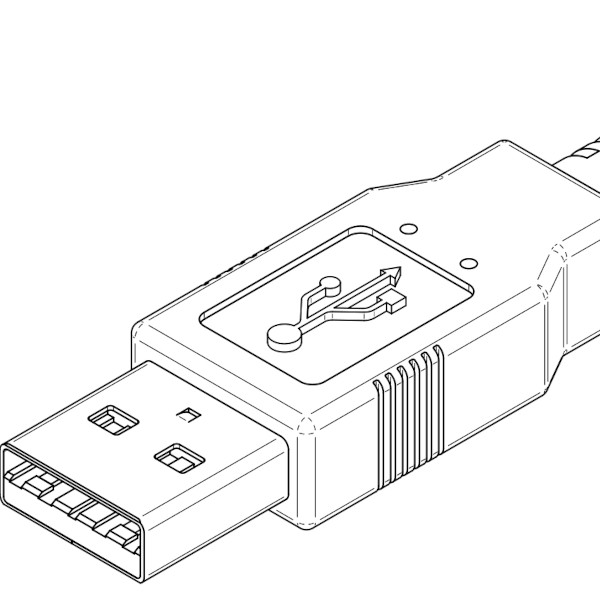
The Memtype project is based on the cheapest and most simplistic USB implementation on the planet. It’s built around an ATtiny85 and V-USB‘s software only implementation of a USB keyboard, requiring only a few resistors and diode in addition to the ‘tiny85 itself.

The device can only be unlocked with a four-digit pin, input through the clever use of a small SMD joystick. After inputting the correct code, the Memtype grants the user access to all the stored passwords. As far as security goes, [Miguel] and [Noel] have implemented NOEKEON in assembly, however it should be noted that all security is weaker than a pipe wrench. For managing the passwords, [Miguel] and [Noel] built a small, simple GUI app to set the PIN and write credentials to the device.

[Miguel] and [Noel] already have a demo video up for the Memtype, you can check that out below.

Continue reading “Hackaday Prize Entry: A Very Small Password Keeper”

Hackaday Prize Entry: Microscopy With Blu-ray

Confocal microscopy is an imaging technique that provides higher resolution micrographs than that of traditional optical microscopy. Confocal microscopes attain this higher resolution from an image sensor behind a pinhole. By eliminating out of focus light, and by scanning the specimen back and forth under the microscope, a very high resolution image may be produced. This technique has applications ranging from life sciences to semiconductor work. For this year’s Hackaday Prize, [andreas.betz] is building a confocal microscope using little more than a Blu-ray drive read head.

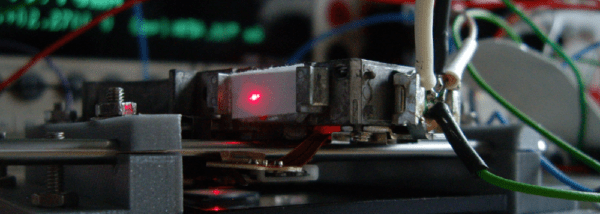
[andreas]’ build uses a standard Playstation 3 Blu-ray drive mechanism. The read head for this mechanism is well documented, but [andreas] still has to drive the laser and the voice coils for this machine to do anything. With the Blu-ray drive working, only the optics remained.

Just this last week, [andreas] imaged the die of a transistor with a resolution of about 680nm. An inductor was also imaged, showing a track separation of about 10um. This is approaching the limits of optical microscopy, and the apparatus is simple enough for anyone to replicate.

As a feat of technical ingenuity, this is a great project. It’s one of the best we’ve seen for the Citizen Science portion of the Hackaday Prize, and can’t wait to see what other images [andreas] can make with this machine.

The HackadayPrize2016 is Sponsored by:

Hackaday Prize Entry: Visualizing Magnetic Fields

In 1820, Hans Christian Oersted discovered the needle of a compass would deflect when placed next to a wire carrying an electric current. It took 15 years for the first electric motor to be invented following this observation. Humans are dumb, but perhaps they wouldn’t be so oblivious to the basic facts of our reality if they could see magnetic fields. Or if they just had a 3D printer. For his Hackaday Prize entry, [Ted Yapo] is doing just this: adding a magnetic field scanner to a 3D printer, allowing for the visualization of magnetic fields in three dimensions.

The device [Ted] is working on is actually extremely simple, and is mostly implemented in software. The hardware is just a 3D printer with a toolhead consisting of a HMC5883L magnetometer breakout board. This is the simplest and easiest way to find the direction and intensity of a magnetic field, the rest of the work is done in software.

Right now, [Ted] has a setup that will scan a 3D volume with a printer. By placing a magnet in the middle of the print bed, he can visualize the magnetic field inside the volume of his 3D printer. It’s a visualization that is vastly superior to a compass, ferrofluid, or even a mess of iron filings, and is surely a much better pedagogical apparatus for classrooms and science museums alike.

The HackadayPrize2016 is Sponsored by: