Photo of a smartphone with the ATTiny85 inserted into it, with a screen unlock pattern being drawn on the screen

ATtiny85 Automates Your Smartphone

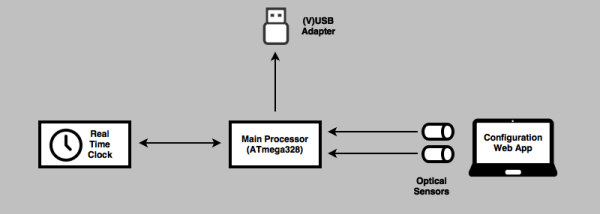
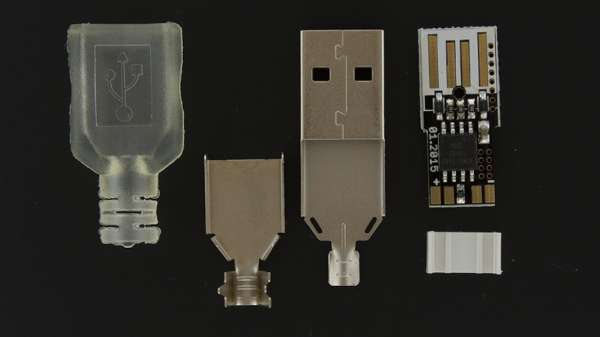
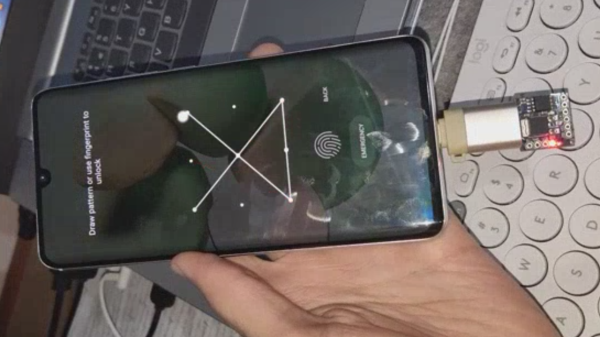
It might not seem too impressive these days, but when microcontrollers with hardware USB support were more expensive and rare, the VUSB library was often used to create USB devices with an ATtiny85. It became so popular that the ATtiny85 even got packaged into USB dongle formfactors, like the DigiSpark boards. Well, you might not know this, but your Android smartphones can also work with USB mice and touchscreens in lieu of the built-in touchscreen display. [ErfanSn] combined these two ideas, creating a library to automate smartphone touchscreen events and keyboard input with an ATtiny85 — open for all of us to use, and with examples to spare.

The library is called DigiCombo, and it comes with plenty of examples for any screen touch event emulation that you might want. For instance, check out the README — it has video examples for Instagram page scrolling, unlock screen brute-forcing with random coordinates, playing the Stack rhythm game, and pinch zoom — all the building blocks for your smartphone touch emulation needs are covered pretty well! Of course, all of these have example code corresponding to them, that you can download and base your own ideas on. What’s more, the library is available in current Arduino IDE under the DigiCombo name. So if you need to, say, make a quick autoclicker for your phone, the library is a few steps away!

If your smartphone project was stalled because you needed to emulate touchscreen input, this library is your chance to get it done! We appreciate projects that let us get more from smartphones — there’s a lot of those laying around, they’re pretty functional and self-sufficient devices, so it makes sense that some projects of ours could do with a phone instead of a Raspberry Pi. Some manufacturers let us get a bit more of our phones, but this hasn’t really caught on, which means we have to make do with help of libraries like these. Or, perhaps, you rely on your phone day-to-day, and you’d like to add a touchpad to its back?

Interfacing A Retro Controller Using The USBASP

An ISP dongle is a very common piece of equipment on a maker’s bench. However, its potential as a hackable device is generally overlooked. The USBASP has an ATmeg8L at its heart and [Robson] decided that this humble USB device could be used as an interface between his PC and a SNES Joypad.

A SNES controller required three pins to communicate with a host: clock, data and latch. In his hack, [Robson]  connects the controller to the ISP interface using a small DIY adaptor and programs the AVR using the V-USB library. V-USB is a software USB library for small microcontrollers and comes in pretty handy in this instance.

[Robson] does a pretty good job of documenting the entire process of creating the interface which includes the USB HID code as well as the SNES joypad serial protocol. His hack works on both Windows and Linux alike and the code is available on GitHub for download.

Simple implementation like this project are a great starting point for anyone looking to dip their toes in the DIY USB device pool. Veterans may find a complete DIY joystick more up their alley and will be inspired by some plastic techniques as well.

Hackaday Prize Entry: A Very Small Password Keeper

One of the more popular security builds in recent memory is USB password vaults. These small thumb drive-sized devices hold all the passwords you have to deal with, and are locked behind a authentication code on the drive itself. For their Hackaday Prize entry, [Miguel] and [Noel] asked how inexpensively one of these devices could be made. The answer, coming in the form of their Memtype project, is very inexpensively.

The Memtype project is based on the cheapest and most simplistic USB implementation on the planet. It’s built around an ATtiny85 and V-USB‘s software only implementation of a USB keyboard, requiring only a few resistors and diode in addition to the ‘tiny85 itself.

The device can only be unlocked with a four-digit pin, input through the clever use of a small SMD joystick. After inputting the correct code, the Memtype grants the user access to all the stored passwords. As far as security goes, [Miguel] and [Noel] have implemented NOEKEON in assembly, however it should be noted that all security is weaker than a pipe wrench. For managing the passwords, [Miguel] and [Noel] built a small, simple GUI app to set the PIN and write credentials to the device.

[Miguel] and [Noel] already have a demo video up for the Memtype, you can check that out below.

Continue reading “Hackaday Prize Entry: A Very Small Password Keeper”

TV Stick Out-Raspberries Raspberry Pi

Android-based TV sticks should be in more projects. They are readily available and inexpensive. They have a lot of horsepower for the price, and they can even boot a mainline Linux kernel, unlike some single-board computers we know. They’re smaller than the Pi Zero, so they’ll fit almost anywhere.

The one thing they don’t have, though, is I/O. Sure, it’s got a USB port, but that’s just about it. [Necromant] considered these problems and created a carrier board that fixes all that.

  • On-board 3A DC-DC. You can power the whole thing with anything from 7 to 24 volts DC
  • A 4-Port USB hub
  • An ATtiny 2313, connected to the hub via the V-USB stack
  • 2 USB ports on the back, with power control via GPIO lines
  • One USB port on the front (with power always on)
  • 3 relays
  • Fits a common anodized aluminum enclosure

The ATtiny code is on GitHub and allows for full I/O control, saving the state of the pins in EEPROM, and providing up to eight channels of servo control. The device connects through the USB port (consuming one port on the hub).

Repurposing consumer gear for embedded service is nothing new. We’ve seen it with phones. We’ve even seen remotes used as a mouse. But this is such a nice template for adding cheap and easy computing power to your projects that we’re surprised we don’t see it more often. Why aren’t you hacking a TV stick into your projects?

Dirt-Cheap USB Arduino Hack From The Past

Mass production is a wonderful thing. Prices fall, and hobby hackers get cheap gear. The mind then wanders towards what can be done with it. So it’s little wonder that someone like [Aaron Christophel] would try to repurpose those sub-$3 AVR programmers that are all over eBay (translated poorly out of German here, but demonstrated in the video embedded below).

[Aaron] didn’t have to do much, really. The only trick is that you’ll first need to re-flash the existing ISP firmware with one that lets you upload code to the device itself over USB. If you don’t have an Arduino on hand to re-flash, buy at least two of the cheap programmers — one to program the other ones. Once you’ve done that, you have essentially an Arduino with limited pinout and two onboard LEDs, but in a nice small form-factor and with built-in USB. [Aaron] even provides an Arduino boards.txt file to make it all work smoothly within the IDE.

Continue reading “Dirt-Cheap USB Arduino Hack From The Past”

Hackaday Prize Entry: Two Factor Authentication Key

Because people are generally idiots when it comes to choosing passwords — including people who should know better — Google created Google Authenticator. It’s two-factor verification for all your Google logins based on a shared secret key. It’s awesome, and everyone should use it.

Actually typing in that code from a phone app is rather annoying, and [Alistair] has a better solution: an Authenticator USB Key. Instead of opening up the Authenticator app every time he needs an Authenticator code, this USB key will send the code to Google with the press of a single button.

The algorithm behind Google Authenticator is well documented and actually very simple; it’s just a hash of the current number of 30-second periods since the Unix epoch and an 80-bit secret key. With knowledge of the secret key, you can generate Authenticator codes until the end of time. It’s been done with an Arduino before, but [Alistair]’s project makes this an incredibly convenient way to input the codes without touching the keyboard.

The current plan is to use an ATMega328, a real-time clock, and VUSB for generating the Authenticator code and sending it to a computer. Getting the secret key on the device sounds tricky, but [Alistair] has a trick up his sleeve for that: he’s going to use optical sensors and a flashing graphic on a web page to send the key to the device. It’s a bit of a clunky solution, but considering the secret key only needs to be programmed once, it’s not necessarily a bad solution.

With a small button plugged into a USB hub, [Alistair] has the perfect device for anyone annoyed at the prospect at opening up the Authenticator app every few days. It’s not a replacement for the app, it just makes everything easier.

The 2015 Hackaday Prize is sponsored by:

A Hacker-Friendly Blinky USB Stick

The availability of Smart RGB LED’s, either as individual units, as strips or even as panels, have made blinky light projects with all kinds of color control and transition effects easy to implement using even the simplest of controllers. Libraries that allow control of these smart LEDs (or Smart Pixels as they are sometimes called)  make software development relatively easy.

[overflo] at the Metalab hackerspace in Vienna, Austria recently completed development of usblinky – a hacker friendly blinky USB stick. It can control up to 150 WS2812B smart LED’s when powered via an external power supply, or up to 20 LED’s when powered via a computer USB port. The micro-controller is an ATTiny85 running the Micronucleus bootloader which implements software USB using vUSB. The hardware is based on the DigiSpark platform. The usblinky software sources are available on their Github repo. The section on pitfalls and lessons learned makes for interesting reading.

Metalab plans to run workshops around this little device to get kids into programming, as it is easy enough and gives quick visual feedback to get you started. To round off the whole project, [overflo] used OpenSCAD to design a customizable, 3D printable “parametric orb” which can house the LED strip and make a nice enclosure or psychedelic night light. Check out the mesmerizing video of the usblinky Orb after the break.

Thanks to [papst] for sending in this tip.

Continue reading “A Hacker-Friendly Blinky USB Stick”