One of the things you find yourself doing as a young engineer is equipping yourself with the tools of your trade. These will be the foundations upon which your career is built in a way that a diploma or degree certificate will never be, for the best degree in the world is less useful if the quality of your tools renders you unable to capitalise upon it. You may be lucky enough to make some of them yourself, but others you’ll lust after as unaffordable, then eventually put the boat out a little to buy at the limit of your meager income.
Your bench may have a few of these lifetime tools. They could be something as simple as screwdrivers or you may have one of those indestructible multimeters, but in my case my lifetime tool is my soldering iron. At some time in 1992 I spent about £60($173 back then), a lot of money for a student, on a mains-powered Weller Magnastat. The World Wide Web was still fairly fresh from Tim Berners-Lee’s NeXT in those days, so this meant a trip to my university’s RS trade counter and a moment poring over a telephone-book-sized catalogue before filling in an order slip.
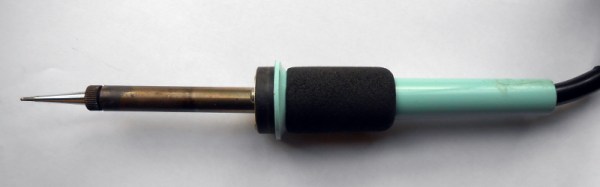
The Magnastat is a simple but very effective fixed-temperature-controlled iron. The tip has a magnet on its rear end which holds closed a power switch for the heating element. When the tip has heated to the Curie temperature of the magnet, it loses its magnetism and the switch opens. The temperature falls to below the Curie temperature and the magnetism returns, the switch closes, the tip warms up again, and the cycle repeats itself. The temperature of the tip is thus dictated by the magnet’s Curie temperature, and Weller provides a range of tips fitted with magnets for different temperatures.
The result is an iron with enough power to solder heat-sucking jobs that would leave lesser irons gasping for juice, while also having the delicacy to solder tiny surface-mount components without destroying them or lifting tracks. It’s not a particularly small or lightweight iron if you are used to the featherlight pencil irons from today’s soldering stations, but neither is it too large or heavy to be unwieldy. In the nearly quarter century I have owned my Magnastat it has had a hand in almost everything I have made, from hi-fi and tube amplifiers through radio transmitters, stripline filters, kits, and too many repairs to mention. It has even been pressed into service plastic-welding a damaged motorcycle fairing. It has truly been a lifetime tool.
Continue reading “Long-Term Review: Weller Magnastat Soldering Iron”


 a simple interface circuit for translating the logic levels, and an interrupt-driven


