Tidy Breadboard Uses Banana Bread

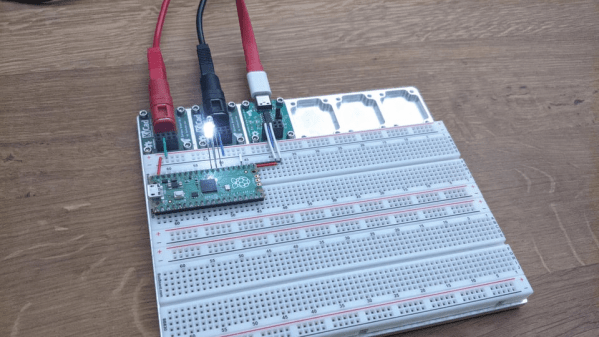
Self-described passionate maker in the electronics and 3D printing world, [Jakob], aka [testudor], was getting frustrated trying to connect banana plugs to solderless breadboards. Project Banana Bread was born — small banana jack adaptors and a companion tray with pockets to hold up to six modules.

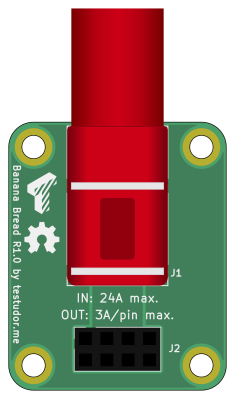
The base in the photo is made from 5083 aluminum, machined on a homemade CNC router. But design files for a yet-to-be-tested 3D printer version are available as well. As can happen, he strayed from the original goal of solving the banana jack issue, and also cranked out a USB-serial port and a blank template module for any custom interfaces folks may want to implement.

If it is only power connections you are interested in, we covered the Open Power project back in 2019. And also don’t forget the mother of all breadboards, this 1960s behemoth we wrote about last year. What kinds of breadboard interface modules do you find most useful? Let us know in the comments below.


E-Textile Tools Get The Multimeter Hookup

[Irene Posch] has done some incredible work with knitted, crocheted, and fabric circuits — check out the crocheted ALUs and embroidered computer for starters. Now, it seems [Irene] is building up a how-to catalog of e-textile tools that can be easily connected to a multimeter.

So far, this toolbox includes a seam ripper and a crochet hook. The concept is similar for both — print out a handle and connect the tool to a banana jack that can then be connected to a multimeter. The crochet hook is simple: just print out the handle, jam the hook in one end, and stick a mini banana jack in the other end. They’re designed to butt up against each other and make a connection without wires.

Building the ripper takes a bit more effort. There’s another printed handle involved, but you must first free the seam ripper from its stock plastic handle and solder a wire to it. Then twist the other end of the wire around a banana jack and and put that in the other end of the handle.

It’s great to see a little bit insight into the troubleshooting tools of e-textiles, especially because they are all-around fiddly. It all starts with a circuit, so why not do your prototyping with a thread-friendly breadboard?

A Walking Robot With A Single Servo

We’ve all been there — you see somebody do something cool on YouTube and you just have to give it a go. For [lonesoulsurfer], the drop-everything-and-build happened to be a little four-legged walker robot that runs on a single servo. Though it may be simple, there really is nothing like seeing a robot you created take its first steps.

[lonesoulsurfer]’s walker is made mostly from scrap aluminium and other scavenged parts like coat hangers, paper clips and the metal bits and bobs from banana jacks. The Dremeled and bent body would likely be the hardest to imitate for a first-time builder, but any sturdy chassis that allows for things screwed and bolted to it should work. Also, don’t expect it to work right away. It will take a bit of tuning to get the gait right, but it’s all part of the fun. So is modifying a 180° servo for continuous rotation.

We really like the way this robot walks — it saunters around like a long bulldog and looks like it can handle almost any terrain. Watch it walk after the break, and stick around for the build video.

There’s just something about simple robots without microcontrollers. If you’ve never heard of BEAM robots, cut your teeth on this ‘bot with circular legs.

Continue reading “A Walking Robot With A Single Servo”