A Big Computer Needs A Big Keyboard

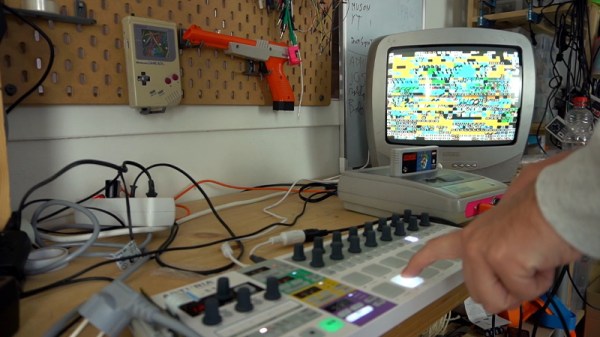
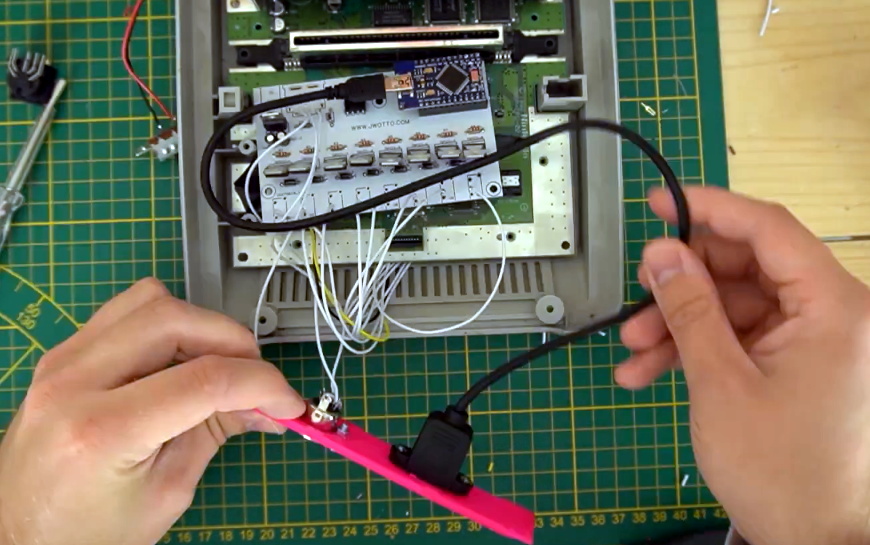
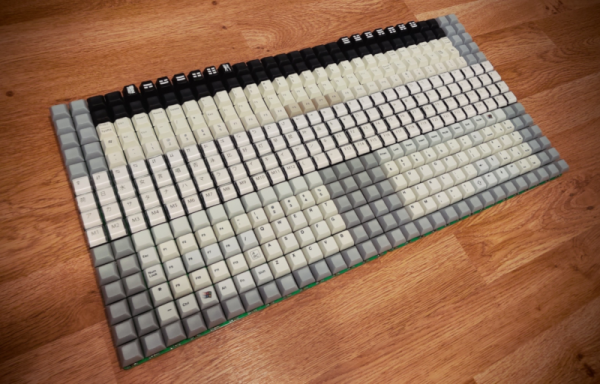
It seems like many keyboard aficionados have been gravitating towards ever smaller boards, but not [Ren]. He’s mostly completed a 433% keyboard with a whopping 450 distinct keys. Using two off the shelf PCBs and Teensy to control it all, this keyboard means you’ll never need to strain to make some awkward chord.

The PCBs have a diode matrix arrangement for 225 keys, which we would have thought was big enough. After all, a Scrabble board has 225 squares, so we assume that’s why the vendor calls them scrabbleboards. Honestly, we’re jealous someone has the desk space for this monster. We were also thinking what other sorts of switch-like sensors you could use with this board. Imagine a home system, for example, with 225 occupancy sensors, each with its own key you could easily read via USB.

There was a time when building your own keyboard of any sort would have been challenging. But now there’s a cottage industry supplying chips, switches, caps, and PCBs to those looking to craft their own custom input devices. The ready availability of 3D printers has also sparked a minor revolution in custom keyboard enclosures and keycaps.

If you’re a fan of the tiny keyboards, we’ve seen some impressive specimens that might catch your fancy. If nothing else, at least they require less soldering. Especially when they only have seven keys.

Thanks [ptkwilliams] for the tip!

Mirror, Mirror, On Your Cam, Show Us What You’ve Drawn By Hand

Working and learning from home may be the new norm, and if IKEA shelves are any indication, folks are tricking out their home office with furniture, gadgets, and squishy chairs. While teleconferencing has proven to be an invaluable tool, paper documents aren’t going down with out a fight.

Unfortunately dedicated document cameras require significant space and monies, so they’re impractical if you only share once in a while. [John Umekubo] didn’t want students and teachers hobbled by the same costs and inconveniences, so he modeled a mirror holder that slides over a laptop’s webcam and directs the view downward.

[John]’s adventures started with a Twitter post, as seen below, but the responses were so encouraging that he published his design on Thingiverse for everyone. There’s also a version that can be laser cut out of cardboard, though we imagine a pair of scissors would work in a pinch. He admits there’s already a consumer model, but wasn’t planning to sell them anyway. Like us, he wants to get people to share their work.

We recently covered a simpler version of the same idea in use at Northwestern University, and we’ve seen a similar hack that gives a split-screen effect to sketch and maintain eye contact. If you want to share the view in your room, we have a Raspberry Pi streaming option that’s worth checking out.

Continue reading “Mirror, Mirror, On Your Cam, Show Us What You’ve Drawn By Hand”

E-Textile Tools Get The Multimeter Hookup

[Irene Posch] has done some incredible work with knitted, crocheted, and fabric circuits — check out the crocheted ALUs and embroidered computer for starters. Now, it seems [Irene] is building up a how-to catalog of e-textile tools that can be easily connected to a multimeter.

So far, this toolbox includes a seam ripper and a crochet hook. The concept is similar for both — print out a handle and connect the tool to a banana jack that can then be connected to a multimeter. The crochet hook is simple: just print out the handle, jam the hook in one end, and stick a mini banana jack in the other end. They’re designed to butt up against each other and make a connection without wires.

Building the ripper takes a bit more effort. There’s another printed handle involved, but you must first free the seam ripper from its stock plastic handle and solder a wire to it. Then twist the other end of the wire around a banana jack and and put that in the other end of the handle.

It’s great to see a little bit insight into the troubleshooting tools of e-textiles, especially because they are all-around fiddly. It all starts with a circuit, so why not do your prototyping with a thread-friendly breadboard?

Rolex Becomes World’s Most Expensive ESD Strap

Anti-static ESD straps are de rigueur in lab settings for those working with sensitive electronics. They’re a simple protective device, and one that generally doesn’t warrant a second thought. However, [Daniel Bogdanoff] figured they could stand to be a little more fashionable, and set to work on a fancier design.

The first step was to take a look at a regular ESD strap. Typically, they consist of a band that fastens around the wearer’s wrist, with a metal stud for connecting to the earthing lead. The earthing lead contains a high resistance to limit the discharge current to avoid ugly high-energy shorts when wearing the strap.

The metal stud is attached to a replacement link on the ROLEX’s strap, making the modification neat, tidy, and reversible.

With a good understanding of the basics, [Daniel] set about modifying a CASIO calculator watch for practice. After soldering a metal stud to the watch case failed, a second attempt with conductive epoxy worked great. The watch could be connected to the earthing strap, and an ESD tester confirmed the device was doing its job.

But unfortunately, permanently modifying the borrowed ROLEX wasn’t an option. Instead, [Daniel] limited his work to a single replacement link which could be inserted into the watch band. Hooked up to an earthing strap, the luxury watch also passed a basic ESD test successfully.

[Daniel] notes that while this is a fun experiment, using properly rated safety equipment is best. Additionally, he points out that the ROLEX is likely to do worse than the CASIO for the simple fact that a metal-banded watch is more likely to cause shorts when working on electronics. Of course, if a watch isn’t your thing, consider a ring instead. Video after the break.

Continue reading “Rolex Becomes World’s Most Expensive ESD Strap”

Patience Beats Rage-Quit In Shattered Xbox Controller Repair

There are negative-one hacks to this project. Someone lost at their game, lost their temper, then raged at their Xbox controller with some horsepower. The result is that [Taylor Burley] gets a free controller with a non-responsive joystick out of the deal, and since he had nothing to lose, he decided to heat up the iron and bring the controller back to life.

The majority of the project is told in pictures and through the narration in the video below. In removing the joystick, [Taylor] opts for the technique of doping the connections with fresh solder (we assume containing lead for easier melting) before reaching for the desoldering wick. The diagnosis stage is brief because when the joystick lifts away, the PCB falls apart into two separate pieces! The next step was to glue the two halves together with cyanoacrylate to get into the nooks and crannies, then epoxy to provide structure. Solder bridges were not going to jump that gap, so he used 30ga wire and attached it wherever he could scrape away some solder mask. Best of all, it worked when he reattached the joystick. Job well done.

Xbox controllers are not a scarce commodity, so people do not spend their idle hours fixing them, but not many people can claim experience. Maybe someday the stakes will be higher and he will have the courage to repair vintage electronics. We won’t rant on how things aren’t built to last, and how we don’t train people to fix things. Today, we want to focus on someone who used their time to repair and learn.

Continue reading “Patience Beats Rage-Quit In Shattered Xbox Controller Repair”

Code For Hackers

Mike and I were talking about two very similar clock projects we’d both built recently: they both use ESP8266 modules to get the time over WiFi and NTP, and they both failed. Mike’s failed because he was visiting relatives in a different timezone with different WiFi credentials, and mine failed because daylight savings time caught me off-guard. In both cases, we hard-coded stuff that could obviously change, but we drew vastly different conclusions.

Mike thought he’d solve his WiFi problem with a fallback to a captive portal, and maybe would have to figure out some web interface for configuring the timezone. A very clean, professional solution. Me? I’ve got good comments in the code, can find the UTC offset (or the WiFi creds) in a few minutes, and flash the new version up simply by fetching a USB cable, for something that happens twice a year. It’s hardly worth the trouble to cobble together a web interface.

There’s an XKCD for everything.

We’ve accidentally embodied a quandary that spans both the hardware and software worlds: should flexibility be exposed to the end-user or to the hacker who can peer under the hood or open up the source code? (And what if the end-user is the hacker?) What are the tradeoffs, in project complexity and in ease of use?

And in this, Mike is on the side of right and good, and I’m the heretic. I don’t always write my code to be extensible or re-usable. I sometimes write it to be quickly re-edited and patched whenever I need to. Is it full of magic numbers? Sure! But I know just where they are and how to change them. Heck, most are even well documented in their own header file. You could probably figure it out just about as fast. Would my father-in-law be able to tweak the timezone? Nope! But this ain’t his project anyway.

Dare to code for hackers! Don’t over-generalize or over-abstract. Less is more. Don’t be afraid to edit code. Tweak, compile, and re-flash when the situation changes. After all, that’s how you got the code there in the first place.

And although I’m on the wrong end of history, in this case I was right. You see, before daylight savings time could come around again, and I could have made use of that captive portal that I didn’t bother coding up anyway, my son entered first grade. Everything needs to be changed, from the hardware to the software. Will I code up the next version with flexible time regimes? As flexible as I need it to be, but not more.

Controlling A Broken Super Nintendo With MIDI

A Super Nintendo that has trouble showing sprites doesn’t make for a very good game system. As it turns out, Super Mario World is a lot less fun when the titular hero is invisible. So it’s no surprise that [jwotto] ended up tossing this partially functional SNES into the parts bin a few years back.

But he recently came up with a project that may actually benefit from its unusual graphical issues; turning the glitched console into a circuit bent video synthesizer. The system was already displaying corrupted visuals, so [jwotto] figured he’d just help things along by poking around inside and identifying pins that created interesting visual effects when shorted out.

Installing the new electronics into the SNES.

Once he mapped out the pins, he wired them all up to a transistor switching board that he’d come up with for a previous project. That would let an Arduino short out the pins on command while still keeping the microcontroller relatively isolated from the SNES. Then it was just a matter of writing some code that would fire off the transistors based on MIDI input.

The end result is a SNES that creates visual glitches along with the music, which [jwotto] can hook up to a projector when he does live shows. A particularly neat feature is that each game responds in its own way, so he can swap out the cartridge to show completely different visuals without having to change any of the MIDI sequencing.

A project like this serves as a nice introduction to both circuit bending and MIDI hacking for anyone looking to get their digital feet wet, and should pair nicely with the MIDI Game Boy Advance.

Continue reading “Controlling A Broken Super Nintendo With MIDI”