A Tshwatch on a table

TshWatch Helps You Learn More About Yourself

TshWatch is a project by [Ivan / @pikot] that he’s been working on for the past two years. [Ivan] explains that he aims to create a tool meant to help you understand your body’s state. Noticing when you’re stressed, when you haven’t moved for too long, when your body’s temperature is elevated compared to average values – and later, processing patterns in yourself that you might not be consciously aware of. These are far-reaching goals that commercial products only strive towards.

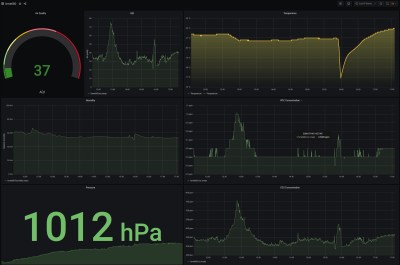
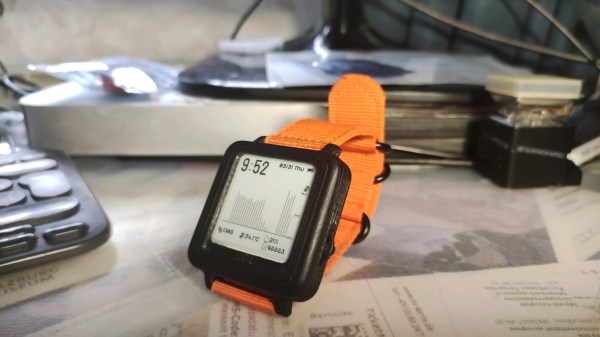
At a glance it might look like a fitness tracker-like watch, but it’s a sensor-packed logging and measurement wearable – with a beautiful E-Ink screen and a nice orange wristband, equipped with the specific features he needs, capturing the data he’d like to have captured and sending it to a server he owns, and teaching him a whole new world of hardware – the lessons that he shares with us. He takes us through the design process over these two years – now on the fifth revision, with first three revisions breadboarded, the fourth getting its own PCBs and E-Ink along with a, and the fifth now in the works, having received some CAD assistance for battery placement planning. At our request, he has shared some pictures of the recent PCBs, too!

Continue reading “TshWatch Helps You Learn More About Yourself”

Two-Part, Four-Wire Air Quality Meter Shows How It’s Done

The Bosch BME680 is a super-capable environmental sensor, and [Random Nerd Tutorials] has married it to the ESP32 to create an air quality meter that serves as a great tutorial on not just getting the sensor up and running, but also in setting up a simple (and optional) web server to deliver the readings. It’s a great project that steps through everything from beginning to end, including how to install the necessary libraries and how to program the ESP32, so it’s the perfect weekend project for anyone who wants to learn.

The BME680 is a small part that communicates over SPI or I2C and combines gas, pressure, temperature, and humidity sensors. The gas sensor part detects a wide range of volatile organic compounds (VOCs) and contaminants, including carbon monoxide, which makes it a useful indoor air quality sensor. It provides only a relative measurement (lower resistance corresponds to lower air quality) so for best results it should be calibrated against a known source.

The tutorial uses the Arduino IDE with an add-on to support the ESP32, and libraries from Adafruit. Unfamiliar with such things? The tutorial walks through the installation of both. There’s a good explanation of the source code, and guidance on entering setup values (such as local air pressure, a function of sea level) for best results.

Once the software is on the ESP32, the results can be read from the serial port monitor. By going one step further, the ESP32 can run a small web server (using ESPAsyncWebServer) to serve the data to any device wirelessly. It’s a well-written tutorial that covers every element well, and complements this other BME680-based air quality meter that uses MQTT and Raspberry Pi.

A Portable Home Air Quality Meter With The ESP32

Around the world, rolling pandemic lockdowns have left many working from home. [kn100] is in just such a predicament, and while spending nearly 24 hour a day in a residential flat, got wondering about air quality. Thus, it was time to build some gear to keep an eye on things!

Grafana may require a database and some work to set up, but the results are to die for.

The build consists of an ESP32 hooked up to a Bosch BME680 air quality sensor. It measures pressure, temperature, humidity and gas resistance, and then with a closed source library, uses this to calculate an “Air Quality Index” as well as estimate CO2 and VOC levels in the air. Data is passed from the ESP32 over MQTT to a Raspberry Pi. This runs Mosquitto for handling the MQTT queries, saving the data in an Influxdb instance. Grafana is then used to query this database and produce attractive graphs of the data.

It’s a build that not only helps keep an eye on things in the flat, but is great practice for building solid Internet of Things devices with top-notch data visualisation. We’ve talked about how to do this before, too – so if you need this capability in your life, there’s no excuse not to get hacking!

Hands-On: CCCamp2019 Badge Is A Sensor Playground Not To Be Mistaken For A Watch

Last weekend 5,000 people congregated in a field north of Berlin to camp in a meticulously-organized, hot and dusty wonderland. The optional, yet official, badge for the 2019 Chaos Communication Camp was a bit tardy to proliferate through the masses as the badge team continued assembly while the camp raged around them. But as each badge came to life, the blinkies that blossomed each dusk became even more joyful as thousands strapped on their card10s.

Yet you shouldn’t be fooled, that’s no watch… in fact the timekeeping is a tacked-on afterthought. Sure you wear it on your wrist, but two electrocardiogram (ECG) sensors for monitoring heart health are your first hint at the snoring dragon packed inside this mild-mannered form-factor. The chips in question are the MAX30001 and the MAX86150 (whose primary role is as a pulse sensor but also does ECG). We have high-res ADCs just waiting to be misused and the developers ran with that, reserving some of the extra pins on the USB-C connector for external devices.

There was a 10€ kit on offer that let you solder up some electrode pads (those white circles with gel and a snap for a solid interface with your body’s electrical signals) to a sacrificial USB-C cable. Remember, all an ECG is doing is measuring electrical impulses, and you can choose how to react to them. During the workshop, one of the badge devs placed the pads on his temples and used the card10 badge to sense left/right eye movement. Wicked! But there are a lot more sensors waiting for you on these two little PCBs.

Continue reading “Hands-On: CCCamp2019 Badge Is A Sensor Playground Not To Be Mistaken For A Watch”