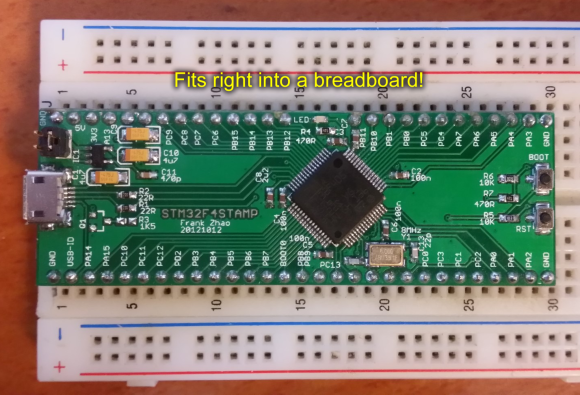
Drag And Drop Code Onto This ARM Dev Board

On the continuing list of homebrew ARM dev boards we’ve seen over the past few months, [Squonk42]’s USBug is one of the best we’ve seen. Like many other ARM boards, it breaks out a member of the Cortex M0/M3 family into a 40-pin DIP, but unlike all the others, [Squonk] designed it so you can drag and drop code onto the microcontroller just like a USB thumb drive.

[Squonk]’s trick relies on a certain breed of NXP LPC11xx/LPC13xx microcontrollers. These chips feature a ROM-based mass storage, meaning you can compile code on your desktop and simply shuffle it over to the USBug, no external programmer required. Here’s the relevant app note (PDF in a zip file. Double whammy).

Of course, the USBug features the I/O you’d generally expect from the current crop of Cortex-M3 devices, all while serving up 64 kB of Flash and 12 kB of RAM.

[Squonk] says he’d like to put the USBug on Kickstarter, but unfortunately he’s not a US citizen. In the spirit of Open Hardware, perhaps some maker-based electronics manufacturer will pick up where [Squonk] is forced to leave off.

Remote Uploading To An Arduino With Codebender

[youtube=http://www.youtube.com/watch?v=KCHqhV6xPMg&w=470]

A few weeks ago, we saw codebender, an online replacement for the Arduino IDE that allowed you to upload a sketch to your board from a web browser. Over on the codebender blog [Vasilis] and his team are rolling out a way to remotely upload code to an Arduino over Ethernet. Now you don’t even need a serial connection to program an Arduino; it can be done over the Internet to a board in the next room, or on another continent.

The star of this hack is the Ariadne bootloader, an implementation of TFTP that allows any Ethernet-enabled Arduino to receive updates over the Internet. There is still one small problem with the Ariadne bootloader: uploading code over Ethernet requires someone to press the reset button on the Arduino, completely negating the benefits of programming an Arduino over Ethernet.

This problem has been solved before for earlier Arduino boards, so we’re sure [Vasilis] and his team will be able to fix the reset issue in very short order. If you’d like to check out the remote TFTP bootloader and play around with codebender, you can grab Ariadne over on GitHub.

Program Your Arduino Via IR Using The Arduino IDE

Here’s a way to program an Arduino wirelessly while still using the stock IDE. It uses an alternative bootloader called SuperDuplex along with an IR receiver like the ones used for TV remotes.

As you can see, this does take two parts. There is the target device which has the IR receiver, as well as the transmitting unit which connects to the computer via USB. You can see a demonstration of the programming process after the break. It might be a bit slow, but nothing outrageous.

With hobby electronics we always thing that “what does it do?/what is it for?” is the wrong question. But in this case we there’s a very apparent use for it. If you’ve built a gadget for use in a harsh environment and want to keep the number of openings in the enclosure to a minimum (like for an underwater ROV) this is perfect. Just make sure there’s a window for the IR receiver and you’ll be able to program as much as you want. Of course it still looks like you need a method to manually reset the target chip, but you’ll think of something.

Continue reading “Program Your Arduino Via IR Using The Arduino IDE”

Chipcon CC1110/CC1111 Serial Bootloader

[Joby Taffey] just rolled out a serial bootloader for the Chipcon CC1110/CC1111 processors. The project is called CCTL and aims to make prototyping with the Girltech IM-ME a bit less tedious. Up until now firmware for the device had to be pushed in with a GoodFET or TI proprietary programmer which was quite slow. But this bootloader makes it possible to push your code via the chip’s serial port at 115200 baud. But the pretty pink pager isn’t the only device using these chips and to prove it [Joby] send this picture of all the electronics he has on hand running this architecture.

Once the 1KB CCTL bootloader has been flashed to the chip, a serial port or USB to Serial converter can be used as a programmer. [Joby] warns that the Chipcon processors are not 5V tolerant so you need to either use a 3V serial converter or add a level converter into the mix.

CCTL provides the features you’d expect from a bootloader. It uses the chip’s watchdog timer to guard against failure due to broken code. And there is an upgrade mode available at power up. Instruction for use are included in the Github repo linked at the top.

Using An ATmega8 To Program PIC24FJ Chips

[Fezoj] likes to play around with microcontrollers and decided that he wanted to try a Bus Pirate as a new tool in his adventures. Since it’s open hardware he had his own board made and populated it himself. The trouble is, he works only with AVR chips and doesn’t have a PIC programmer. No problem, he figured out how to flash the PIC24FJ using an ATmega8.

To get started, he grabbed a copy of the flash programming specifications from Microchip. Once he had implemented the protocol in the AVR code, it was just a matter of getting the downloaded PIC firmware to the AVR. An RS232 chip gives him the serial connection he needs, with the help of his own programming software written with Visual Studio.

It’s not a robust solution for prototyping on the PIC platform, but maybe it could be developed for that purpose. For now, all he needed was a bootloader so that he could flash the Bus Pirate via a USB connection.

[via Dangerous Prototypes]

Build A Binary Wall Clock For Just A Few Bucks

The weekend is almost here and if you’re looking for an afternoon project consider building your own binary wall clock. [Emihackr97] built the one you see above using parts on hand, but even if you put in an order for everything, it won’t cost you much.

He used a cardboard box as the housing for the clock, marking a grid for the LEDs on the face and drilling holes to house them. Two columns for hours and another two for minutes let the clock display 24-hour time with alternate firmware for 12 hour time. Since there are two buttons – one to set hours, the other to set minutes – a little coding would make it possible to select between the two either by clicking both buttons at once, or holding down one button.

[Emihackr97] is driving the display with an ATmega48, which is a pin-compatible replacement for the ATmega168/328. Those chips are the type most commonly found on Arduino boards an indeed this project is running the Arduino bootloader, but uses an ISP programmer and breadboarded circuit to keep the costs low. There are plenty of pins to drive the 13 LEDs directly, making the soldering quick and painless. Check out a demo clip after the break.

If you’re successful at this build and get the itch for something with more style, there’s a ton of ways to spice up the look of a binary clock.

Continue reading “Build A Binary Wall Clock For Just A Few Bucks”

arduino_bootloader_burner

A Beginner’s Guide To Burning Arduino Bootloaders

When it comes to learning about microcontrollers, everyone has to start somewhere. [Lady Ada] recently posted a tutorial on burning the Arduino bootloader to standalone chips for those just getting started with the micro.

The tutorial cites a common situation, where someone is working on a project using an Arduino chip but they don’t want to sacrifice their dev board when just the micro and a few other components would do just fine. A short list of supplies is required, including an Arduino, a proto shield kit, a ZIF socket, and a blank ATmega chip.

The process is probably pretty straightforward and likely familiar to many of you out there. The ZIF socket is soldered to the board and handful of wires are added for powering and programming the new chip. The protoboard is installed on top of the Arduino like any other shield, and using a sketch that [Lady Ada] has made available, the bootloader burning process is a cinch.

It’s a useful tip for newcomers, and definitely a skill that seasoned Arduino users should have under their belts as well.