Galaxy SIII Hack Puts Android In Your Dashboard

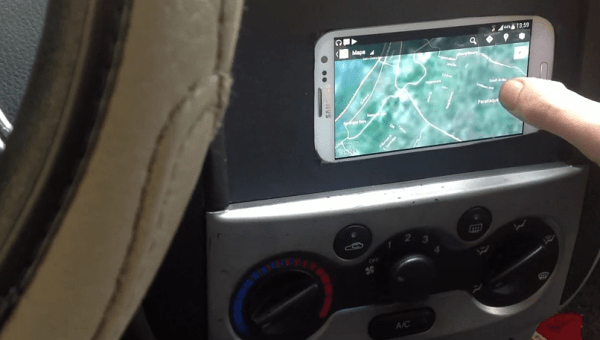
Here’s how you can have a hands-free, no worries about the battery, Android experience while you drive. [Steve] removed the head unit from his car and replaced it with a Samsung Galaxy SIII Android phone. The look is pretty nice, but we do have a few suggested improvements if you try this one for yourself.

It started simply by removing the factory stereo which left a double-height opening in the dashboard. [Steve] cut a piece of wood to fit the gaping hole, painting it a grey that would compliment the interior colors of the car. The phone is mounted on this plate, with plenty of room for the USB and audio cables. From there it is finished up with another wooden plate which has a cutout for the touch screen. See the final project, as well as glimpses of the installation, in the video after the break.

[Steve] demonstrates using the GPS features and playing music. We’d improve this in a couple of ways. First off, using something like the IOIO board you could add a physical volume knob, which we’re not interested in giving up for a touch screen quite yet. If you were willing to go the extra mile, a CAN-BUS chip could be added too that would monitor button presses from the steering wheel music controls.

Continue reading “Galaxy SIII Hack Puts Android In Your Dashboard”

Giving The IPod Nano A Home On A Honda Dashboard

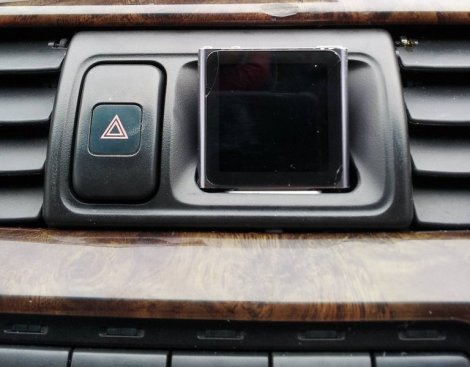
[Hyeinkali’s] iPod Nano looks right at home on the dashboard of his 2001 Honda Accord. He got rid of the simple LCD clock and the buttons that were used to set it. The hack holds the iPod securely in place, but it remains easy to remove and take with you.

He started by popping out the bezel that holds the clock module and hazard light button in place. The original display was about the same width as the Nano, but he wasn’t interested in mounting the mp3 player under the dash. Since he needed to be able to take it with him to sync his music library he made a space near the bottom of the bezel to accept the connector end of the USB cable while keeping the device accessible. After connecting the other end to power he covered the hole in the bezel with mesh and put everything back together. We’re not sure if audio is piped into the car stereo via a cable or through Bluetooth, but it does feed to the head unit.

[via Reddit]

Relighting A Gauge Cluster

When a few lights in the dashboard of  [Garrett]’s truck burned out, he was looking at a hefty repair bill. The repair shop would have to replace the huge PCB to change a few soldered light bulbs, so he was looking at a $500 repair bill. Lighting up a LED is everyone’s first project, so [Garrett] decided to change out the bulbs with LEDs and save a few dollars.

The repair was very simple – after removing the dials and needles, [Garrett] found a huge PCB with a few burnt out bulbs on board. He took a multimeter to each bulb’s solder pad and replaced each one with an LED and resistor. The finished project looks like it came out of a factory and is a huge improvement over the ugly amber bulbs originally found in his truck.  [Garrett] also posted a nice Instructable of his build showing the nicely soldered lamp replacements.

All Your I/O Pins Belong To ArduinoDashboard

arduino_dashboard

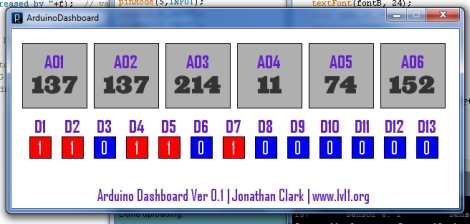
So if you’re knee deep in an Arduino-based project and you want to constantly monitor all of the micro’s pins, what’s the best way to go about it? [Jonathan Clark] from LVL1 in Louisville was looking to keep a closer eye on his board and whipped up an application he calls ArduinoDashboard.

Programmed in Processing, the application gives you a look at all of your Arduino board’s analog and digital pins in a simple to use display. All that’s required to run the application is a bit of code inserted at the top of your sketch, which can be called anywhere in your program’s loop. Once the code snipped is called, all of the board’s pins are read and the data is sent to your PC.

ArduinoDashboard is still very much in beta at the moment, but it looks to be stable enough for everyday use. [Jonathan] has plenty of improvements and new features in mind, so be sure to check back often to see what’s changed.

[via Adafruit Blog]

In-button Display For Your Car’s Dashboard

OLED display in a dashboard button

Here’s an interesting take on augmenting a car’s dashboard. [Daniel] is using a button blank to house a 1″ OLED display in his Jetta. It shows auxiliary data such as boost pressure and several sets of temperature readings. The display itself has a tiny little circuit board with a PIC 24 to drive it. A larger board, seen above, collects the temperature data from some sensors that [Daniel] added as part of the hack. There are some pictures of the installed display inside of the dark car and it looks really easy to read. It also sounds like there’s some dimming functionality built into the firmware. This is the easiest way we’ve seen to add a display to your dashboard as it just requires you to pop out a button blank, rather than disassembling the entire console or patching into what’s already there.

Hijacking The Mazda LCD Display

[Pieter] is in the process of adding a turbo package to his ride. He needed a status display for the boost but didn’t have a good way to mount an additional display. He came up with the idea of using the LCD screen that’s already in the dashboard, but the specs for it were not available. Wielding his hard-earned hacking skills [Pieter] used a logic analyzer to sniff out the communications to the screen. He built a controller board that overrides the data coming in from the head unit. The board is also able to query the car’s computer for data and display it in any format you want. What he ends up with is a stock look that he can customize for his needs. Nice!

IPhone Cop-cam

iphone_windshield_mount

[Tim] wanted to make some recordings of himself driving similar to those made by the dashboard cameras on police cars.  In a simple two step hack (1. Measure, 2. Drill), he altered his iPhone windshield mount so that it didn’t block the lens of the camera. We will admit (sheepishly) that at first glance we thought this might be connected to the outside of the windshield but it’s not. Take a look at his drive to work after the break.

Continue reading “IPhone Cop-cam”