Raspberry Pi Wedded To A DSLR

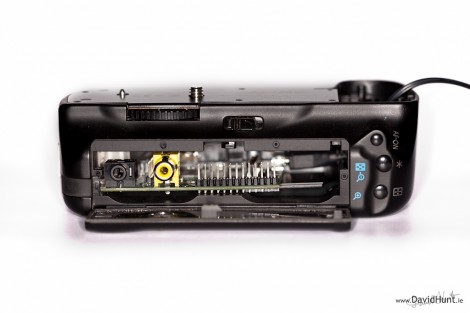
This is a Raspberry Pi outfitted in a DSLR battery grip. [Dave H] was very interested in the idea of combining a single-board computer with a high-end camera. The size and cost of such a computer was prohibitive until the RPi came along. He managed to fit the board into the broken battery grip he had on hand, and he already has the prototype up and running.

[Dave’s] alterations to the battery grip allow access to the USB, Ethernet, and Composite video ports. Powering the RPi was a bit of a challenge. He tried using an iPhone charger with four AA batteries but that only provided 4.2V. After going back to the drawing board he discovered he could rework the parts that he removed from the grip, using a Cannon 7.2V 1800 mAh battery. So far he can automatically pull images from the Camera and transmit them over a network connection. But since the RPi is running Linux, there’s a whole world of hacks just waiting to be exploited. What comes to mind first is image manipulation software (like ImageMagick) which has a command-line interface.

[Thanks Christian]

New Cameras Learning Old Lens Tricks

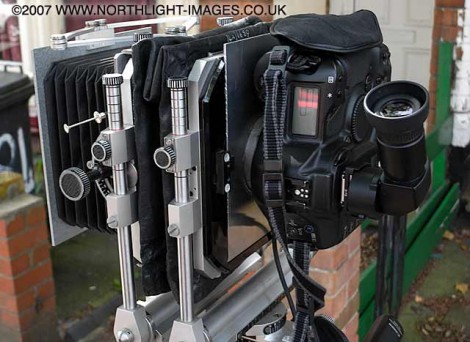
[Michael H] tipped us off about this guide to using view camera lens parts with DSLR cameras and lenses. We weren’t familiar with the term ‘view camera’ but we certainly recognize the accordion-like bellows that define that type of camera. The idea is that modern cameras with their fixed lenses miss out on some types of shots. Why not work out a way to get the best from both old and new?

The concept behind the view camera is that there are two plates connected by the bellows. One plate holds the film and shutter, the other holds the lens. The two can be adjusted for focal length but can also be set at an angle to each other. This modern adaptation uses an adjustable frame to hold the two plates in position. Custom connectors were made by attaching lens rings to the plates. It’s pretty much the same connection technique as we’ve seen when trying to mate cameras with lenses from a different maker.

High Speed Photography Controller Built To Catch Water Droplets

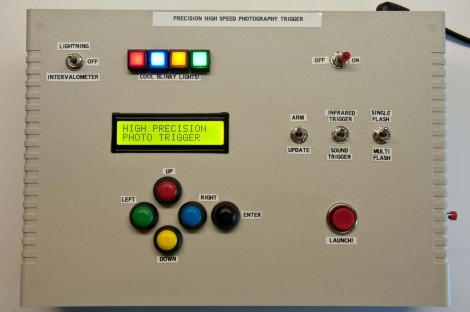
One high-speed photography controller to rule them all. If you’re looking to photograph droplets of water splashing on a still reservoir this is the ticket. But if you’re not, it still offers an incredible amount of flexibility for other high-speed needs. Inside you’ll find an Arduino Mega, which has plenty of room to bend to your will.

[Michael Ross] is the man behind this box. He wanted a system that did it all; timings, droplet control, camera shutter, etc. What you can’t see in the image above is the interface panel on the back of this enclosure (this shot shows the top of the box). The video after the break will give you a look at the overall setup. It has ports to control two different light sources, detectors to snap the images using an infrared sensor or via sound (we’re thinking bullet photography), and four ports to control solenoid valves.

He produced a mammoth PDF tutorial which will guide even the biggest noob through the entire build process. Find it at his site linked above.

Continue reading “High Speed Photography Controller Built To Catch Water Droplets”

Laser Light Painting Includes Camera Control

This laser light painting setup can even control the camera. But it probably will not work with your average point-and-shoot. The exposure time used is somewhere around 2 seconds long, a feature which is hard to find on anything but DSLR cameras.

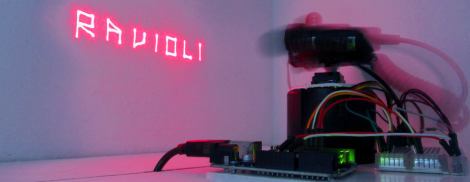
The setup relies on a red laser diode to do the painting. When viewed in real time you only see a dot tracing out a cryptic pattern and occasionally switching on and off. But with a long exposure the intense light persists to achieve an image like the one seen above. Note the ghosting around the rig as it has moved while the shutter was open.

The Arduino controlled device consists of a base which pivots the diode horizontally, with a servo for aiming on the vertical axis. Since the sketch is divided up by letter, we wonder how hard it would be to adapt this for use with a point-and-shoot? Perhaps you could capture one letter at a time and layer the frames in post production?

It seems this is a lot easier to build than some of the LED plotters we’ve looked at. If you do make your own don’t forget to send a link our way.

Continue reading “Laser Light Painting Includes Camera Control”

A DSLR Shutter Cable For Android

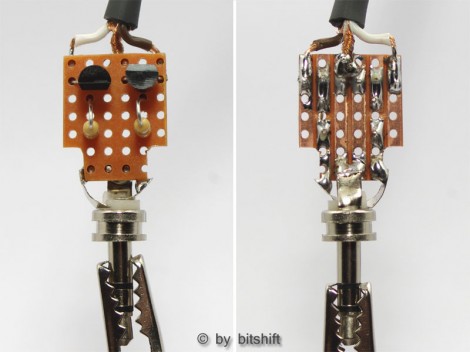
Here’s a very easy way to trigger your DSLR camera using an Android device. It’s a similar method used with IR triggered cameras, in that all you need to do is assemble some simple hardware to plug into the headphone jack. The app that triggers the camera simply plays back a well crafted audio file to do so. The thing that this cable adds is the ability to use the focus feature, since the cable has two data lines.

The hardware is dead-simple. A pair of NPN transistors and a pair of resistors are hosted by this small chunk of strip board. The audio jack for Android uses left and right audio channels to drive the base of these transistors. On the camera side of things the transistors are pulling the focus, and shutter contacts to ground. Once this is covered with shrink tubing it’ll be pretty rugged, and ready to be thrown in your camera bag for use on short notice.

[Thanks Hannes]

Scanning Turntable Digitizes Objects As 3D Models

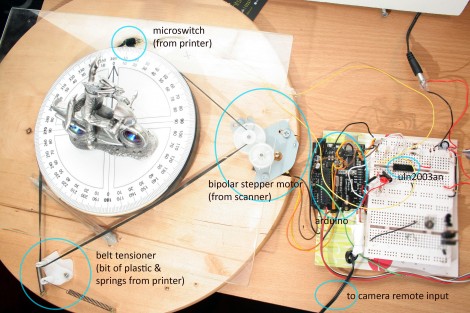
This turntable can automatically digitize objects for use in 3D rendering software like Blender3D. [James Dalby] built it using a high-quality DSLR, and some bits and pieces out of his junk box. The turntable itself is a Lazy Susan turned on its head. The base for the spinning model is normally what sits on the table, but this way it gives him an area to rest the model, and the larger portion acts as a mounting surface for the drive mechanism.

He used the stepper motor from a scanner, as well as the belt and tension hardware from a printer to motorize the platform. This is driven by a transistor array (a ULN2003 chip) connected to an Arduino. The microcontroller also controls the shutter of the camera. We’ve included his code after the break; you’ll find his demo video embedded there as well.

The concept is the same as other turntable builds we’ve seen, But [James] takes the post-processing one step further. Rather than just make a rotating gif he is using Autodesk 123D to create a digital model from the set of images.

Continue reading “Scanning Turntable Digitizes Objects As 3D Models”

Controlling A DSLR With A Nintendo DS

At Hack a Day, we’ve seen dozens of intervalometer builds that open and close a camera shutter remotely. [Luke Skaff] decided to take these builds to the next level by automating a camera’s focus and shutter with a Nintendo DS.

[Luke]’s build is based on the Open Camera Controller project that puts the power of an intervalometer, sound trigger, sequencer, and HDR bracket shooting into the hands of professional photogaphers. The Open Camera Controller is built to run on a Nintendo DS with an AVR-based card attached to the Game Boy Advance cartridge port.

The Open Camera Controller attaches to a camera’s shutter port, but [Luke] stepped things up a little bit by using a USB host controller and implementing the picture transfer protocol. Now, instead of [Luke]’s controller telling his camera when to open and close the shutter, the focus of the camera can be adjusted as well. [Luke]’s build uses an Xilinx CoolRunner-II CPLD and a USB host controller to convert the DS cartridge port to a USB port every DSLR can connect to.

[Luke] still has a mess of wires on his hand, but even we can see the power that inexpensive automation would bring to the world of digital photography.

Continue reading “Controlling A DSLR With A Nintendo DS”