How To Use CoIDE With LPCXpresso Board

lpcxpresso-coocox

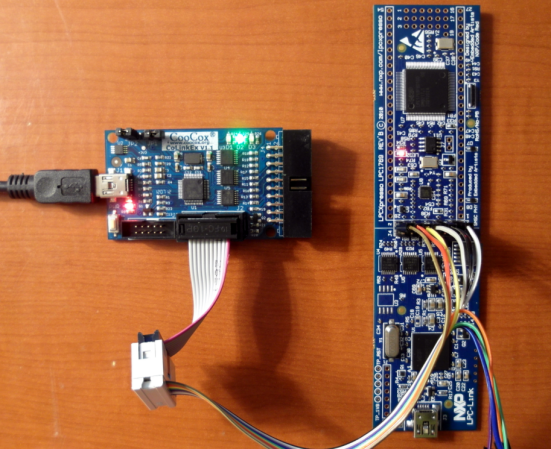
[James Lynch] picked up an LPCXpresso board because he wanted play around with ARM processors. The board, which is shown on the right, provides everything you need to get started. It even ships with a free IDE. But unfortunately the free version of that Code Red IDE is size limited. If he wanted to remove the restriction he would have to pony up $999 for a licensed version. A company might not think twice about this payment, but in the hobby realm that’s simply out of the question. Instead, [James] figured out how to use the CooCox programmer with the LPCXpresso hardware. To get at his 59-page guide on the process follow that link and hit the “Download Zip” button in the lower right for a copy of the PDF file.

The hack comes in two parts. First you need to alter the LPCXpresso board. There is a center line that separates the dev board form the debugger/programmer. These are connected with solder bridges between rows of a dual pin-header. [James] removed the bridges and added said pin header. This allows him to jumper the connections and use it as normal, or attach it to his CooCox programmer as seen above. The second part of the project walks through the process of getting the free CoIDE (also based on Eclipse) to compile and program code for the LPCXpresso.

We’ve seen this dev board here and there, notably in an oscilloscope build.

How To Configure Eclipse For The Stellaris Launchpad

eclipse-for-stellaris-launchpad

We’re partial to using gedit and a makefile for our AVR projects. But for the most part we don’t a debugger with those smaller chips. Now that we’re getting going with ARM processors we use debugging all the time and Eclipse is a great way to combine code writing, compiling, and debugging in one place. Sure, we could use one of TI’s provided IDEs (some of them are based on Eclipse), but we’d rather build our tools up ourselves. [Doragasu] is making this a snap with his Eclipse for Stellaris Launchpad tutorial.

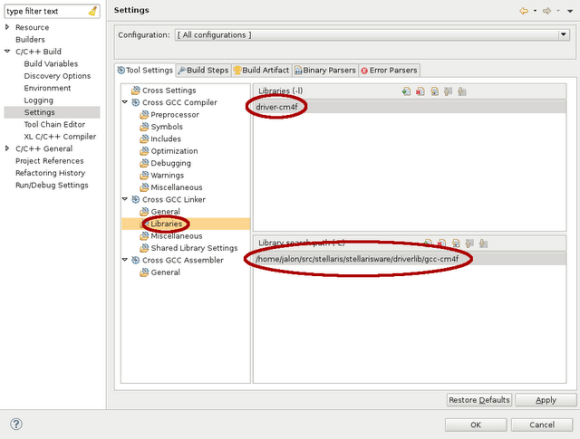
He illustrates every step with a screenshot like the one seen above. Here he is including the driverlib from StellarisWare in the linking step. After all of the compiler and linker settings are just right all you need to do is make a copy of the template to start a new project. The final part of the setup configures lm4flash to write binaries to the chip, and configures OpenOCD for use when debugging.

[via Comments]

A Quick Kludge To View The Transit Of Venus

[Justin] is a bit of an astronomy geek, but that doesn’t mean he’s always prepared for celestial phenomena. When he realized the May 20th annular eclipse was only a few days away, [Justin] dropped everything, built a pinhole solar viewer, and drove three hours for the best view of the eclipse. He learned something watching the eclipse; these sort of things sneak up on you, and you really need to plan ahead if you want to truly enjoy the music of the celestial spheres. After the eclipse, [Justin] set to work building a filter to watch a Venusian eclipse with his telescope.

If [Justin] pointed his 8 inch Schmidt–Cassegrain directly at the sun, he would most likely damage the optics in his ‘scope, burn several retinas, and other very, very bad things. The best way to view the Sun with a telescope is with an expensive Hydrogen alpha or a general solar filter, but these are expensive and the clock was rapidly ticking down to the transit of Venus. After reading that blocking most of the light from coming into the ‘scope, [Justin] built an aperature reducer out of a few bits of foam board, foil, and dark fleece.

How did viewing the transit with a telescope turn out? Well, if you don’t compare [Justin]’s pictures to the multi-million dollar toys NASA and astronomers have, pretty good. It’s a very good job considering the entire foam-core aperture reducer was built in the course of an evening.

While it may be a little early to be planning for the next Venusian transit in the year 2117, there will be a transit of Mercury on May 9, 2016. All [Justin] has to do is remember when it will happen.

Debugging MSP430 Using Eclipse

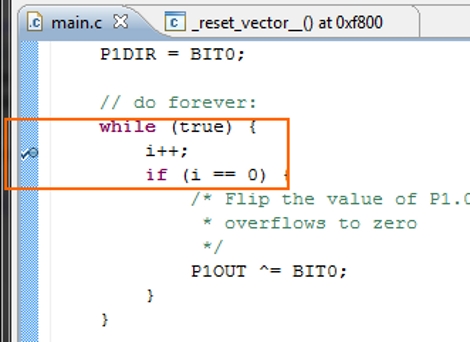
[Springuin] just posted a tutorial about debugging MSP430 projects using Eclipse. He read our feature about debugging under IAR, a proprietary IDE which TI offers as a code-limited freebie with the TI Launchpad. In that writeup we wondered if anyone would put together a tutorial using open source tools like DDD and GDB to make debugging easier for those that choose to use operating systems other than Windows. Even though he didn’t directly use those particular packages, this should work just as well.

Eclipse is a popular IDE for many different languages like C, C++, Java, and others. We’ve already seen it used to develop for the TI Evalbot on Linux systems. [Springuin] is using the Java-based IDE on a Windows system, and this is the first time we recall seeing directions on using an open-source alternative for programming with the TI Launchpad under Windows. That being said, the only real Windows specific parts are the steps necessary for communicating with the programmer. Since this method uses MSP-GCC and msp430-gdbproxy, it should be easy to do this under Linux as well. Use our tutorial to set up those tools if you haven’t already, then follow this one for a setting up and debugging in the Eclipse environment.

TI Evalbot Development Under Linux

We have some beefs about how Texas Instruments does things, the biggest of which is their lack of support for development under Linux operating systems. But if they build it, someone will try to get Linux involved in one form or another. This time around, [BLuRry] put together a guide to developing for the Evalbot under Linux. He got a shove in the right direction from the code package that went along with that nunchuck-controlled Evalbot. Picking apart that example to the bare essentials he wrote up the process of setting up the cross-compiling toolchain in a virtual machine so as not to clutter your system. From there he details how to set up and use Eclipse when starting a new project. What what did he choose for a Hello World experience? Well a plain “Hello World” was first but right on its heels is the “Hello Hack-A-Day” seen above. So if you’ve got one of these on hand get out there and start coding for it.

Didn’t See The Lunar Eclipse, Make One!

Lunar eclipse simulator

Last night was a lunar eclipse meaning that most people would have been out gazing up at the sky watching it. For some the eclipse evaded them using cloud cover, but instead of giving up, they got innovative. [Garrett] decided to build a moon simulator to keep track of the eclipse using a few spare parts and some quick code. The parts that were required for this project includes an Arduino UNO, a singular ShiftBrite Shield, a ShiftBar, ChronoDot and a Satellite Module 001. This is the perfect project for the Arduino to be used in because he had to toss it together very quickly and it is meant to be a temporary solution. If he were to make this permanent, we would guess that he would make a smaller and more cost effective version of the electronics.  He documents his experience on Macetech.com in more detail and the outcome is pretty amazing. Code is yet to be posted but hopefully it is forthcoming soon as well as a video of the simulator working.

Lego Machine Predicts Future Eclipses

Hidden behind the white face plates of this machine are racks of gears that make up a replica of one of the oldest known mechanical computers. This is a working model of the Antikythera mechanism made from Lego pieces. In the video, which you absolutely can’t miss after the break, The machine is disassembled into its various components. Each mechanical unit takes advantage of gear ratio combinations to perform numerous levels of mathematical functions in order to display the date and time that future celestial events will occur.

The background information on the original device reads like the script for a sequel to The Goonies. Believed to date back to 100-150 BC, the stone bronze mechanism was recovered from a shipwreck around the turn of the twentieth century. The use of x-ray analysis helped to unlock the functions and confirm the theories of its operation.

Part of what makes this so interesting is the historical connection. But the production quality of the video (which to be fair, seems to be an advertisement) really brings home how complicated this process is. Now it’s time for us to watch the video a few more times, sketching out the gearing to see that this works as they say it does.

Want more of the Antikythera mechanism? Check out the model built by [Tatyana van Vark].

Continue reading “Lego Machine Predicts Future Eclipses”