Repairing A Gear With A Candle (and Some Epoxy)

You have a broken gear you need to fix, but there’s no equivalent part available. That’s the issue [Well Done Tips] faced with a plastic gear from a lawnmower. While we’d be tempted to scan the gear, repair the damage in CAD and then 3D print a new one, we enjoyed hearing about his low-tech solution. In addition to the write up, there’s a video showing the process you can watch below.

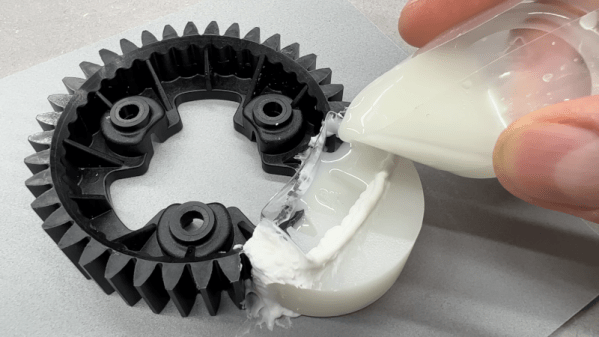
The idea is pretty simple. Using a piece of pipe and melted candle wax, he prepared a mold of an undamaged section of the gear. Then he cast epoxy resin in place to recreate the missing pieces. There are a few tricks, like putting holes in the remaining part of the gear so the epoxy flows into the existing part. Depending on the gear’s purpose and original material, you might be able to just use it as-is. However, you could also use the repaired gear as a template to create another mold and then cast an entire gear from resin or even metal if you can cast metal.

You can argue whether resin is better or worse than PLA, but of course, it depends on the kind of resin—photopolymers are different from epoxy resins you’d use for this sort of thing. If you think you might like to make your new gear out of aluminum, you might find some inspiration in a previous post.

Continue reading “Repairing A Gear With A Candle (and Some Epoxy)”

Degassing Epoxy Resin On The (Very) Cheap

Anyone who’s tried to encapsulate something in epoxy resin knows how much of a hassle air bubbles can be. If you’re trying to get a perfectly clear finish, the last thing you want is a bunch of microscopic bubbles frozen in time. The best way to prevent this is to put the parts in a vacuum chamber so all the air works its way out before the epoxy cures, but that’s a considerable investment for a one-off project.

But assuming your parts are small enough, [Jasper Sikken] has a great tip that allows you to construct a simple vacuum chamber for just a few dollars. He shows his homemade chamber off in the video after the break, and we think you’ll agree that the change between before and after is pretty dramatic. The best part is that if you want to build your own version, you only need two parts.

The first one is a airtight container large enough to hold the piece you’re working on. Remember that the larger the chamber is the more time it will take to pump down to a suitable vacuum, so avoid the temptation to use something larger than necessary. [Jasper] used a glass jar with a locking lid, which is not only cheap and readily available, but has a decently large internal volume.

Obviously, the second component is the vacuum pump itself. This might normally be a tall order, but [Jasper] recently found that you can buy small battery-powered gadgets designed for sucking the air out of food containers for as little as $5 USD from the usual import sites. All you need to do is pop a hole in the lid of your container, hold the device over the hole, and watch the magic.

This method is great for anything smaller than a paperweight, but if you’ve got something bigger than that, you’ll need to step up your chamber game. Luckily even larger vacuum chambers can be built cheaply at a pinch.

Continue reading “Degassing Epoxy Resin On The (Very) Cheap”

Epoxy LED Cube Looks Sleek, And Flashes To The Beat

If there’s one thing that’s universally popular in these polarizing times, it’s colorful glowing objects. LEDs reign supreme in this area, and we’re accustomed to seeing all manner of fun flashy devices hit the tips line. Today is no different, and we’ve been looking at [Modustrial Maker]’s stylish epoxy LED cube.

The build starts with the casting of a black epoxy cube, with a cutout near the top in which the LEDs will be installed. A melamine form is used, with aluminium foil tape, caulk and paste wax to help seal it up. After releasing the cast from the form, there were some unsightly voids which were swiftly dispatched, by trimming the block down with a table saw. With the block cut to size, LED strips were installed, and the light cavity sealed with hot glue before white epoxy was poured in as a diffuser. All that’s left was a simple matter of polishing the cube and installing electronics.

The cube runs from a single-cell LiPo battery, and there’s a wireless power receiver and charging module to keep the power flowing. The cube can be used on most wireless phone chargers, as well as its own dedicated charging base. The LEDs are controlled by an off-the-shelf module, which offers a variety of flashing displays as well as a music-reactive mode.

While the electronics side is done with off-the-shelf parts, the real art in this piece is in the build of the cube. Its glossy, attractive form would look stunning on any coffee table or bedside shelf.

LED cubes are a great rabbit hole to go down on your lunch break. This OpenGL-enabled build is particularly impressive. Video after the break.

Continue reading “Epoxy LED Cube Looks Sleek, And Flashes To The Beat”