A Guide To Shop Equipment Nobody Thinks About: Clean, Organized, And Efficient

When planning out a workspace at home, the job, or at a makerspace, we all tend to focus on the fun parts. Where the equipment will go, how you’ll power it, what kind of lights you’ll get, etc, etc. It’s easy to devote all your attention to these high-level concepts, which often means the little details end up getting addressed on the fly. If they get addressed at all.

But whether we want to admit it or not, an organized workspace tends to be more efficient. That’s why [Eric Weinhoffer] has put together a blog post that details all those mundane details that we tend to forget about. It’s not exactly exciting stuff, and contains precisely as much discussion about whiteboards as you probably expect. That said, it’s thorough and clearly comes from folks who’ve had more than a little experience with setting up an efficient shop.

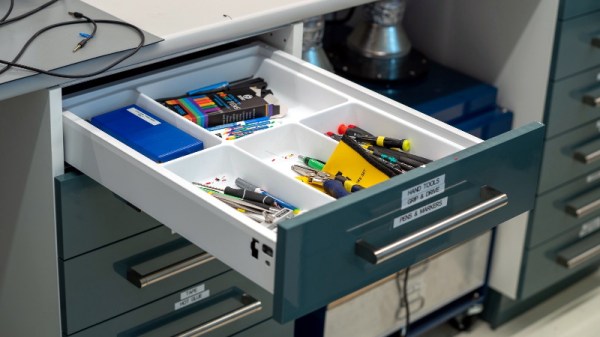
So what’s the first thing most shops don’t have enough of? Labels. [Eric] says you should put labels on everything, parts bins, tools, machines, if it’s something you need to keep track of, then stick a label on it. This does mean you’ll likely have to buy a label maker, but hey, at least that means a new gadget to play with.

Of course, those self-stick labels don’t work on everything. That’s why [Eric] always has a few rolls of masking tape (such as the blue 3M tape you might be using on your 3D printer bed) and some quality markers on hand to make arbitrary labels. Apparently there’s even such a thing as dry erase tape, which lets you throw an impromptu writing surface anywhere you want.

[Eric] also suggests investing in some collapsible cardboard bins which can be broken down and stored flat when not in use. If you’ve got the kind of situation where you’ll always have more or less the same amount of stuff then plastic is probably your best bet, but in a more dynamic environment, being able to collapse the bins when they aren’t in use is a capability we never even realized we needed until now.

As you might imagine, the post also touches on the issues of keeping sufficient safety gear available. We’ve talked about this in the past, but it’s one of those things that really can’t be said too many times. Having a wall of meticulously labeled storage bins is great, but it’s going to be the last thing on your mind if you manage to get an eye full of superglue.

Vintage Philco Radio Looks Stock, Contains Modern Secret: A Raspberry Pi

Antique radio receivers retain a significant charm, and though they do not carry huge value today they were often extremely high quality items that would have represented a significant investment for their original owners. [CodeMakesItGo] acquired just such a radio, a Philco 37-11 made in 1937, and since it was it a bit of a state he set about giving it some updated electronics. Vintage radio purists, look away from the video below the break.

Stripping away the original electronics, he gave it a modern amplifier with Bluetooth capabilities, and a Raspberry Pi. Vintage radio enthusiasts will wince at his treatment of those classic parts, but what else he’s put into it makes up for the laying waste to a bit of ’30s high-tech.The original tuning dial was degraded so he’s given it a reproduction version, and behind that is an optical encoder and two optical sensors. This is used to simulate “tuning” the radio between different period music “stations” being played by the PI, and for an authentic feel he’s filled the gaps with static. The result is a functional and unusual device, which is probably better suited than the original to a 2019 in which AM radio is in decline.

If you think of a high-end set like this Philco as being the ’30s equivalent of perhaps an 8K TV set, you can imagine the impact of AM radio in those early days of broadcasting. We recently took a look at some of the directional antenna tricks that made so many AM stations sharing the band a possibility.

Continue reading “Vintage Philco Radio Looks Stock, Contains Modern Secret: A Raspberry Pi”

Hackaday Links Column Banner

Hackaday Links: July 7, 2019

Like modular synths? Sure you do, and you need another hole to throw money into! For the last few months, Supplyframe has been hosting synthesizer and electronic music meetups in San Francisco. This week, the HDDG/Piqued meetup will have a great talk with the creator of VCV Rack. VCV Rack is an Open Source, virtual, modular synthesizer — basically a bunch of Eurorack modules inside a computer and it costs a whole lot less. The talk is this Thursday evening in SF. You should come!

The W600 is a new module (you can get it from Seeed, although it’s produced by Winner Micro in various formats) that is basically an ESP32, except it uses an ARM Cortex-M3 instead of a Tensilica core. [ultratechie] recently got their hands on one of these modules and got started with MicroPython. This seems like a capable module and it’s only three dollars, but will that be enough to catch up to the ESP32?

Purple gorilla enters art gallery. At the Het Nieuwe Instituut in Rotterdam there is a new exhibit featuring the, ‘destructive beauty of the computer virus’. The curators are detailing the historical progress of the computer virus from innocent DOS viruses to Melissa to Stuxnet and ransomware.

USB C has been around for a while, but 2019 is the year everything started to become USB C. Case in point: the Raspberry Pi 4. The only problem is that the Raspberry Pi Foundation messed up their implementation of USB C. Not a problem, because here’s how you design a USB C power sink. Basically, you give each CC line its own resistor. Don’t even think about it, just copy the USB C spec. You don’t know more about USB C than the people who designed it, and you’re not really saving a ton of money by deleting one resistor. Just copy the spec.

Smart Shelf Hides Some Serious Functionality

Today, it can feel like you’re always connected to the grid. We’re constantly alerted to notifications from smart phones, smart watches, and our houses have begun to swell with all manner of internet-enabled devices. [Jake P] wanted a less connected lifestyle, and built a shelf to help realise that goal.

The idea of [Jake]’s Analog Smart Shelf is to serve as a digital check point in his home. It’s a name that more reflects the ethos of the shelf rather than the components. The shelf contains a Qi wireless charging platform, so smartphones can be placed on the shelf when entering the house and left to charge. The shelf also conceals an Amazon Fire tablet behind woodgrain veneer, which displays the time, weather, and basic notification data. This enables [Jake] to see relevant digital information at a glance, while being able to switch off from the online world by simply walking away.

It’s a well-executed project, which artfully blends wood, concrete, and epoxy to create an attractive final product. It also bears some similarities to smart mirror projects we’ve seen before. It’s a piece we’d be proud to see on our walls, and a great concept for managing one’s digital life, too.

Epoxy LED Cube Looks Sleek, And Flashes To The Beat

If there’s one thing that’s universally popular in these polarizing times, it’s colorful glowing objects. LEDs reign supreme in this area, and we’re accustomed to seeing all manner of fun flashy devices hit the tips line. Today is no different, and we’ve been looking at [Modustrial Maker]’s stylish epoxy LED cube.

The build starts with the casting of a black epoxy cube, with a cutout near the top in which the LEDs will be installed. A melamine form is used, with aluminium foil tape, caulk and paste wax to help seal it up. After releasing the cast from the form, there were some unsightly voids which were swiftly dispatched, by trimming the block down with a table saw. With the block cut to size, LED strips were installed, and the light cavity sealed with hot glue before white epoxy was poured in as a diffuser. All that’s left was a simple matter of polishing the cube and installing electronics.

The cube runs from a single-cell LiPo battery, and there’s a wireless power receiver and charging module to keep the power flowing. The cube can be used on most wireless phone chargers, as well as its own dedicated charging base. The LEDs are controlled by an off-the-shelf module, which offers a variety of flashing displays as well as a music-reactive mode.

While the electronics side is done with off-the-shelf parts, the real art in this piece is in the build of the cube. Its glossy, attractive form would look stunning on any coffee table or bedside shelf.

LED cubes are a great rabbit hole to go down on your lunch break. This OpenGL-enabled build is particularly impressive. Video after the break.

Continue reading “Epoxy LED Cube Looks Sleek, And Flashes To The Beat”

DJI Fights Back Over Sensationalist Drone Reporting

Over the past few years the number of reported near misses between multirotors, or drones as they are popularly referred to, and aircraft has been on the rise. While evidence to back up these reports has been absent time and again.

We’ve looked at incident reports, airport closures, and media reporting. The latest chapter comes in the form of a BBC documentary, “Britain’s Next Air Disaster? Drones” whose angle proved too sensational and one-sided for the drone manufacturing giant DJI. They have penned an acerbic open letter to the broadcaster (PDF link to the letter itself) that says that they will be launching an official complaint over the programme’s content. The letter begins with the following stinging critique:

As the world’s leader in civilian drones and aerial imaging technology, we feel it is our duty on behalf of the millions of responsible drone users around the globe, to express our deep disappointment at the BBC’s negative portrayal of drone technology and one-sided reporting based on hearsay.

It then goes on to attack the tone adopted by the presenter in more detail : “overwhelmingly negative, with the presenter frequently using the words ‘catastrophic’ and ‘terrifying’.“, before attacking the validity of a series of featured impact tests and highlighting the questionable basis for air proximity incident reports. They round the document off with a run through the safety features that they and other manufacturers are incorporating into their products.

DJI have pulled no punches in their condemnation of the standard of reporting on drone incidents in this document, and it is a welcome and rare sight in an arena in which the voices of people who know something of multirotors have been rather lonely and ignored. The BBC in turn have responded by saying “its investigation had shown positive uses of drones and that its programmes were fair“.

Over the past few years we have reported on this issue we have continually made the plea for a higher quality of reporting on drone stories. While Britain has been the center of reporting that skews negatively on the hobby, the topic is relevant wherever in the world there are nervous airspace regulators with an eye to any perceived menace. These incidents have pushed the industry to develop additional safety standards, as DJI mentions in their letter: “the drone industry itself has implemented various features to mitigate the risks described”. Let’s hope this first glimmer of a fight-back from an industry heavyweight (with more clout than the multirotor community) will bear the fruit of increased awareness from media, officials, and the general public.

If you’d like to see the BBC documentary in question it will be available for the next few weeks to people who see the Internet through a British IP address.

Thanks [Stuart] for the tip!

Low Res Video Card Is Still Amazing Since It’s Made Out Of Logic Chips

[Ben Eater] has been working on building computers on breadboards for a while now, alongside doing a few tutorials and guides as YouTube videos. A few enterprising hackers have already duplicated [Ben]’s efforts, but so far all of these builds are just a bunch of LEDs and switches. The next frontier is a video card, but one only capable of displaying thousands of pixels from circuitry built entirely on a breadboard.

This review begins with a review of VGA standards, eventually settling on an 800×600 resolution display with 60 MHz timing. The pixel clock of this video card is being clocked down from 40 MHz to 10 MHz, and the resulting display will have a resolution of 200×150. That’s good enough to display an image, but first [Ben] needs to get the horizontal timing right. This means a circuit to count pixels, and inject the front porch, sync pulse, and back porch at the end of each horizontal line.

To generate a single horizontal line, [Ben]’s circuit first has to count out 200 pixels, send a blanking interval, then set the sync low, and finally another blanking interval before rolling down to the next line. This is done with a series of 74LS161 binary counters set up to simply count from 0 to 264. To generate the front porch, sync, and back porch, a trio of 8-input NAND gates are set up to send a low signal at the relevant point in a horizontal scan line.

The entire build takes up four solderless breadboards and uses twenty logic chips, but this isn’t done yet: all this confabulation of chips and wires does is step through the pixel data for the horizontal and vertical lines. A VGA monitor detects it’s in the right mode, but there’s no actual data — that’ll be the focus of the next part of this build where [Ben] starts pushing pixels to a monitor.

Continue reading “Low Res Video Card Is Still Amazing Since It’s Made Out Of Logic Chips”