Interactive Core Memory Shield Helps Explains The Past

[Andy Geppert] sends in his incredibly clever interactive core memory shield. 

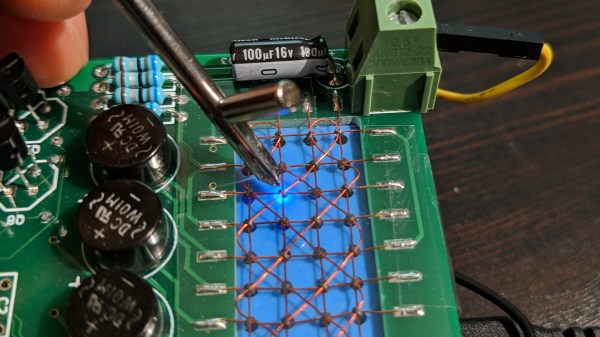
In a great display of one hacker’s work being the base for another’s, [Andy] started out with [Jussi Kilpelainen]’s core memory shield for Arduino.  As he was playing with the shield he had a desire to “see” the core memory flipping and got the idea to add an LED matrix aligned behind the individual cores.

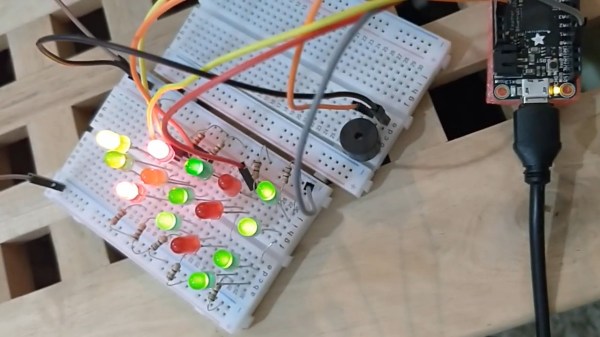
The first iteration worked, but it only showed the state that the Arduino believed the core memory to be in. What he really wanted was a live read on the actual state. He realized that an Adafruit Featherwing 8×8 matrix display also fits behind the core memory. Now the LEDs update based on the read state of the core memory. This allows him to flip the individual bits with a magnetic stylus and see the result. Very cool.

You can see a video of it working after the break.

Continue reading “Interactive Core Memory Shield Helps Explains The Past”

A Box With A Pocket Sized Boom

[Discreet Electronics Guy] sends in his very pocket sized boom box.

One thing we love about [Discreet Electronics Guy]’s projects is how they really showcase that a cool hack is possible without access to 3D printers, overnight PCB services, and other luxuries. Everything in this board is hand made by electronics standards. The board is etched, the vias are wires, and even the case seems to be a modified plastic mint container.

The boombox itself uses an ATiny85 at its core which plays .wav files from an SD card. This is routed through an audio amp which powers two small speakers. We love the volume knob being a board mount potentiometer. The device even features its own small LiON battery pack. If you don’t want to enjoy the deep sound of the two small speakers there’s a headphone jack.

He’s got a great write-up on the circuit design on his website and you can see a video of him presenting the project here or after the break.

Continue reading “A Box With A Pocket Sized Boom”

Super Easy Small Robot Wheels

Anyone who has delved into DIY wheels knows that they are a trickier than it may seem, especially if the wheels aren’t just for show and need to provide things like decent traction and durability. 3D printers have helped a lot, but they’re not a cure-all.

Check out how [Robert K.] makes wheels from segments of automotive silicone hose, which are constructed with fibers embedded within them for durability and structure. Not only are these hoses easily sourced, but the silicone makes a great wheel surface and the hoses themselves are highly durable. He uses a 3D printed jig to cut a slice of hose that press-fits perfectly onto a 3D printed hub. [Robert] finds that a 28 mm hose pulled over a 35 mm diameter wheel is a perfect fit.

These wheels are for a Beetleweight class combat robot, which are limited to three pounds (1.36 kg) or less. You can see some video of [Robert]’s previous Beetleweight robot named ‘Bourbon’, and we have featured what goes into the even-smaller Antweight class (one pound or less) in the past.

Degassing Epoxy Resin On The (Very) Cheap

Anyone who’s tried to encapsulate something in epoxy resin knows how much of a hassle air bubbles can be. If you’re trying to get a perfectly clear finish, the last thing you want is a bunch of microscopic bubbles frozen in time. The best way to prevent this is to put the parts in a vacuum chamber so all the air works its way out before the epoxy cures, but that’s a considerable investment for a one-off project.

But assuming your parts are small enough, [Jasper Sikken] has a great tip that allows you to construct a simple vacuum chamber for just a few dollars. He shows his homemade chamber off in the video after the break, and we think you’ll agree that the change between before and after is pretty dramatic. The best part is that if you want to build your own version, you only need two parts.

The first one is a airtight container large enough to hold the piece you’re working on. Remember that the larger the chamber is the more time it will take to pump down to a suitable vacuum, so avoid the temptation to use something larger than necessary. [Jasper] used a glass jar with a locking lid, which is not only cheap and readily available, but has a decently large internal volume.

Obviously, the second component is the vacuum pump itself. This might normally be a tall order, but [Jasper] recently found that you can buy small battery-powered gadgets designed for sucking the air out of food containers for as little as $5 USD from the usual import sites. All you need to do is pop a hole in the lid of your container, hold the device over the hole, and watch the magic.

This method is great for anything smaller than a paperweight, but if you’ve got something bigger than that, you’ll need to step up your chamber game. Luckily even larger vacuum chambers can be built cheaply at a pinch.

Continue reading “Degassing Epoxy Resin On The (Very) Cheap”

Replace Your Smartphone With These Arcane Amulets

It’s hard not to feel the constant pull on our limited attention from the very interesting rectangles in our pockets and packs. [Antoine Pintout] is fighting against it with three interesting pendants.

The three objects each have functions. Sablier, tells time, but rather than giving the numerals it vibrates on a set interval to give a relative sense of the passage. Boussole is a compass like device which doesn’t tell the cardinal directions. Instead it tells you which way to go in order to get to a pre-set location. The last, Sifflet, is a pager, but rather than sending a text it plays a melody reflecting the sender’s mood.

We love the look of the objects. The circuits are beautifully laid out and showcased in well machined brass cases. Small details abound; in Sifflet for example, the coil antenna is symmetrically presented with its own cutout in the board. Laying out a board is hard enough, but taking this much care in component placement easily doubles the time.

All the files and models are available,  though we’re not sure we possess the craftsmanship to reproduce these to the same standard.

atom drawing

What’s An Exciton?

If you read the scientific literature, you see the familiar subatomic particles you learned about in school: protons, neutrons, and electrons. If you are young enough, you see others you probably heard about, too, like quarks and gluons. But recently there has been a lot of buzz about excitons and even some transistor circuits demonstrated that use them. But what is an exciton?

It actually sounds like a subatomic particle, but it is a little more complicated than that. An exciton is a bound state of an electron and an electron hole and is technically a boson. You are probably familiar with the idea of an electron hole from semiconductor physics. Technically, it is a quasiparticle. The reason scientists are interested in the beast is that it can transport energy without transporting net electric charge. That is, the state itself is neutral, but also contains energy. Continue reading “What’s An Exciton?”

Learn Arduino In Time And In Tune For Christmas

If you’re one of the lucky ten thousand today who still haven’t tried programming electronics with the Arduino platform, this detailed guide by [Dafna Mordechai] should hopefully give you enough incentive to pick it up now and make a simple bit of Christmas-themed decoration with it.

The guide isn’t exactly aimed at complete ground-up beginners but it does give some pointers on where to look up whatever information you don’t have in order to follow along. Other than that, it’s very simple and has well-detailed steps, showing you how to turn a breadboard into a simple animated arrangement of LEDs in the shape of a Christmas tree, along with a piezo buzzer playing “Jingle Bells”. If you’ve never done this sort of stuff before, [Dafna] explains in pretty good detail which part of the code does what, making it pretty simple if you want to play around with it and customize it to your taste.

Once you’ve gotten the hang of the basics of Arduino, why not try a project that’s a little more elaborate? Without having to stray too far from your comfort zone, you can easily build a kid’s toy full of switches and lights or even a very extra clock that has no shortage of lights and dials.