Glowscope Reduces Microscope Cost By Orders Of Magnitude

As smartphones become more ubiquitous in society, they are being used in plenty of ways not imaginable even ten or fifteen years ago. Using its sensors to gather LIDAR information, its GPS to get directions, its microphone to instantly translate languages, or even use its WiFi and cellular radios to establish a wireless hotspot are all things which would have taken specialized hardware not more than two decades ago. The latest disruption may be in microscopy, as this build demonstrates a microscope that would otherwise be hundreds of thousands of dollars.

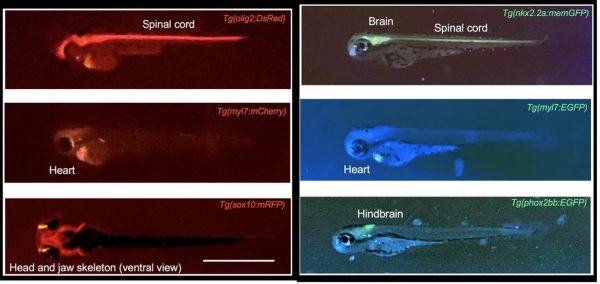
The microscope is a specialized device known as a fluorescence microscope, which uses a light source to excite fluorescent molecules in a sample which can illuminate structures that would otherwise be invisible under a regular microscope. For this build, the light is provided by readily-available LED lighting as well as optical filters typically used in stage lighting, as well as a garden-variety smartphone. With these techniques a microscope can be produced for around $50 USD that has 10 µm resolution.

While these fluorescence microscopes do have some limitations compared to units in the hundred-thousand-dollar range, perhaps unsurprisingly, they are fairly impressive for such a low-cost alternative. More details about these builds can also be found in their research paper published in Nature. Even without the need for fluorescence microscopy, a smartphone has been shown to be a fairly decent optical microscope, provided you have the right hardware to supplement the phone’s camera.

UV Photography Box Is Great For Shooting Fancy Rocks

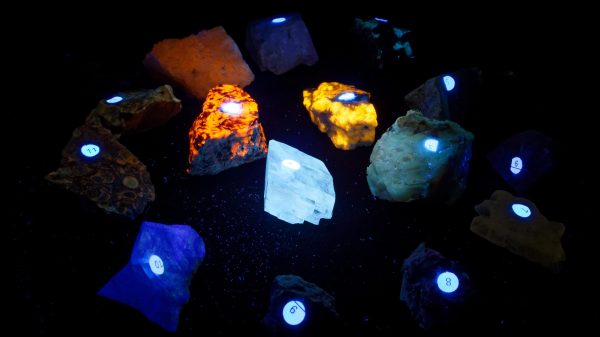
If you want to shoot photographs of various fluorescent UV-related phenomena, it’s hard to do so when ambient light is crowding out your subject. For this work, you’ll want a dedicated UV photography box, and [NotLikeALeafOnTheWind] has a design that might just work for you.

The build is set up for both UVA and UVC photography. Due to the danger posed by the latter, and even the former in some cases, the builder recommends never using the box with a direct-view camera. If it must be done, the eyepiece should be covered to avoid any exposure to harmful light. The key rule? Never look directly into a UV source.

Light sources that can be used include UV LEDs, lamps, and tubes. The box is sealed to keep out external light. It then features a turntable that can be manipulated from outside the box, allowing samples inside to be rotated as necessary. Using a camera with a macro or wide-angled lens is recommended for the work.

The photographs taken inside the box are stunning. They remind us of childhood museum trips, where we marvelled at the magic of the fluorescent rock displays. We’ve featured some other great fluorescence projects before, too. If you’re cooking up your own great scientific builds in the lab, we’d love to see those too. Hit us up on the tipsline!

DVD Optics Power This Scanning Laser Microscope

We’ve all likely seen the amazing images possible with a scanning electron microscope. An SEM can yield remarkably detailed 3D images of the tiniest structures, and they can be invaluable tools for research. But blasting high-energy cathode rays onto metal-coated samples in the vacuum chamber of a bulky and expensive instrument isn’t the only way to make useful images, as this home-brew laser scanning microscope demonstrates.

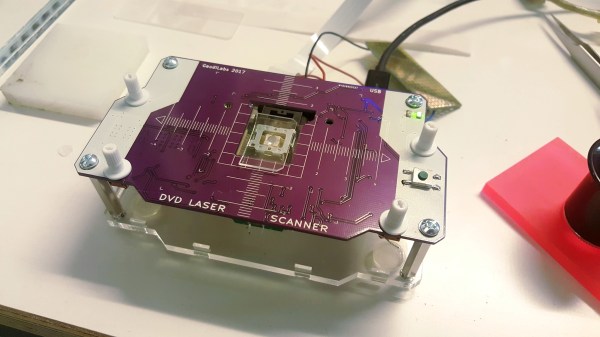
This one comes to us by way of [GaudiLabs], a Swiss outfit devoted to open-source lab equipment that enables citizen science; we saw their pocket-sized thermal cycler for PCR a while back. The basic scheme here is known as confocal laser scanning fluorescence microscopy, where a laser at one wavelength excites fluorescent tags bound to structures in a sample. Light emitted by the tags is collected, and a 3D image is built up from multiple scans of the sample at different focal planes.

Like many DIY projects, this microscope is built from old DVD parts, specifically the pickup heads. The precision optics in these commonly available assemblies, which are good enough to read pits as small as 150 nm on a Blu-Ray DVD, are well-suited for resolving similarly sized microstructures. One DVD pickup is used to scan the laser in the X-axis, while the other head is modified to carry the sample and move it in the Y-axis. The pickup head coils and laser are driven by an Arduino carried on a custom PCB along with the DVD heads. Complete build files are posted on GitHub for anyone interested in recreating this work.

We love tips like this that dig back a bit and find things we missed the first go-around. And the equipment [GaudiLabs] lists really has potential for the budding biohacker, which we also like.

Thanks for the tip on this one, [Bill].