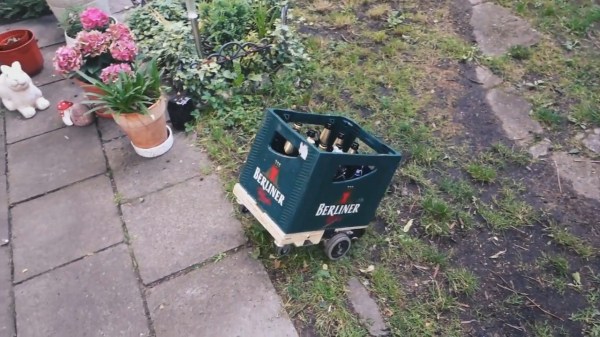
Hardware Store CNC Machine Is Remarkably Precise

A vise, a hacksaw and file, some wrenches – the fanciest tools [HomoFaciens] uses while building his DIY hardware store CNC machine (YouTube link) are a drill press and some taps. And the bill of materials for this surprisingly precise build is similarly modest: the X- and Y-axes ride on cheap bearings that roll on steel tube stock and aluminum angles; drives are threaded rods with homemade encoders and powered by small brushed DC gear motors; and the base plate appears to be a scrap of ping-pong table. The whole thing is controlled by an Arduino and four H-bridges.

The first accuracy tests using a ball point pen for tooling are quite impressive. [HomoFaciens] was able to draw concentric circles eyeball-accurate to within a few tenths of a millimeter, and was able to show good repeatability in returning to a point from both directions on both the X- and Y-axis. After the pen tests, he shows off a couple of other hardware store tooling options for the Z-axis – a Proxxon rotary tool with a burr for engraving glass; a soldering iron for cutting styrofoam; and a mini-router that works well enough to cut some acrylic gears.

We’re impressed by this build, which demonstrates that you don’t need a fancy shop to build a CNC machine. If you’re getting the itch to jump into the shallow end of the CNC pool, check out some of the builds we’ve featured before, like this PVC CNC machine, or this $250 build.

[Thanks, ThunderSqueak]

Class D Amp With An H-Bridge

Class D amps are simple – just take an input, and use that to modulate a square wave with PWM. Send this PWM signal to a MOSFET or something, and you have the simplest class D amp in existence. They’re so simple, you can buy a class D amp chip for $3, but [George] thought that would be too easy. Instead, he built his own with an ATTiny and an H-bridge motor driver. No surprise, it works, but what’s interesting is what effect the code on the ATtiny can have on the quality of the audio coming out of the speaker.

The microcontroller chosen for this project was the ATtiny 461, a part we don’t see much, but still exactly what you’d expect from an ATtiny. The heavy lifting part of this build is an L298 chip found on eBay for a few dollars. This dual H-bridge is usually used for driving motors, but [George] found a home for it in the power section of an amplifier.

The ATtiny is clocked at 16 MHz, making the ADC clock run at 1 MHz. A 10-bit precision conversion takes place, and this value sets the PWM duty cycle. Timer1 in the chip is set up to run at 32 MHz, and by counting this timer up to 1023 gives this amp its PWM cycle speed of 31.25 kHz. That’s right in the neighborhood of what a class D amp should run at, and the code is only about 30 lines. It can’t get simpler than that.

[George] put up a video of this amp in operation, and despite not following the standard design of a Class D amp, it sounds pretty good. You can see that video below.

Continue reading “Class D Amp With An H-Bridge”

A H-Bridge Motor Controller Tutorial Makes It Simple To Understand

hbridge tutorial

[Afroninja] is back with another great tutorial on basic electronics. This time around he’s explaining H-Bridge motor controllers and how they work!

Even if you don’t have much (or any) experience with basic electrical circuits, [Afroninja] explains the concept of an H-Bridge motor controller in a clear, concise and easy way to understand. So what’s an H-Bridge anyway? For any project using DC motors, if you want to be able to spin up the motor in either direction, you’re going to need a method to power the motor in two different configurations, i.e. you’re going to have to swap the polarity some how.

The easiest way of doing this is with an H-Bridge. It’s called an H-Bridge… because it’s shaped like an H, with the motor in the very middle. It allows both polarities to control the motor — however if you do it with just plain old switches or relays, you could short the circuit if you try going in both directions at once! To solve this, [Afroninja] explains how to poka-yoke (Japanese term for Idiot-Proof) the circuit, by using transistors which will sink the voltage if you try to abuse the circuit.

It’s a 5 minute video and well worth the watch — stick around after the break to learn more!

Continue reading “A H-Bridge Motor Controller Tutorial Makes It Simple To Understand”

Hacking A Christmas Tree For Less Blinkyness

Hacking a Christmas Tree to Blink Slower

What good is a fiber optic self-lighting Christmas tree if it flashes so fast it will put you into an epileptic attack? The answer is “Not very good”, if you ask [Mads Nielsen] a.k.a [EcProjects]. So [EcProjects ] started a little project to slow the Christmas tree’s blinkyness down to a more reasonable rate. The task didn’t seem too difficult at first but turned into a quality tutorial building a variable frequency H-bridge motor control.

After opening the base of the tree [EcProjects] found a 12 volt AC geared synchronous motor turning a multi colored translucent plastic disk. A bright spotlight was shining upwards through the turning disk into the ends of hundreds of small fiber optics. This mechanism dumps loads of multi colored light out the ends of the fibers at the tips of the Christmas tree branches as the disk turns.

His goal was to slow down the motor; however, the rotation was based on the 50 Hz mains signal. In order to continue using this motor a lower frequency AC power source was needed. What follows in the video is an excellent lesson on how an AC synchronous motor works plus how to build a variable frequency control and H-bridge using some transistors, resistors and CMOS 4069 inverter chip.

In the end the frequency drive could only be lowered to about 30 Hz before the synchronous motor would stall and reverse using his design. [EcProjects] was bold enough to include several fails which always provides more opportunity for learning and is greatly appreciated.

If you believe you have a better solution please share your idea in the comments. I’m sure the first proposal will include an Arduino and servo modified for continuous rotation, but any solutions would be fascinating including modifications to his design. You can join us after the break to watch the video.

Continue reading “Hacking A Christmas Tree For Less Blinkyness”

Wireless Temperature Control For A Microbrewery

Wireless Temperature Control

When brewing your own beer, temperature control is important. If the temperature isn’t regulated correctly, the yeast will be killed when it’s added to the wort. It’s best to cool the wort from boiling down to about 25 C quickly before adding yeast.

To do this, [Kalle] came up with a wireless temperature controller for his home brewing setup. The device uses a heat exchanger to cool the wort. An ATmega88 connected to a H-bridge controls a valve that regulates flow through the heat exchanger. It reads the current temperature from a LM35 temperature sensor and actuates the valve to bring the wort to a set point.

A neat addition to the build is a wireless radio. The nRF24L01 module provides a wireless link to a computer. There’s an Android application which communicates with the computer, providing monitoring of the temperatures and control over the set point from anywhere [Kalle] can get an internet connection.

Motor Drivers: Half H-bridge With Brake And More

Here’s a nice little circuit that will drive a motor and allow you to stop its rotation, giving your robot a set of brakes. It’s part of [JM’s] post about the in’s and out’s of building microcontroller friendly motor controllers (translated).

This particular setup is a half H-bridge. It allows you to drive the motor in one direction only. The MOSFET used on the ground-side of the motor doesn’t actually need to be there. This is the brake which let you electronically stop the motor from spinning. Without it, the motor will keep turning under its own momentum when the half-bridge is shut off. Depending on the application this can be a big problem. There’s a great demonstration of the circuit braking a fast spinning motor in the video clip below the fold.

It is possible to use this driver with PWM, but [JM] has some warnings about inbuilt functions like FastPWM. Make sure you read his admonition, and if you need a refresher don’t miss this Hackaday video segment.

Continue reading “Motor Drivers: Half H-bridge With Brake And More”

Tinywrench Controls Motors With ATtiny24 Chips

Tinywrench is [Tanjent’s] take on a motor controller board. It aims to replicate all of the functions that a standalone motor controller chip offers at as low a cost as possible. Early results are in. It works, and as seen can be assembled for about $8.

The top of the device offers a terminal block for connecting motors, ground, and 24V input. A pin header on the bottom has all the connections you would expect to find with a stepper motor driver board. Looking back on top there’s also a pair of ATtiny24 chips, each with its own trimpot for balancing the constant current output. Hiding on the underside of the board are two H-bridges built using high and low-side MOSFETs along with some diodes for protection, and various passive components for driving them.

As it stands, each of those H-bridges can handle around 9 amps which should be more than enough for projects with small motors. [Tanjent] mentions that one of the main advantages of working with this instead of a single motor-driver chip is that if you fry one of the MOSFETs you can replace it instead of trashing the entire board.