A H-Bridge Motor Controller Tutorial Makes It Simple To Understand

hbridge tutorial

[Afroninja] is back with another great tutorial on basic electronics. This time around he’s explaining H-Bridge motor controllers and how they work!

Even if you don’t have much (or any) experience with basic electrical circuits, [Afroninja] explains the concept of an H-Bridge motor controller in a clear, concise and easy way to understand. So what’s an H-Bridge anyway? For any project using DC motors, if you want to be able to spin up the motor in either direction, you’re going to need a method to power the motor in two different configurations, i.e. you’re going to have to swap the polarity some how.

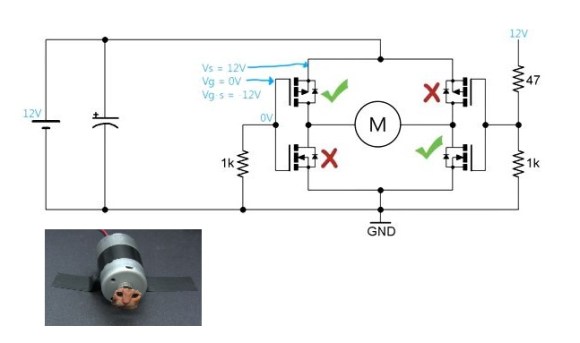
The easiest way of doing this is with an H-Bridge. It’s called an H-Bridge… because it’s shaped like an H, with the motor in the very middle. It allows both polarities to control the motor — however if you do it with just plain old switches or relays, you could short the circuit if you try going in both directions at once! To solve this, [Afroninja] explains how to poka-yoke (Japanese term for Idiot-Proof) the circuit, by using transistors which will sink the voltage if you try to abuse the circuit.

It’s a 5 minute video and well worth the watch — stick around after the break to learn more!

Continue reading “A H-Bridge Motor Controller Tutorial Makes It Simple To Understand”

NES Cartridge Hack Makes Great Novelty Gift

NES cartridge with arduino

Most all of us recall the Blinking Screen of Death on original NES systems. This was caused by a bad connection between the cartridge and the NES cartridge connector. For whatever reason, it became a very popular idea to give a quick blow down the cartridge, even though this didn’t really help. [Dale] decided to play on this annoying problem by making the NES Blow Cart!

Inspired by a previous cartridge hack, [Dale] mounted a custom made circuit sporting the ever popular ATtiny85 in a Super Mario / Duck Hunt cartridge. A small microphone sits where the original cartridge connector was, along with the on/off switch and program header. A quick blow triggers the ATtiny85 to play a song.

The most difficult part for [Dale] was to figure out how to get the ATtiny to play “music”. This was solved with the discovery of a library called Rtttl. This allowed him to take old Nokia Super Mario and Zelda ringtones and get them on the Attiny85. All files, including the rtttl library are available on his github. Be sure to stick around after the break for a video of the project in action.

Continue reading “NES Cartridge Hack Makes Great Novelty Gift”

Interactive LED Beer Pong Table Has More Features Than You Can Shake A Stick At

LED Beer Pong

Holy cow. The amount of detail and functionality that went into this Interactive LED Beer Pong Table is absolutely incredible.

The table features 384 individually controlled RGB LEDs, covered with a 2′ x 8′ Lexan sheet to protect them from spills. Each cup holder (pod) contains an additional 4 RGB LEDs and an IR sensor that can detect whether or not the cup is in place — if it is removed, the IR sensor triggers an animation on either the 32 x 12 LED grid across the middle of the table or the other pods.

The rings of LEDs on the outside edge act as VU meters and pulse to the music in different animation patterns. What is really impressive is that [Jeff] also included a ping pong ball washer — A water reservoir connects under the table between the two LED rings at either end. When you put the ball into one, it gets sucked underneath and pops out the other side clean!

You seriously have to see the video of this thing in action.

Continue reading “Interactive LED Beer Pong Table Has More Features Than You Can Shake A Stick At”

Overengineering A USB Hub

hub

Like many of us, I’m sure, [Nick] doesn’t like digging around behind his computer case for a spare USB port and ended up buying a small USB hub for his desk. The hub worked perfectly, but then [Nick] realized an Ethernet port would be a nice addition. And a DC power supply. Then feature creep set in.

What [Nick] ended up building is a monstrosity of a desk hub with two 24V,  5V, 3.3V 50 Watt DC outputs on banana plugs, a five-port USB hub, four-port Ethernet switch, three mains sockets, 32 digital I/Os, UART, SPI, and I2C ports, a 24×4 LCD or displaying DC current usage and serial input, cooling fans, and a buzzer just or kicks.

The case is constructed out of 6mm laser cut acrylic, and the electronics are admittedly a bit messy. That said, this box does seem very useful and even plays the theme from Mario Brothers, as seen in  the video below.

Continue reading “Overengineering A USB Hub”

Building A Software Defined Radio With A Teensy

[Rich, VE3MKC] has been wanting to get into Software Defined Radio for a while now, but didn’t want to go the usual PC route. He initially thought the Raspberry Pi would be the best platform for a small, embedded device that could manipulate audio, but after discovering the ARM-powered Teensy 3.0, had an entirely different project in mind.

[Rich] is using a SoftRock SDR to take RF from an antenna and downconvert it into the audio range. Doing DSP for SDR is fairly computationally intensive, but he found a Teensy 3.0 with the audio adapter board was more than up to the task.

So far, [Rich] is running the audio from the SoftRock to the Teensy where the audio is digitized and multiplied with a VFO, sent through a filter and then sent to the output of the headphone jack to a speaker. The volume pot on the audio adapter board is used to tune the VFO, something [Rich] be replacing with a proper encoder sometime in the future.

In the videos below, you can see [Rich] listening in on a contest with a tiny TFT display showing everybody on the air. It’s a very cool build, and even though it’s still very early in development, there’s still a whole lot of CPU cycles for the Teensy to do some very cool stuff.

Continue reading “Building A Software Defined Radio With A Teensy”

A Tutorial On Using Linux For Real-Time Tasks

[Andreas] has created this tutorial on real-time (RT) tasks in Linux. At first blush that sounds like a rather dry topic, but [Andreas] makes things interesting by giving us some real-world demos using a Raspberry Pi and a stepper motor. Driving a stepper motor requires relatively accurate timing. Attempting to use a desktop operating system for a task like this is generally ill-advised. Accurate timing is best left to a separate microcontroller. This is why we often see the Raspi paired with an Arduino here on Hackaday. The rationale behind this is not often explained.

[Andreas] connects a common low-cost 28BYJ-48 geared stepper motor with a ULN2003 driver board to a Raspberry Pi’s GPIO pins. These motors originally saw use moving the louvers of air conditioners. In general, they get the job done, but aren’t exactly high quality. [Andreas] uses a simple program to pulse the pins in the correct order to spin the motor. Using an oscilloscope, a split screen display, and a camera on the stepper motor, [Andreas] walks us through several common timing hazards, and how to avoid them.

The most telling hazard is shown last. While running his stepper program, [Andreas] runs a second program which allocates lots of memory. Eventually, Linux swaps out the stepper program’s memory, causing the stepper motor to stop spinning for a couple of seconds. All is not lost though, as the swapping can be prevented with an mlockall() call.

The take away from this is that Linux is not a hard real-time operating system. With a few tricks and extensions, it can do some soft real-time tasks. The best solution is to either use an operating system designed for real-time operation, or offload real-time operations to a separate controller.

Continue reading “A Tutorial On Using Linux For Real-Time Tasks”

3D Printed Hydrofoil Boat RC Flies

hydrofoil boat

[Wersy] has been trying out different designs for 3D printed RC boats — his latest is a hydrofoil!

He’s using a high power RC plane out-runner motor, which he found is simply… too powerful. It would cause his first boat to flip and sink if he opened the throttle up too much! To counter this — and make full use of his motor — he’s made new two boats; a hydrofoil, and a dual-hulled  air(?) boat.

He based the hydrofoil’s profile off of NACA 63-412, a typical profile for sailboat hydro foils like the Moth. What he found was it’s still extremely difficult to get the right balance between the pitch of the wings, and the throttle output to hit a steady condition for driving smoothly. It works, but it will still needs a few more iterations!

His other solution, a quasi-jet engine-dual-hulled-boat is pretty fun too — he’s 3D printed a large impeller for his motor, and strapped it in between two of his boats! It’s quite a bit more stable to drive, and looks pretty unique!

Stick around after the break to see both of them in action.

Continue reading “3D Printed Hydrofoil Boat RC Flies”