A drone is shown hovering in the sky, with two bright lights shining from its underside.

2025 Component Abuse Challenge: Overdriven LEDs Outshine The Sun

Tagging wildlife is never straightforward in the best of times, but it becomes a great deal more complicated when you’re trying to track flying insects. Instead of trying to use a sensor package, [DeepSOIC] attached tiny, light retroreflectors to bees and hornets, then used a pulsed infrared light mounted on a drone to illuminate them. Two infrared cameras on the drone track the bright dot that indicates the insect, letting the drone follow it. To get a spot bright enough to track in full sunlight, though, [DeepSOIC] had to drive some infrared LEDs well above their rated tolerances.

The LEDs manage to survive because they only fire in 15-µs pulses at 100 Hz, in synchrony with the frame rate of the cameras, rather like some welding cameras. The driver circuit is very simple, just a MOSFET switch driven by an external pulse source, a capacitor to steady the supply voltage, and a current-limiting resistor doing so little limiting that it could probably be removed. LEDs can indeed survive high-current pulses, so this might not really seem like component abuse, but the 5-6 amps used here are well beyond the rated pulse current of 3 amps for the original SFH4715AS LEDs. After proving the concept, [DeepSOIC] switched to 940 nm LEDs, which provide more contrast because the atmosphere absorbs more sunlight around this wavelength. These new LEDs were rated for 5A, so they weren’t being driven so far out of spec, but in tests they did survive current up to 10A.

We’ve seen a similar principle used to drive laser diodes in very high-power pulses a few times before. For an opposite approach to putting every last bit of current through an LED, check out this low-power safety light.

Continue reading “2025 Component Abuse Challenge: Overdriven LEDs Outshine The Sun”

Hosting Your Own PixMob Party Made Easy

Over the last few years, it’s been increasingly common for concertgoers to be handed a light-up bracelet from PixMob that synchronizes with the others in the crowd to turn the entire audience into a music visualizer. They’re a clever way of enhancing the concert experience, but unfortunately, they don’t do anything once you leave the show. Or at least, that used to be the case.

We’ve seen efforts to reverse engineer the IR (and occasionally radio) signals that drive these PixMob devices, but since we checked in last it seems like things have gotten a lot easier for the home gamer. [David Pride] has recently posted a brief write-up that shows how quickly and easily it is to get these devices fired up using nothing more exotic than an Arduino, an IR LED, and an audio sensor module.

With the audio sensor module connected to the Arduino’s digital input and the IR LED wired to digital out, all you need to do is flash firmware to the board and start playing some beats. The source code [David] has provided is a a remixed version of what’s previously been published by [Carlos Ganoza], which, in this case, has been tweaked to make the lighting patterns less random.

Presumably, this is to make the devices behave more like they do during an actual concert, but since nobody at Hackaday is cool enough to have seen a live musical performance in the last decade, we’re not really sure. All we can say is that the effect looks pretty sweet in the demo video.

Back in 2019, we saw a teardown of an early PixMob device, and by 2022, the efforts to reverse engineer their IR control protocol were well underway. We’re glad to see things have progressed to the point that you can piece together a transmitter from what’s in the parts bin, as it means at least some of these devices will have a lifespan longer than a single concert.

Machining A Reciprocating Solenoid Engine

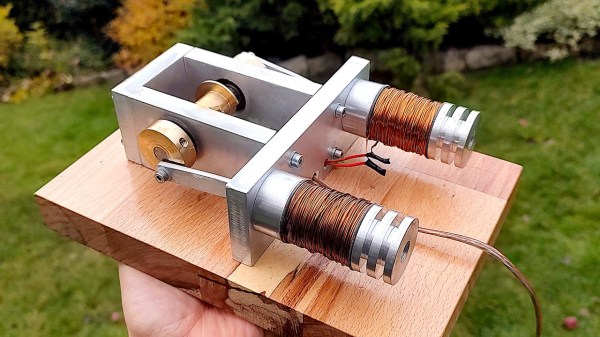
The reciprocating engine has been all the rage for at least three centuries. The first widely adopted engine of this type was the steam engine with a piston translating linear motion into rotational motion, but the much more common version today is found in the internal combustion engine. Heat engines aren’t the only ways of performing this translation, though. While there are few practical reasons for building them, solenoid engines can still do this job as well and, like this design from [Maciej Nowak Projects], are worth building just for the aesthetics alone.

The solenoid engine is built almost completely from metal stock shaped in a machine shop, including the solenoids themselves. The build starts by making them out of aluminum rod and then winding them with the help of a drill. The next step is making the frame to hold the solenoids and the bearings for the crankshaft. To handle engine timing a custom brass shutter mechanism was made to allow a set of infrared emitter/detector pairs to send signals that control each of the solenoids. With this in place on the crankshaft and the connecting rods attached the engine is ready to run.

Even though this solenoid engine is more of a project made for its own sake, solenoid engines are quite capable of doing useful work like this engine fitted into a small car. We’ve seen some other impressive solenoid engine builds as well like this V8 from [Emiel] that was the final iteration of a series of builds from him that progressively added more solenoid pistons to an original design.

Continue reading “Machining A Reciprocating Solenoid Engine”