Hosting Your Own PixMob Party Made Easy

Over the last few years, it’s been increasingly common for concertgoers to be handed a light-up bracelet from PixMob that synchronizes with the others in the crowd to turn the entire audience into a music visualizer. They’re a clever way of enhancing the concert experience, but unfortunately, they don’t do anything once you leave the show. Or at least, that used to be the case.

We’ve seen efforts to reverse engineer the IR (and occasionally radio) signals that drive these PixMob devices, but since we checked in last it seems like things have gotten a lot easier for the home gamer. [David Pride] has recently posted a brief write-up that shows how quickly and easily it is to get these devices fired up using nothing more exotic than an Arduino, an IR LED, and an audio sensor module.
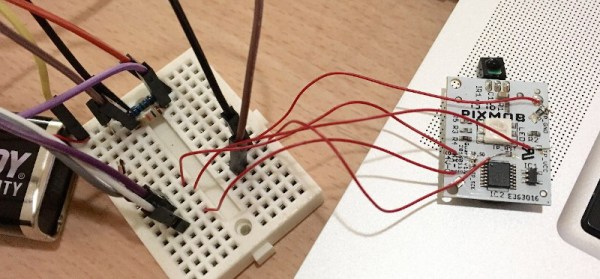
With the audio sensor module connected to the Arduino’s digital input and the IR LED wired to digital out, all you need to do is flash firmware to the board and start playing some beats. The source code [David] has provided is a a remixed version of what’s previously been published by [Carlos Ganoza], which, in this case, has been tweaked to make the lighting patterns less random.

Presumably, this is to make the devices behave more like they do during an actual concert, but since nobody at Hackaday is cool enough to have seen a live musical performance in the last decade, we’re not really sure. All we can say is that the effect looks pretty sweet in the demo video.

Back in 2019, we saw a teardown of an early PixMob device, and by 2022, the efforts to reverse engineer their IR control protocol were well underway. We’re glad to see things have progressed to the point that you can piece together a transmitter from what’s in the parts bin, as it means at least some of these devices will have a lifespan longer than a single concert.

Exploring The Tech Behind Concert LED Wristbands

LED wristbands are now a common feature of large arena concerts and events, with a variety of capabilities and technical implementations. In the video after the break, Wall Street Journal does a fascinating deep dive into these wearable light shows.

The three main control technologies are IR light, RF radios, and Bluetooth. The IR-controlled ones are the simplest, and we’ve covered a teardown, a reverse engineering effort and reflash of the Pixmob IR armbands.

Finally, we get a good behind-the-scenes look at how they are controlled. Using pan-tilt IR emitters mounted on lighting towers, the operators can sweep across the audience controlling color and light levels or activating pre-programmed sequences.

The full control setup for RF wristbands, with transmitter on the left.

RF armbands have the simplest control setup, only requiring a single portable transmitter connected to a computer running the control software. It does however require some pre-planning for more complex light displays, to ensure each section of the audience is individually addressable.

The most advanced and expensive versions are handheld light sticks controlled via Bluetooth from an app on the users smartphone, and are popular at K-Pop concerts. Each device is linked to the users seat number, making them individually addressable and allowing the lighting operators to produce complex patterns, and even text, in the crowd.

While each of these devices is simple and underwhelming on its own, tens of thousands working together produce impressive effects and probably hide some hard-earned engineering experience.

Continue reading “Exploring The Tech Behind Concert LED Wristbands”

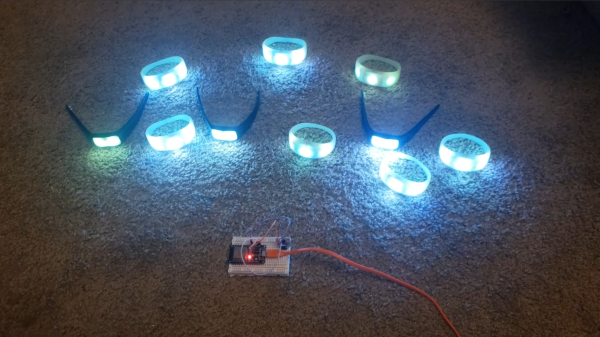
A family of PixMob bracelets being coltrolled by an ESP32 with an IR transmitter attached to it. All the bracelets are shining a blue-ish color

PixMob Wristband Protocol Reverse-Engineering Groundwork

The idea behind the PixMob wristband is simple — at a concert, organizers hand these out to the concertgoers, and during the show, infrared projectors are used to transmit commands so they all light up in sync. Sometimes, attendees would be allowed to take these bracelets home after the event, and a few hackers have taken a shot at reusing them.

The protocol is proprietary, however, and we haven’t yet seen anyone reuse these wristbands without tearing them apart or reflashing the microcontroller. [Dani Weidman] tells us, how with [Zach Resmer], they have laid the groundwork for reverse-engineering the protocol of these wristbands.

Our pair of hackers started by obtaining a number of recordings from a helpful stranger online, and went onto replaying these IR recordings to their wristbands. Most of them caused no reaction – presumably, being configuration packets, but three of them caused the wristbands to flash in different colors. They translated these recordings into binary packets, and Dani went through different possible combinations, tweaking bits here and there, transmitting the packets and seeing which ones got accepted as valid. In the end, they had about 100 valid packets, and even figured out some protocol peculiarities like color animation bytes and motion sensitivity mode enable packets.

The GitHub repository provides some decent documentation and even a video, example code you can run on an Arduino with an IR transmitter, and even some packets you can send out with a  Flipper Zero. If you’re interested in learning more about the internals of this device, check out the teardown we featured back in 2019.

PixMob LED Wristband Teardown (Plus IR Emitters And How To Spot Them)

PixMob units are wearable LED devices intended for crowds of attendees at events like concerts. These devices allow synchronized LED effects throughout the crowd. [yeokm1] did a teardown of one obtained from a preview for the 2019 Singapore National Day Parade (NDP), and in the process learned about the devices and their infrastructure.

Suspected IR emitter for the PixMob units, mounted on a lighting tower (marked here in white).

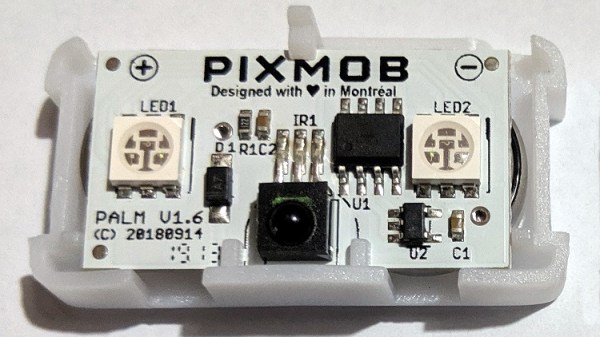
PixMob hardware has been known to change over time. This version has two RGB LEDs (an earlier version had only one), an unmarked EEPROM, an unmarked microcontroller (suspected to be the Abov MC81F4104), and an IR receiver module. Two CR1632 coin cells in series power the device. [yeokm1] has made the schematic and other source files available on the teardown’s GitHub repository for anyone interested in a closer look.

One interesting thing that [yeokm1] discovered during the event was the apparent source of the infrared emitter controlling the devices. Knowing what to look for and reasoning that such an emitter would be mounted with a good view of the crowd, [yeokm1] suspected that the IR transmitter was mounted on a lighting tower. Viewing the tower through a smartphone’s camera revealed a purplish glow not visible to the naked eye, which is exactly the way one would expect an IR emitter to look.

Sadly, there wasn’t any opportunity to record or otherwise analyze the IR signals for later analysis but it’s possible that the IR protocol might be made public at some point. After all, running custom code on an earlier PixMob board was made possible in part by asking the right people for help.

Hacking Pixmob Bands And Finding A Toolchain

The Pixmob band is an LED wrist strap, of the type often used at big concerts or other public events. Many have tinkered with the device, but as of yet, nobody was running custom code. It wouldn’t be easy, but [JinGen Lim] got down to work.

The wristbands are given out to concertgoers to create synchronized light shows in the crowd.

A teardown of a 2016 device revealed it consisted of an RGB LED, an IR sensor, a small EEPROM and a coin cell, which were all common parts. Unfortunately, the ABOV MC81F4204 microcontroller was a little more obscure. It’s a part that’s quite hard to find, and uses a proprietary programmer and an ancient IDE.

Searches online proved fruitless, and a working programmer remained outside [JinGen]’s grasp. Undeterred, he decided to simply walk into the company’s Korean headquarters and ask for help. As the part was end-of-life, they were unable to supply a programming device, but happily provided documentation for the chip that wasn’t publicly available. With this in hand, it was possible for [JinGen] to build his own programmer instead.

Booting up a copy of the ABOV IDE, with his newly-built programmer in hand, it was relatively easy to get the chip running custom code. Going the extra mile, [JinGen] even hacked the Arduino IDE to be partially compatible with the platform! A silicon error in the MC81F4204 design bricks the chips after only a few flash rewrites, so its never going to be the most useful platform, but it works nonetheless.

The Pixmob hardware has continued to evolve, and it’s unlikely modern units still use the same chip. Despite this, it’s a great example of what can be achieved by a little sleuthing and asking the right people the right questions. Others have attempted to hack similar products before, found at Disneyland and Coldplay concerts. You won’t catch this author at either, but if you’ve hacked something similar, be sure to reach out on the tip line!