The Internet Of Reflow Ovens

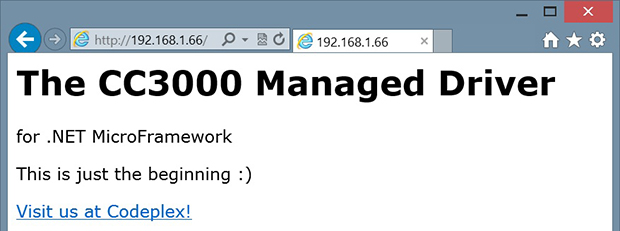
Using a toaster oven to reflow solder isn’t a new idea. But [Sukasa] wanted something that had more features and improved appearace. So he married a Netduino, a toaster oven, and some solid state relays to made a clean-looking reflow oven. His goal was to have nothing look like an overt modification to a casual observer. Inside, however, the oven now has a network connection for system status via a Web browser or JSON.

The new brains of the oven are a Netduino Plus 2 and an I2C port expander that connects to a few extra I/O devices. The challenging I/O, though, is the heaters. When cold, the oven can draw over 16 amps, so a pair of 12A solid state relays in parallel handle that load. There are also two fans: one to keep the electronics cool and another on software control. An IGBT allows the controller to pulse width modulate the fan’s output. A pair of MAX31855s read the thermocouples that report the temperature.

lcd
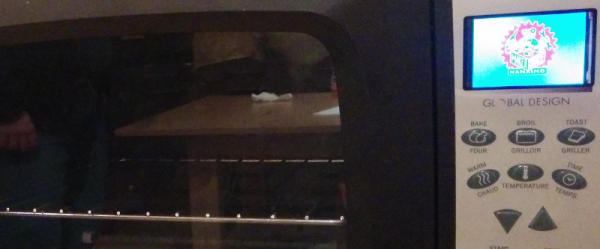
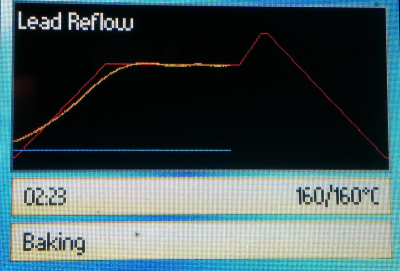
The controller was a mashup of the existing oven’s keypad and an add-on LCD display (see right). One thing we didn’t see was a schematic. Of course, you can read the code and figure out how it is all connected and (unless you use the exact same oven) you are probably going to need to modify things to suit your particular setup, anyway.

We’ve seen other good looking reflow oven and controller builds in the past, including one with a touchscreen. It is also worth noting that you can find reflow ovens at relatively low prices now if you don’t feel like rolling your own.

3D Printed Netduino Remote Controlled Car

netduinocar

[Matt] lives in South Africa, where homes have smallish crawlspaces (some only 30cm high!) that he can’t quite squeeze himself into. Even if he could, he probably wouldn’t: they’re apparently vacation homes for the local rats. He did, however, want to explore these spaces to get a better idea what’s going on inside, so he built a Windows Phone-controlled car with a Netduino and 3D-printed parts.

Such a specialized application requires unique parts, so [Matt] designed and 3D-printed the wheels and frame from scratch. You’ve probably noticed that the wheels aren’t your typical cylinders. The terrain [Matt] faces is sand, so the spiked shape provides better grip. The body’s design required extra attention because it holds the motors, the Netduino, the motor driver, and the battery.

A Bluetooth module connects to the Netduino and allows [Matt] to drive the car with his Windows Phone, and an inexpensive 5V LED board provides some light for those dark corners. How does it see once inside the crawlspace? It looks like [Matt’s] getting to that part. His plan is to simply mount a second phone running Skype and watch the stream. Stick around after the break to see [Matt] use the car to both confuse and excite his dog.

Continue reading “3D Printed Netduino Remote Controlled Car”

CC3000 WiFi Driver For .NET Micros

CC3000

The Netduino and other .NET Micro boards don’t seem to get much love, but that doesn’t mean they’re not able to use one of the coolest chips we’ve seen in a while. [Valkyrie] has written a driver for TI’s new CC3000 all-in-one WiFi chip, giving any .NET micro device a very small and very cheap WiFi connection.

A while back, [Chris Magagna] created a TI CC3000 library for the Arduino. [Valkyrie] fell out of his chair when he saw that post, as it meant the .NET Micro devices such as the Netduino could finally use this device. With a TI Launchpad and a logic analyzer, [Valkyrie] recorded all the SPI commands and responses eventually reconstructing the entire library.

As for how useful this is without any hardware, There’s already a CC3000 Gadgeteer module available from GHI Electronics.

Smartphone Controlled Labyrinth

smartphone-controlled-labyrinth

This entire project could have been done as an app, drawing the maze and ball virtually on the screen. But that wouldn’t have been nearly as fun as what [Matt] accomplished. He built a little Labyrinth which responds to the accelerometer in his phone.

Take a close look at that handset. It’s not an Android, an iPhone, or a Blackberry. That thing is a Windows phone…. no, really! The phone doubles as a timer, which we think is a nice touch. It communicates with a Netduino which is both driving and monitoring the Labyrinth.

You may have noticed that the maze is hand-built rather than a modified commercial version of the toy. He mounted some hardboard on a pair of servo motors, then built up the maze on that surface. There is also sensing hardware that detects when the metal ball bridges two contacts. This gives us fond memories of our Minotaur’s Revenge build.

We’ve embedded the demo video after the break.

Continue reading “Smartphone Controlled Labyrinth”

Netduino Gets A Huge Upgrade

The Netduino, a dev board built around the .NET Micro framework with the goal of being compatible with Arduino shields just got a huge upgrade.

The new Netduino Plus 2 features an upgraded STM32 ARM Cortex-M4 uC running at 168 MHz, improving on the original Netduino’s ARM7 running at 47 MHz. In addition to some more processing power, the STM32-based microcontroller has twice the RAM and six times as much Flash memory. Also, Ethernet (10Mbps), a MicroSD card port, and of course compatibility with all Arduino shields – including the new Arduino ‘Revision C’ boards for the Leonardo – remains intact.

In keeping with the design goals of the Netduino, the new board uses the .NET Micro Framework running under Windows. It looks like OS X and Linux users won’t be left out in the cold for long, though; there’s a project to port the .NET Micro stuff over to Mono.

Tip ‘o the hat to [Jason] for sending this one in.

Measuring Projectiles With OpenChronometer

[Spork] over on the Netduino forums wanted to push the limits of what his little board could do. He put together a chronometer to measure the velocity of rifle rounds and Nerf darts using an Arduino-compatable CPLD shield.

The project is built around a pair of commercial CED M2 chronograph sensors; because people have the tendency to shoot through these sensors, they’re available as replacement units for much less than the cost of a complete chronograph setup. [Spork] couldn’t figure out a way for his Arduino clone to read pins with a resolution of 1 microsecond, so a Amani GTX CLPD shield was added to the build. This programmable logic chip takes the output from a chronometer sensor, starts a timer, waits for the second sensor to trigger, and stops the timer. From that, the velocity of just about any projectile can be calculated.

Of course, [Spork] needed to test his new device, so he took it out to the range and fired 25 rifle rounds through his chronometer. The result was a very nice, normal distribution centered around 2400 feet per second, exactly as would be expected. Although [Spork] didn’t test out low-velocity projectiles such as Nerf darts, we expect the same reliable results.

via majolsurf

Sixty4Racer An 8×8 Game

[Pete] has a cool new tutorial creating a re-imagining of the Atari classic “River Raid” for the PIX-6T4 micro controller based game system. The PIX is a netduino on a larger board featuring 2 analog controllers, a speaker, an sd card and an 8×8 monochrome LED display. With a resolution that low, it may make the good ole VCS look like a 360, but there is still a lot to learn about making a game at this low of a level.

The tutorial [Pete] has put together covers concept, gameplay, progression goals, screen handling and a boat load of code to show how it all goes together. Though this is for a C# based system many of the basics apply to just about any system you can imagine. So if you’re looking to learn how to handle graphics in C, sprite animation, collision, or randomly putting levels together out of tile blocks then you should take a look.

Join us after the break for a quick video.

Continue reading “Sixty4Racer An 8×8 Game”