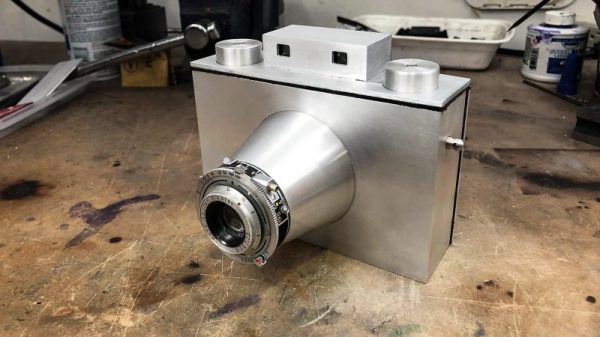
Caption CERN Contest – I’ve Got My Eye On You

As week 20 of the Caption CERN Contest comes to a close, we can say that this scientist may have been a bit sleepy from all his hard work, but all our caption writers certainly were not! Thank’s to everyone who stayed up late and entered.

Whiteboards and their associated dry erase markers have become a staple in every office, school, and home. It’s getting hard to remember that everyone used blackboards not so long ago. High energy physics,and flammable dust probably are not a good mix. Let’s hope our sleeping scientist cleaned the erasers outdoors after he woke up.

The Funnies:

  • “A weekend at CERNies”- [Rob]
  • “After bitten by the Schrödinger’s cat, Doc Brown acquired the most useful power of a cat – being able to sleep anywhere, any time.” – [K.C. Lee]
  • “CERN’s infamous “wind tunnel” experiments” – [Rollyn01]

This week’s winner is [MechaTweak] with “During the great blackboard shortage of ’66, scientists went to great lengths to protect their unfinished work from premature erasure”. [MechaTweak] describes himself as a “Mild mannered design engineer by day, father of four crazy kids by night.” With all those kids running around, he’s going to enjoy having a Stickvise from The Hackaday Store. You can bet he’ll be using the Stickvise to solder up some boards for Shower water saver, his entry in the 2015 Hackaday Prize.

Week 21

cern-21-smThese two CERN scientists are looking through some kind of optical apparatus. There is a plano-convex lens mounted on an adjustable arm. The scientists appear to be looking through a window while adjusting some controls.

Is this some kind of physics experiment? Could it be research into psychomotor acuity? Maybe the dark-haired scientist is just getting her yearly CERN eye exam? You tell us!

This week’s prize is the ever poular Teensy 3.1 from The Hackaday Store.  Add your humorous caption as a comment to this project log. Make sure you’re commenting on the contest log, not on the contest itself.

As always, if you actually have information about the image or the people in it, let CERN know on theoriginal image discussion page.

Good Luck!

Retrotechtacular: Firepower For Freedom

As the United States were settled, its leaders found that they needed firepower to preserve freedom. This became especially apparent during the military engagements of the era, so a number of specialized facilities were founded to manage the research, development, manufacture, and dissemination of different types of munitions.

Picatinny Arsenal in New Jersey was the place for both nuclear and conventional weapon development. The men and women working in this facility created anti-personnel devices, including a flexible, adhesive charge called Flex-X that could be affixed to almost anything. This demolition charge could be layered for increased power, and could even detonate underwater. Picatinny also developed new rocket engines, propellants, and liquid propulsion for projectiles.

In Pennsylvania, a small-arms ammunition plant called Frankford Arsenal developed a duplex rifle cartridge. That is, a lead projectile fires on target, and a second one sitting behind it in the cartridge shoots at an angle, landing an inch or so near the lead bullet. Frankford workers also ground precision optics for target sighting and centering, and developed a case-less cartridge. Propellants geared for a wide variety of uses also came out of Frankford. These propellants were employed to deliver nerve agent antidotes, inflate life rafts quickly, and eject pilots from sketchy situations.

The Edgewood Arsenal in Baltimore specializes in the research and development, manufacture, and supply of chemical weapons. They are particularly adept at fire suppression. Edgewood research has provided civilian benefits as well, such as an anthrax vaccine. In addition, Fort Detrick, Maryland contains a biological R&D wing where vital antidotes and vaccines are developed.

All of this R&D and manufacture was orchestrated by the Ammunition Procurement and Supply Agency (APSA) located near Joliet, IL. In addition to reviewing all contractor bids with equal consideration, APSA controlled distribution, maintaining inventory on large computers that could crunch numbers like nobody’s business.

Continue reading “Retrotechtacular: Firepower For Freedom”

A DIY Fourier Transform Spectrometer

Typical spectrometers use prisms or diffraction gratings to spread light over a viewing window or digital sensor as a function of frequency. While both prisms and gratings work very well, there are a couple of downsides to each. Diffraction gratings produce good results for a wide range of wavelengths, but a very small diffraction grating is needed to get high-resolution data. Smaller gratings let much less light through, which limits the size of the grating. Prisms have their own set of issues, such as a limited wavelength range. To get around these issues, [iliasam] built a Fourier transform spectrometer (translated), which operates on the principle of interference to capture high-resolution spectral data.

[iliasam]’s design is built with an assortment of parts including a camera lens, several mirrors, a micrometer, laser diode, and a bunch of mechanical odds and ends. The core of the design is a Michelson interferometer which splits and recombines the beam, forming an interference pattern. One mirror of the interferometer is movable, while the other is fixed. [iliasam]’s design uses a reference laser and photodiode as a baseline for his measurement, which also allows him to measure the position of the moving mirror. He has a second photodiode which measures the interference pattern of the actual sample that’s being tested.

Despite its name, the Fourier transform spectrometer doesn’t directly put out a FFT. Instead, the signal from both the reference and measurement photodiodes is passed into the sound card of a computer. [iliasam] wrote some software that processes the sampled data and, after quite a bit of math, spits out the spectrum. The software isn’t as simple as you might think – it has to measure the reference signal and calculate the velocity of the mirror’s oscillations, count the number of oscillations, frequency-correct the signal, and much more. After doing all this, his software calculates an interferogram, performs an inverse Fourier transform, and the spectrum is finally revealed. Check out [iliasam]’s writeup for all the theory and details behind his design.

Lumographic Images Created With Lens Only

Lumographic images are those patterns you see at the bottom of swimming pools. When water works as a lens, the light patterns of bright and dark are random and wandering based on the waves above. [Matthew] figured out a way to create fixed images from lens shape alone. The images only morph into view clearly when light shines at the proper angle. At near angles an eerie fun-house mirror effect appears, but too far off and it scatters unrecognisably.

The exact method for designing the optics is not explained, though we are sure someone in our readership could figure it out. The artist claims it to be a hundred year old million-variable math problem. The lenses are often quite thick and do not resemble much of anything. The effect however, is sharp, clear and detailed.

At first he suspected he needed astronomically-expensive military-grade 50 nanometer (0.000002″) precision machining for the lenses, but some friends in the autobody industry gave him a few tips to squeeze good enough accuracy from more affordable industrial machines. The technique also allows for images to appear from mirrors and internal reflections. It is probably not something you can 3D print or machine yourself, but it would be interesting to see someone try.

[Matthew]’s work is on display in the “Composite” gallery at the National Museum of Math in New York (MoMath). See the video after the break for a peak at the machinery he uses to manipulate the lenses to enhance the visuals in the exhibit.

Continue reading “Lumographic Images Created With Lens Only”

DIY Optic Lens

One Small Step For Magnification, One Giant Leap For Home Lens Manufacturing

There are some types of projects that we see quite often here on Hackaday; 3D Printers, Development Boards and Video Game Hardware to name a few. Once in a while we see an optics-based project but those use pre-made lenses. [Peter] felt it was time to give home lens manufacturing a shot and sent in a tip about his experience.

The typical lens manufacturing process starts off by taking a piece of glass and manipulating it into a rough lens shape, either by removing material or heating the glass and forming it in a mold. These lens blanks are then lapped using progressively finer grits of abrasives until the final lens shape and surface finish are achieved. The tool used to lap the lens is very specialized and specific to one lens contour shape. This lapping process can be very time consuming (and therefore expensive) depending on the quality and size of the lens being made.

Continue reading “One Small Step For Magnification, One Giant Leap For Home Lens Manufacturing”

InfinitEye HMD Brings 210 Degree FOV To The Party

Head mounted displays are coming in hot and heavy this year. InfinitEye doesn’t have an official web page yet, so we’re linking to a review done by TheRoadToVR. Note that this is the second version of the display. InfinitEye released plans for their V1 HMD back in February. The InfinitEye prototype looks strikingly like the early Oculus Rift prototypes. Gaffers tape and what appears to be the frame from a face shield hold together the optical system. It’s this optical system which is interesting. InfinitEye has decided to go with head mounted LCD screens, similar to the rift, and unlike castAR’s projection system.

The InfinitEye team decided to go with two screens, giving them a whopping 1280×800 resolution per eye. The optics are also simple – fresnel lenses. This is all similar to the first version of the goggles, however the InfinitEye team claims that this new edition provides a 210 degree field of view. What we don’t know is exactly what they changed. We’re curious if the wider field of view will reduce the Sim Sickness some of us have felt with the rift – though to be fair, almost any head mounted display requires some time to adjust. What we are sure of is that the future is bright for virtual (and augmented) reality.

Continue reading “InfinitEye HMD Brings 210 Degree FOV To The Party”

Building An Oak Telescope

You might not think about the finish of your homemade telescope but if it’s build from solid oak you probably should. [Gregory Strike] built this 8″ telescope a few years back but just posted about it a few days ago. The optics are quite expensive but the rest of the build was done dirt cheap and he did a great job of it.That includes taking care to finish the oak boards that make up the octagonal body of the instrument.

This is much more approachable for the average hacker than something like the 22″ binocular build (or going way too far and building your own observatory). [Gregory] developed his design after looking at a couple of others. If you need a bit of a push to get started check out the telescope resource we ran across in our days of Internet infancy.