Independent Wheel Drive R/C Car

4wdRcCar

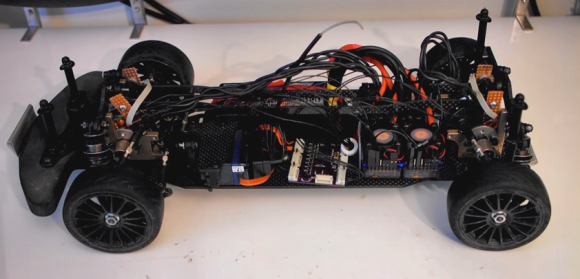
The picture above looks like a standard four-wheel drive (4WD) touring car. As one looks closer, a few strange things start to pop out. Where’s the motor? 4 electronic speed controls? What’s going on here? [HammerFET] has created this independent drive R/C car (YouTube link) as a research platform for his control system. The car started off life as a standard Schumacher Mi5 1/10th scale Touring Car. [HammerFET] removed the entire drive system. The motor, differentials, belt drive, and ESC all made for quite a pile of discarded hardware.

He replaced the drive system with 4 Turnigy brushless outrunner motors, installed at the chassis center line. To fit everything together, he had to 3D print new drive cups from stainless steel. The Mi5’s CVD drive shafts had to be cut down, and new carbon fiber suspension towers had to be designed and cut.

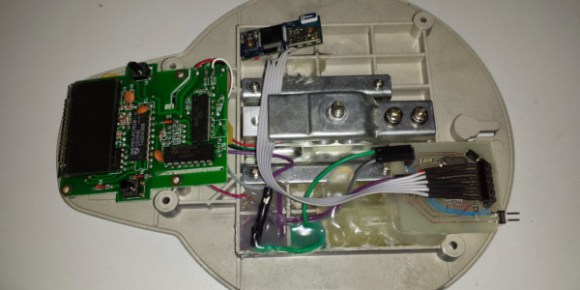
The real magic lies in [HammerFET’s] custom control board. He’s using an STM32F4 ARM processor and an InvenSense  MPU-6050 IMU which drone pilots have come to know and love. Hall effect sensors mounted above each motor keep track of the wheel speed, much like an ABS ring on a full-scale car.

[HammerFET’s] software is created with MATLAB and SimuLink. He uses SimuLink’s embedded coder plugin to export his model to C, which runs directly on his board. Expensive software packages for sure, but they do make testing control algorithms much simpler. [HammerFET’s] code is available on Github.

Since everything is controlled by software, changing the car’s drive system is as simple as tweaking a few values in the code. Front and rear power offset is easily changed. Going from a locked spool to an open differential is as simple as changing a value from 0 to 1. Pushing the differential value past 1 literally overdrives the differential. In a turn, the outer wheel will be driven faster than it would be on a mechanical differential, while the inner wheel is slowed down. Fans of drifting will love this setting!

[HammerFET] is still working on his software, he hopes to implement electronic torque vectoring. Interested? Check out the conversation over on his Reddit thread.


Continue reading “Independent Wheel Drive R/C Car”

Google Cardboard VR

Google Cardboard VR Kit For Under $15

Craving some virtual reality goodness? Unsure of Oculus after Facebook purchased them? Well — why not make your own then!

At last weeks Google I/O conference, those lucky enough to attend received the Google Cardboard VR kit. It’s basically just a piece of cardboard, two lenses, a few magnets, an NFC tag and some velcro — but when you slide your phone into it and download the Cardboard app — you have virtual reality, on your phone.

This inspired [Wolfgang] to make his own variation of this, except instead of a phone, it fits a tablet much nicer. It really is just a cardboard box with the lenses glued in place — but it works! Of course you could 3D print a nice housing — but if you’re super excited to try out some VR apps — cardboard will do the trick as well!

Besides the Cardboard app there’s a few more Android VR applications worth a look — Tuscany Dive (explore Tuscany from the comfort of your chair), ViewR (a voice controlled experience), and Dive Volcano VR Demo (explore a volcano!).

Only trick is finding those pesky lenses…

Embedding Wireless Charging Into Your Laptop

Wireless charger in chromebook

Looking for a project to do [Jason Clark] thought it might be fun to integrate a spare wireless Qi charger into his HP Chromebook 14.

He started by cracking open the Qi charger — it’s held together by adhesive and four phillips screws hiding under the feet pads — all in all, not that difficult to do. Once the plastic is off, the circuit and coil are actually quite small making it an ideal choice for hacking into various things. We’ve seen them stuffed into Nook’s, a heart, salvaged for a phone hack…

Anyway, the next step was opening up the Chromebook. The Qi charger requires 5V at 2A to work, which luckily, is the USB 3.0 spec — of which he has two ports in the Chromebook. He identified the 5V supply on the board and soldered in the wires directly —  Let there be power!

While the coil and board are fairly small, there’s not that much space underneath the Chromebook’s skin, so [Jason] lengthened the coil wires and located it separately, just below the keyboard. He closed everything up, crossed his fingers and turned the power on. Success!

It’d be cool to do something similar with an RFID reader — then you could have your laptop locked unless you have your RFID ring with you!

DIY Optic Lens

One Small Step For Magnification, One Giant Leap For Home Lens Manufacturing

There are some types of projects that we see quite often here on Hackaday; 3D Printers, Development Boards and Video Game Hardware to name a few. Once in a while we see an optics-based project but those use pre-made lenses. [Peter] felt it was time to give home lens manufacturing a shot and sent in a tip about his experience.

The typical lens manufacturing process starts off by taking a piece of glass and manipulating it into a rough lens shape, either by removing material or heating the glass and forming it in a mold. These lens blanks are then lapped using progressively finer grits of abrasives until the final lens shape and surface finish are achieved. The tool used to lap the lens is very specialized and specific to one lens contour shape. This lapping process can be very time consuming (and therefore expensive) depending on the quality and size of the lens being made.

Continue reading “One Small Step For Magnification, One Giant Leap For Home Lens Manufacturing”

Add A Bluetooth Interface To Your Kitchen Scale

Kitchen scale

When [Adam] found himself in need of a force meter, he didn’t want to shell out the cash for a high-end model. Instead, he realized he should be able to modify a simple and inexpensive kitchen scale to achieve the results he desired.

The kitchen scale [Adam] owned was using all through hole components on a double-sided PCB. He was able to easily identify all of the IC’s and find their datasheets online. After doing some research and probing around with a frequency counter, he realized that one of the IC’s was outputting a frequency who’s pulse width was directly proportional to the amount of weight placed on the scale. He knew he should be able to tap into that signal for his own purposes.

[Adam] created his own custom surface mount PCB, and used an ATMega8 to detect the change in pulse width. He then hooked up a Bluetooth module to transmit the data wirelessly. These components required no more than 5V, but the scale runs from two 3V batteries. Using what he had on hand, [Adam] was able to lower the voltage with just a couple of diodes.

[Adam] managed to cram everything into the original case with little modification. He is now considering writing an Android application to interface with his upgraded kitchen scale.

BigBoy Advance, A Giant GBA For Big Hands

big boy advance

Ever wish Game Boys came in a slightly larger size? [John], aka [Bacteria] of Bacman, decided to try something different with this retro console mod — the BigBoy.

In case you’re not familiar with the Bacman website, it’s a site dedicated to retro video game console modding — and our hacker, [John] is the man behind the scenes. We’ve shared plenty of their projects before.

The BigBoy is basically a Game Boy Advance — with an 8″ display. It uses the electronics from a knockoff copy of a RetroBit in a custom case that [John] vacuum formed at home. He sketched out the proposed outline, built a mold out of plastic sheets and hot glue, and created a concrete dummy mold for the vacuum former — meaning if he ever wanted to recreate this project it would be a piece of cake!

Continue reading “BigBoy Advance, A Giant GBA For Big Hands”

Commodore 64 And Nintendo Make Beautiful Music Together With SYNCART

Cyncart

[Dan] has been hard at work developing CYNCART to get his Commodore 64 and original NES to play together. We’ve seen [Dan’s] handiwork before, and it’s pretty clear that he is serious about his chip tunes.

This project starts with something called a Cynthcart. The Cynthcart is a Commodore 64 cartridge that allows you to control the computer’s SID chip directly. In effect, it turns your Commodore 64 into a synthesizer. [Dan] realized that the Commodore’s user port sends out simple eight bit values, which happens to match perfectly with the NES’ controller ports. In theory, he should be able to get these two systems communicating with each other.

[Dan] first modified the Cynthcart to send data out of the user port on the Commodore. This data gets sent directly to the NES’ 4021 shift register chip in the second player controller port. The NES runs a program to turn this data into sound on the NES’ audio chip. The first player controller can then be used to modify some other sound settings on the NES. Musical notes are played on the Commodore’s keyboard. This setup can also be used to play music on both systems at the same time. Be sure to watch the video of the system in action below.

Continue reading “Commodore 64 And Nintendo Make Beautiful Music Together With SYNCART”