
Tombstone Brings New Life To Board

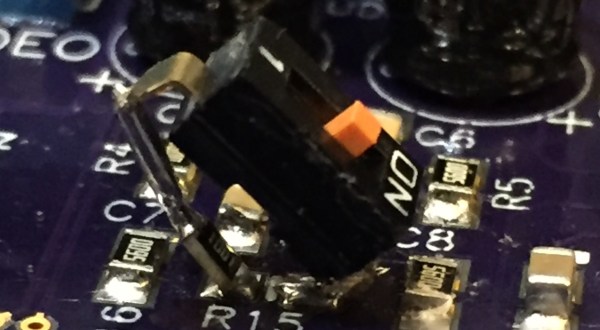
Making revisions to existing PCBs with surface mount components often leads to creative solutions, and this insertion of a switch over a tombstoned resistor is no exception. According to [kubatyszko], “this is an FPGA-based Amiga clone. R15 serves as joint-stereo mixing signal between channels to make it easier on headphone users (Amiga has 4 channels, 2 left and 2 right). Removing R15 makes the stereo 100% ‘original’ with fully independent channels. Didn’t want to make it permanent so I decided to put a switch.”

Whether [kubatyszko] intends it or not, this solution is not going to be permanent without some additional work to mechanically secure the switch. We’ve tried this sort of thing before and it sometimes results in the contact area of the resistor being ripped off the substrate and separated from the rest of the resistor, rendering it useless. However, the creative use of the pads to get some additional functionality out of the board deserves some kudos.

We love creative fixes for board problems but it’s been a really long time since we’ve seen several of them collected in one place. We’d love to hear your favorite tricks so let us know in the comments below.

Extreme Repair Of A Burnt PCB

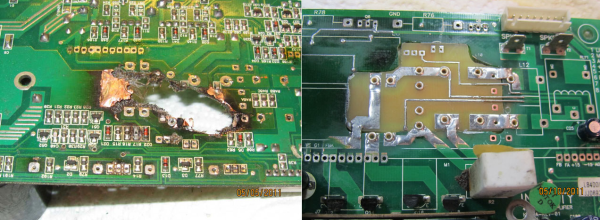
[xsdb] had a real problem. His JBL L8400P 600 watt subwoofer went up in flames – literally. Four of the large capacitors on the board had bulged and leaked. The electrolyte then caused a short in the mains AC section of the board, resulting in a flare up. Thankfully the flames were contained to the amplifier board. [xsdb’s] house, possessions, and subwoofer enclosure were all safe. The amplifier board however, had seen better days. Most of us would have cut our losses and bought a new setup. Not [xsdb] he took on the most extreme PCB repair we’ve seen in a long time.

After removing the offending caps and a few other components, [xsdb] got a good look at the damage. the PCB was burned through. Charred PCB is conductive, so anything black had to be cut out. The result was a rather large hole in the middle of an otherwise serviceable board. [xsdb] had the service manual for the JBL sub. Amazingly, the manual included a board layout with traces. Some careful Photoshop work resulted in an image of the section of PCB to be repaired. [Xsdb] used this image to etch a small patch board.

The amplifier and patch were milled and sanded to match up nearly perfectly. Incredibly, all the traces aligned. [Xdsb] soldered the traces across the join with small sections of wire and solder wick. After soldering in some new high quality capacitors, the amplifier was back in action!

If you’re a big fan of burned PCB’s, check out Hackaday Prize Judge Dave Jones latest EEVblog video, where he works on a Ness home alarm panel with a similarly cooked section of FR4.

[Thanks for the link JohnS_AZ!]








