Towards A Tiny Pick And Place Head

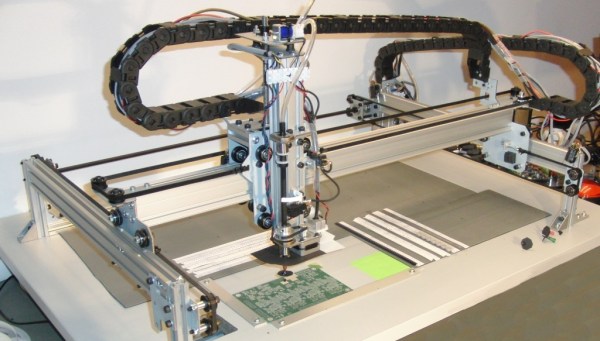
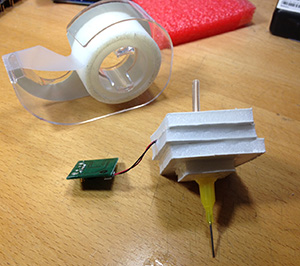
One of the projects that has been on [Peter Jansen]’s build list for a long time – besides a fully functioning tricorder, of course – is a pick and place machine. It’s a project born out of necessity; each tricorder takes four days to assemble, and assembling the motherboard takes eight hours with a soldering iron and hot air gun. The pick and place machine isn’t complete yet, but one vital component – the vacuum head for picking up components – is getting there with the help of some odd components.

A few months ago, [Peter] saw a post on Hackaday about repurposing a tiny piezo micro blower for use as an extremely small vacuum pen. The original build was extremely simple – just a few pieces of foam board and a power supply, but the potential was there. A tiny electric air pump that’s able to pick up large chips and modules along with tiny resistors without having to run a hose through the mechanics of a CNC gantry is a godsend.

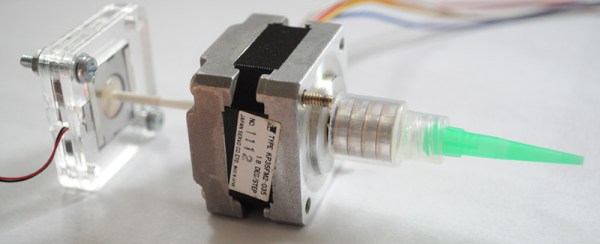
[Peter] got his hands on one of these micro blowers and started work on a proper tool head for a pick and place machine. A port on the micro blower was covered so it would suck instead of blow, the vacuum port was threaded through a stepper motor with a hollow shaft, and a fine tip was attached to the end.

What can this vacuum head pick up? 0604 size resistors aren’t a problem, but larger modules are simply too heavy. It looks like this micro blower would only be able to pick up small components. There are other options, though: [Grant Trebbin] has had some luck with a larger pump from Sparkfun, but this requires a vacuum line to run through a CNC gantry. There’s still some work to do before a small vacuum head shows up on the tool head of a pick and place machine, but given how long it takes [Peter] to put together a single tricorder, it’s well worth investing the time to do this right.

3D Printed SMD Tool

We’ve seen pick and place tools in the form of tweezers, mechanical pencils adapted to aquarium pumps, but never as a 3D printed tool optimized for standard blunt-nose needles in a comfortable, ergonomic shape.

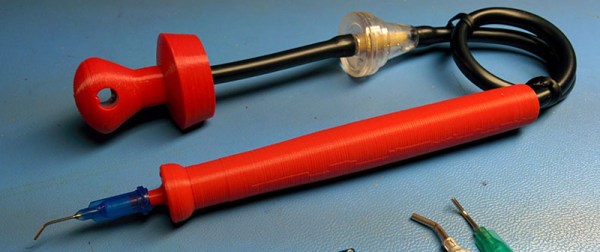
[Zapta] created this 3D printed SMD hand picker to populate a few boards. The tool is mostly 3D printed parts that come together for an airtight enclosure. The needles are the standard eBay affair, with the smallest he could find easily lifting 0402 and 0603 components from their tape reel. There’s also the option to switch over to larger needles for bigger components.

There are files available for two versions of this vacuum picker – one with a hole in the handle for those of us who would rather connect this thing directly to a modified aquarium pump, and one for the geniuses among us who use a foot pedal and pneumatic valve to release the tiny part. Other than the pump, the only a few bits of tubing are required to turn this bit of 3D printed plastic into a useful tool.

Piezo Vacuum Pump For Lightweight Pick And Place

If you’re building a pick and place machine, or even just a vacuum pen, you’ll need some way to pick up tiny part. This means something that sucks, aquarium tubing, and everything that goes with that. A few months ago, [Wayne] found an interesting device called a Micro Blower that will blow small amounts of air from a small, lightweight device. A few modifications later, and he had a piezoelectric vacuum pump for picking up tiny parts.

The Micro Blower [Wayne] found is available on Mouser for about $45, but this device blows. To turn it into something that sucks, he would need to find a way to block up the input side of the pump so it could draw a vacuum. Eventually settling on mounting the blower inside a stack of foam board, [Wanye] glued on a 20 gauge needle and was able to suck up 0603 SMD parts.

The new piezoelectric sucker is extremely light, and the power draw is very reasonable: 18V and 20mA. This would be a great device to mount to a certain pick and place machine without having to run vacuum lines through the mechanics of a motion platform. Video below.

Continue reading “Piezo Vacuum Pump For Lightweight Pick And Place”

THP Hacker Bio: Neil Jansen

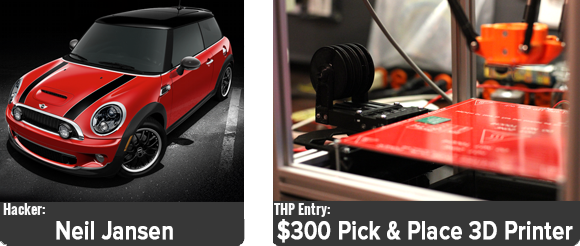
If we were running a contest to give away a trip to space for building the most innovative open hardware project a few years ago, the winner would inevitably be a 3D printer. Times have changed, 3D printing is reaching the limits of what can be done with simple plastic extrusion, and there are new hardware challenges to be conquered. One of the challenges facing hardware designers is the ability to create and assemble electronic circuits quickly. For that, there are a few pick and place machines being developed, the lowest cost being the FirePick Delta. It sells itself as a $300 pick and place machine borrowing heavily from the RepRap project, enabling tinkerers and engineers to assemble PCBs quickly.

[Neil Jansen] is the project lead for the FirePick Delta, and along with team members ranging from software developers in the bay area, to electronics technicians and high school students, they’ve created what will become the lowest cost and most capable pick and place machine available. Already the machine has tape feeders, tray feeders, a vision system, and modules to dispense solder paste. It’s an astonishing accomplishment, and were it not for some damage in shipping, we would have a video of [Neil] demoing the FirePick at Maker Faire NY.

In lieu of that, we do have a bio on [Neil] and what challenges he’s faced in building the FirePick. You can read that below, or check out their second demo video for The Hackaday Prize:

https://www.youtube.com/watch?v=46pLeLBYVTs

Continue reading “THP Hacker Bio: Neil Jansen”

Pick And Place Machines At Maker Faire

A few years ago, every booth at a Maker Faire had a 3D printer. It didn’t matter if 3D printing was only tangental to the business, or even if the printer worked. 3D printers have finally jumped the shark, and there’s going to be an awesome t-shirt to reflect this fact. This year there weren’t many 3D printers, leaving us asking ourselves what the new hotness is.

Pick and place machines. We couldn’t find many at the faire, and only Carbide Labs’ Pick and Paste machine was working on picking up small resistors and LEDs the entire faire. Carbide’s Pick and Paste machine is exactly what you would expect in a pick and place machine: it picks up components out of tapes and wells, orients them correctly, and plops them down on a board.

The killer feature for the Pick and Paste is its modular design. The toolhead is expandable, allowing anyone to add a second vacuum nozzle to double the rate parts are placed, or a solder paste dispenser. The guys didn’t have the paste dispenser working for the fair (leaded solder and kids don’t mix), but this machine is effectively a combination pick and place machine and solder paste dispenser, something that’s usually two machines on an assembly line.

Also at the faire was Tempo Automation. They’re in a pseudo-stealth mode right now, waiting until everything works perfectly until bringing their machine to the masses. It is, however, exceptionally fast and about a third of the price of a similar machine.

The only other pick and place machine at the faire was the Firepick Delta, one of the more popular projects on hackaday.io and one of fifty finalists for the Hackaday Prize. Unfortunately, the FirePick Delta was broken in shipping, and although [Neil] was sitting right next to the 3D printing guys, it would have taken all weekend to repair the machine.

THP Semifinalist: Retro Populator, A Pick And Place Retrofit For A 3D Printer

A huge theme of The Hackaday Prize entries is making assembly of electronics projects easier. This has come in the form of soldering robots, and of course pick and place machines. One of the best we’ve seen is the Retro Populator, a project by [Eric], [Charles], [Adam], and [Rob], members of the Toronto Hacklab. It’s a machine that places electronic components on a PCB with the help of a 3D printer

The Retro Populator consists of two major parts: the toolhead consists of a needle and vacuum pump for picking up those tiny surface mount parts. This is attaches to a quick mount bolted right to the extruder of a 3D printer. The fixture board attaches to the bed of a 3D printer and includes tape rails, cam locks, and locking arms for holding parts and boards down firmly.

The current version of the Retro Populator, with its acrylic base and vacuum pen, is starting to work well. The future plans include tape feeders, a ‘position confirm’ ability, and eventually part rotation. It’s a very cool device, and the ability to produce a few dozen prototypes in an hour would be a boon for hackerspaces the world over.

You can check out a few videos of the Retro Populator below.


SpaceWrencherThe project featured in this post is a semifinalist in The Hackaday Prize. 

Continue reading “THP Semifinalist: Retro Populator, A Pick And Place Retrofit For A 3D Printer”

Thumbnail that say The Hacklet

Hacklet #4 — PCB Tools And Wristwatches

4

The Hackaday Prize is heating up! When we set up the prize, we expected to see some incredible entries, and you guys haven’t let us down. Projects like SatNOGS, which aims to create a global network of satellite ground stations, or OpenMV, a low-cost Python powered vision module, are seriously blowing us away.

We’re starting to give away some prizes through community voting and there’s still plenty of time for you to enter. Check out The Hackaday Prize page for the full details.

Low Cost Printed Circuit Board Tools

Pick and Place

We’ve seen mills, lathes, CNC machines and 3D printers, but if there is any device that gets a hardware hacker’s attention, it’s a pick and place machine. In the PCB industry these machines pick up thousands of parts every hour, perfectly placing them on printed circuit boards. The downside is they’re incredibly expensive. The cheapest Chinese machines without vision start in the $4000 USD price range.

[Neil] aims to break down those price barriers with a $300 Pick and Place Machine that doubles as a 3D printer. He’s using delta 3D printer hardware to do it, and he’s throwing in everything! OpenCV based vision, multiple tool heads, reel and tray pick up, [Neil] has covered all the major points. He can’t do it alone though, so he’s looking for help. Check it out, and give him a hand (or a skull)!
pcbMill

A low-cost pick and place machine will need printed circuit boards to work on. Not to worry, [shlonkin] has you covered with his PCB mill for under $10. Built from recycled printers, an Arduino, and host software written in processing, [shlonkin] has already posted impressive photos of boards his machine has milled. The main problem [shlonkin] has run into is longevity with plastic parts. In his most recent update, he’s looking for ideas. Can you help him?

Digital Watches

Anyone will tell you that digital watches are a pretty neat idea. With the era of smartwatches upon us, more than one hacker has delved into building their own timepiece. We’re happy to report that most of them even tell time.

walltech[Walltech] has gone all out to create the ultimate watch. His OLED Smart Watch 6.0 is the culmination of years of work. The watch features a 1.5” OLED display, an SD card slot, and a vibrator motor. It has Bluetooth 4.0 to connect to the world, and an Atmel ATmega32u4 as its brain. A 500mAh battery will power the watch for 18-24 hours per charge.

[Walltech] plans to make it do everything from SMS and email notifications to music streaming. Don’t see a feature you want? Add it! Smart Watch 6.0 Is completely open source, so you can hop into the code and hack away!

tilttouchtime2On the other side of the spectrum is [askoog89’s] Tilt Touch Time, which utilizes  those awesome bubble LED displays some of us remember from the 70’s. The retro look is only 3D printed skin deep though, as [askoog89] is using an ATtiny2313 processor. Atmel’s Qtouch is providing the capacitive touch sensing, while a tilt sensor helps Tilt Touch Time live up to its name. [Askoog89] has submitted his watch to The Hackaday Prize, so he’s trying to figure out a way to use the touch sensor to sync time with a PC. If that doesn’t work out, we bet those bubble LEDs would make great light sensors for some monitor-blink-sync action.

Fallout fans have seen plenty of PIP boys here on Hackaday, but have you seen [jara’s] PIP Watch? This Personal Information Panel is going big on size but low on power with a 3 inch e-ink display. [Jara] is using an STM32F101 ARM Cortex-M3 CPU, so he’s got plenty of processing power at his disposal. He’s connecting to the world through a Bluetooth serial link. All he needs is a Geiger counter, and he’s good to go!

pipWatch

That’s it for this week’s Hacklet, stay tuned for next week when we bring you more of what’s happening at Hackaday.io!