Build Your Own In-Fridge Soda Fountain

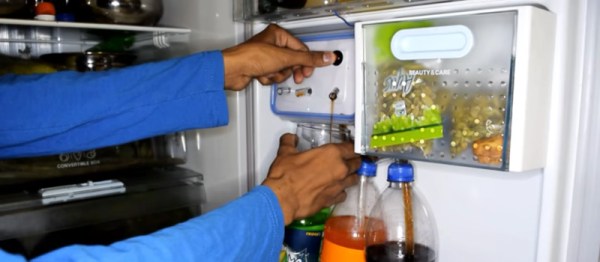
Who doesn’t love an ice cold soda? Lots of people, probably. This one’s not for them. It’s for those of us that are tired of having to go through the arduous process of manually opening a bottle and pouring a drink. Wouldn’t it be cool if you could have your own soda fountain at home? [Kedar Nimbalkar] thought so, and built a soda fountain that you can install right inside a fridge.

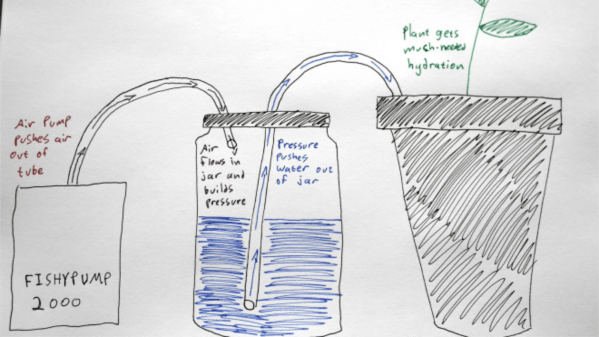
The system is based around using small pumps marketed as “6V DC air pumps” on Amazon. [Kedar] uses an indirect method of pumping the soda in this project. It’s a sad fact that it’s hard to find a cheap pump that’s safe to use with fluids for human consumption, and on top of that, many types of pump out there aren’t self-priming. This means the pump needs to be charged with fluid to work, which can make changing empty bottles a real pain.

Instead of pumping the fluid directly, the pumps instead push air into the top of the sealed soda bottles, which forces soda out of another tube in the bottle. This means that the pumps themselves don’t have direct contact with the soda which is a great design when working with stuff you’re going to put in your body. Following on from this careful design, the tubing selected is food safe. Unfortunately, even though the pumps don’t directly touch the soda itself, it’s highly unlikely the pumps chosen (designed for aquariums) are genuinely food-safe themselves.

When you’re building a beer funnel setup for Australia Day/4th of July/Other, using all manner of industrial or agricultural fittings may be a relatively low risk, as it’s a one-off exposure. But if you’re building a system handling products for human ingestion that you’re using on a regular basis, you really do want to make sure that the parts you use aren’t slowly poisoning you. There’s many ways this can happen — parts may corrode or react with substances in the food, plastics may outgas, or there may be lubricants in the parts that have toxic compounds in them. Just look what can happen if you drink wine out of a gun barrel — and that was from a single exposure!

Overall it’s a cool project, and one that would be especially fun and educational to do with children. Young humans are well known for their predilection towards sugary beverages, and have minds ready to be filled with knowledge about pumps, safe food handling practices, and of course, electronics. We also like [Kedar]’s use of commonly available materials, like a plastic food container for the enclosure. The project would be a great starter on your way to building a more complicated cocktail-mixing barbot. Video after the break.

We know peristaltic pumps are the go-to for safe liquid pumping. Anyone know a hacker friendly way of pumping air while ensuring all parts of the system are food safe? The most creative solution we’ve seen is to use breast pumps but it wasn’t ideal. Let us know your own tricks in the comments!

Continue reading “Build Your Own In-Fridge Soda Fountain”

Autonomous Plant Watering Thingamajig

[Eitan] is one of those guys whose plants keep tottering between life and death. Can’t blame the plants, because he just keeps forgetting when to water them. But keeping them hydrated requires him to get off his butt and actually water them. Surely, there had to be an easier solution which needed him to do nothing and yet prevent his plants from dying. Being lazy has its benefits, so he built his own super simple Autonomous Plant Watering Thingamajig.

He needed a water pump, but all he had was an air pump. So he hooked it up to force air in to a sealed container and push the water out. To make the setup autonomous, he connected the pump to a WiFi-enabled wall socket and then programmed it to dispense water at regular intervals. It may take him some time to fine tune the right interval and duration for his setup over the next few weeks, but right now, it’s pumping water for a short duration once every week.

The important thing for a system like this to work is to ensure it is well sealed. Any air leakage will require an increasing amount of air to be pumped in to the container as the water level keeps reducing. Without knowing the actual level of water in the container, it isn’t easy to compensate for this via programming. And that’s the other problem. [Eitan] will still have to periodically check his mason jar for water, and top it up manually. Maybe his next hack will take care of that. We’re thinking a Rube Goldberg watering system would be awesome. It’s nice when people put on their thinking caps and say “Okay, here’s a problem, how do I solve it?” instead of going out and buying an off-the-shelf device.

Thanks, [Clay], for sending in this tip.

It Sucks To Pick Up The Pieces

Jigsaw puzzles are a fun and interactive way to spend an afternoon or twelve, depending on the piece count and your skill level. It’s exciting to find the pieces you need to complete a section or link two areas together, but if you have poor dexterity, excitement can turn to frustration when you move to pick them up. [thomasgruwez] had the disabled and otherwise fumble-fingered in mind when he created this pick and place jigsaw puzzle aid, which uses suction to pick up and transport puzzle pieces.

The suction comes from an aquarium pump running in reverse, a hack we’ve seen often which [thomasgruwez] explains in a separate Instructable. A large, inviting push button is wired in line to turn the pump on and off. An equally large and inviting momentary switch turns off the vacuum temporarily so the piece can be placed.

At the business end of this hack is the tiny suction-cupped tip from a cheap vacuum pen. To interface the pen head with the pump, [thomasgruwez] designed and printed a rigid straw to bridge the gap. With utility already in mind, [thomasgruwez] also designed a ring that can be bolted to the straw to house a steadying finger of your choice, like the pinkie hook on a pair of barbers’ shears.

Our favorite part of this hack has to be the optional accessory—a tiny platform for quickly flipping pieces without cutting the vacuum. Check it out after the break.

Continue reading “It Sucks To Pick Up The Pieces”

3D Printed SMD Tool

We’ve seen pick and place tools in the form of tweezers, mechanical pencils adapted to aquarium pumps, but never as a 3D printed tool optimized for standard blunt-nose needles in a comfortable, ergonomic shape.

[Zapta] created this 3D printed SMD hand picker to populate a few boards. The tool is mostly 3D printed parts that come together for an airtight enclosure. The needles are the standard eBay affair, with the smallest he could find easily lifting 0402 and 0603 components from their tape reel. There’s also the option to switch over to larger needles for bigger components.

There are files available for two versions of this vacuum picker – one with a hole in the handle for those of us who would rather connect this thing directly to a modified aquarium pump, and one for the geniuses among us who use a foot pedal and pneumatic valve to release the tiny part. Other than the pump, the only a few bits of tubing are required to turn this bit of 3D printed plastic into a useful tool.

Cryogenic Machining Custom Rubber Parts

Cryogenic Machining: Custom Rubber Parts

Fashioning a custom, one-off rubber part for your project isn’t usually an option, but [Ben Krasnow] has an alternative to injection molding and casting: machining frozen rubber.

As [Ben] points out, you can’t exactly pop a sheet of rubber on your mill and CNC the needed shape; the bit will push the material around rather than cut it. Freezing the rubber first, however, allows you to carve into the now-hardened material.

His initial setup consisted of a sheet of aluminum with water drizzled on top, a square of neoprene placed on the water, and a steady stream of -60 to -80C alcohol flowing directly onto the rubber. The water underneath freezes, holding the neoprene in place. This proved problematic as the ice-clamp gives way before the milling is complete. [Ben] later adds some bolts to clamp the pieces down, allowing the milling process finish as planned.

A small plastic tray sits underneath this assembly to capture the alcohol as it runs off, feeding it back with some tubing. [Ben] recommends against a submersible aquarium pump—his initial choice—because the pump stopped working after a few minutes immersed in the chilly alcohol. An external, magnetically-driven pump solved the problem although it does require manual priming.

Stick around after the jump for the video and check out some of [Ben’s] other projects, like his quest for the perfect cookie, or CT scanning a turkey.

Continue reading “Cryogenic Machining: Custom Rubber Parts”

Grow Your Own Fresh Salad Year Round With This Cheap Hydroponic Setup

With fall approaching you might think about moving your gardening inside. [Jared] used cheap and readily available materials to make these salad-green trays.  When used with his grow lights and tent (which he built during a different project) he was able go from seed to salad-bowl in just four weeks.

A pair of plastic storage bins act as the base, keeping the water right where it should be. Some holes cut into a piece of solid foam insulation holds a set of plastic pots in place, allowing the water to leech into the Rockwool that holds each plant in lieu of soil. To aerate the water [Jared] grabbed a cheap aquarium pump, splitting the output into several different branches. Each has its own check valve to ensure that a pump failure doesn’t let the water find its way out of the plastic tube. A set of bubble stones breaks up the output, helping to mix it with the water.

This isn’t quite as easy to pull off if you don’t already have a grow light. But you can always make it worth the investment if you decide to start next summer’s garden from seed. Or perhaps you can try to make your own using a varation of this shop lighting hack.

[Thanks Jayson]