See A Cheap Smoker Get An Automation Power Up

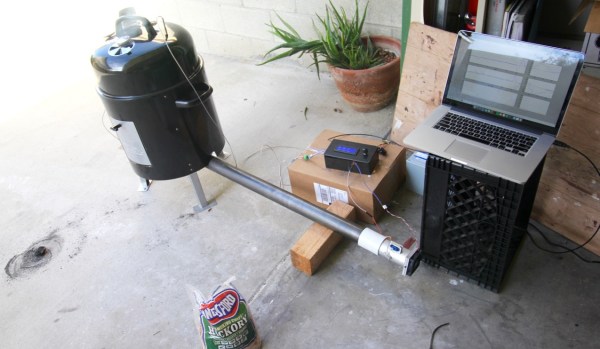
[Jason] learned a lot by successfully automating this meat smoker. This is just the first step in [Jason’s] smoker project. He decided to begin by hacking a cheaper charcoal-fed unit first, before setting his sights on building his own automatic pellet-fed smoker. With a charcoal smoker it’s all about managing the airflow to that hot bed of coals.
automated-meat-smoker-air-valve
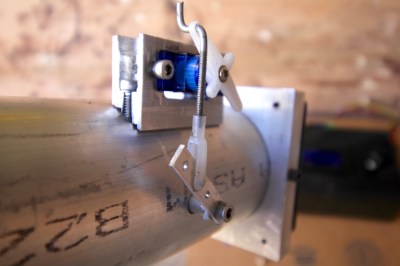
Custom mount for servo was actually one of the more challenging things to get just right.

[Jason] started by making sure the bottom was sealed off from stray airflow, then he cut a hole into the charcoal pan and attached a length of steel pipe. The opposite end of the pipe has a fan. Inside the pipe there is a baffle separating the fan from the charcoal pan. The servo motor shown here controls that valve.

The pipe is how air is introduced into the smoker, with the fan and valve to control the flow rate. The more air, the higher the temperature. The hunk of pipe was left uncut and works fine but is much longer than needed; [Jason says] the pipe is perfectly cool to the touch only a foot and a half away from the smoker.

With the actuators in place he needed a feedback loop. A thermocouple installed into the lid of the smoker is monitored by an Arduino running a PID control loop. This predicts the temperature change and adjusts the baffle and fan to avoid overshooting the target temp. The last piece of hardware is a temperature probe inside the meat itself. With the regulation of the smoker’s temperature taken care of and the meat’s internal temperature being monitored, the learning (and cooking) process is well underway.

There are many, many smoker automation projects out there. Some smokers are home-made electric ones using flower pots, and some focus more on modifying off the shelf units. In a way, every PID controlled smoker is the same, yet they end up with different problems to solve during their creation. There is no better way to learn PID than putting it into practice, and this way to you get a tasty treat for your efforts.

Hacking Cheap Chinese PID Temperature Controllers

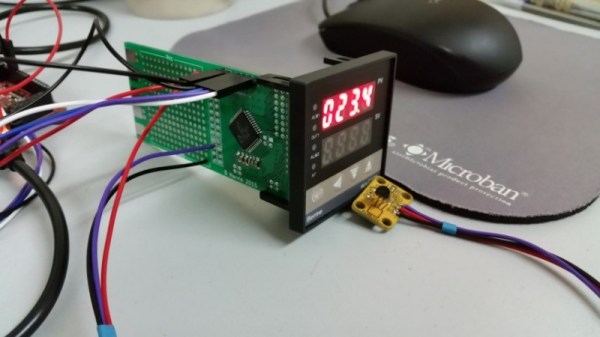
[Harvs] hacked a cheap PID controller he found on eBay to improve its performance. The controller originally used a K-type thermocouple but lacked cold junction compensation. As thermocouples only provide a differential measurement between the measurement junction and cold junction, this meant the controller was assuming the cold junction was at room temperature, and would in many cases be significantly inaccurate. The system also used a no-name brand Chinese microcontroller making firmware hacks impractical.

[Harvs] decided that even with cold junction compensation a K-type thermocouple wasn’t ideal for his application anyway, and designed a replacement PCB to interface to the display and power supply. The new PCB is based around a Cypress PsoC (a popular choice for its great analog functionality) with a DS18B20 temperature sensor. At the lower temperature ranges [Harvs] is interested in the DS18B20 is far more accurate and easy to use than the thermocouple.

Though the project hasn’t been updated recently, [Harvs] was planning on adding an ESP8266 for remote monitoring and control. Great work [Harvs]!

Thanks to Peter for the tip.

Overhauling A 3-Zone Reflow Oven

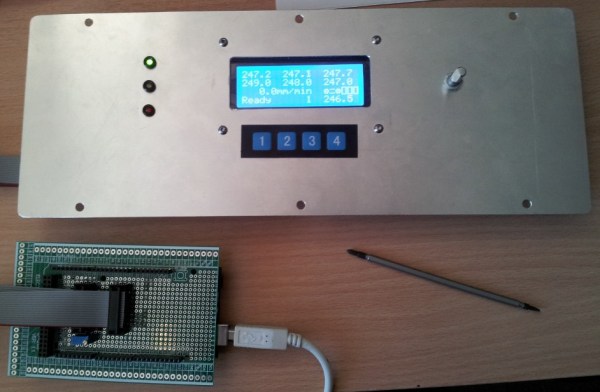
[Ed] owns a 3-zone reflow oven (which he coincidently uses to manufacture reflow oven controllers), but its performance has gotten worse and worse over time. The speed of the conveyer belt became so inconsistent that most boards run through the oven weren’t completely reflowed. [Ed] decided to rip out the guts of the oven and replace it with an Arduino, solving the belt problem and replacing the oven’s user-unfriendly interface

When [Ed] was looking into his belt speed problem, he discovered that the belt motor was controlled by an adjustable linear regulator with no feedback. Although this seems a bit sketchy by itself, the motor also had some mechanical issues and [Ed] ended up replacing it entirely. After realizing that closed-loop speed control would really help make the oven more consistent, [Ed] decided to overhaul all of the electronics in the oven.

[Ed] wanted to make as little custom hardware as possible, so he started out with an Arduino Mega and some MAX31855’s that measure multiple thermocouples in the oven. The Arduino controls the belt speed and runs PID loops which control heating elements in each of the oven’s 3 zones. The Arduino can be programmed with different profiles (stored in EEPROM) which are made up of 3 zone temperatures and a conveyor speed. Don’t have a 3-zone oven of your own to hack? Check out some DIY reflow oven builds we’ve featured before.

Melting Chocolate – FOR SCIENCE!

The Ultimate Fondu Melting Pot

[Patrick Herd] was in Sweden recently and decided to help out a team of high school students in the International Young Physicist Tournament — The challenge? Chocolate Hysteresis.

Chocolate what? When chocolate melts, it doesn’t actually re-solidify at it’s melting point — in fact, it’s quite below that. The challenge here is figuring out a scientific way of measuring the time (and temperature) it takes to return to a solid state. This in itself is kind of tricky considering you have to accurately measure the temperature and be able to empirically tell if its solid or liquid.

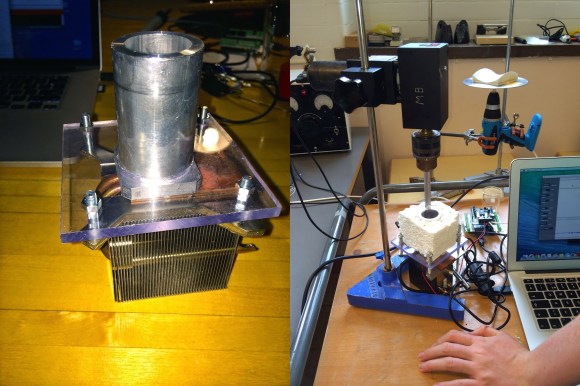
The first scientific apparatus they came up with was the Chocolate Rig V1 – a very simple peltier heated and cooled calorimeter. They used an Arduino to control the temperature and a motor shield to power the peltier plate. It kind of worked but they discovered it was difficult to assess the physical state of the chocolate. This is when [Patrick] started doing some research and discovered rotary viscometry.

Continue reading “Melting Chocolate – FOR SCIENCE!”