Hackaday Prize Entry: Superb Audio With The Teensy

The Raspberry Pi and Teensy 3 both have I2S interfaces, and that means these boards can be used to play very high quality audio. A codec and an I2S interface is one thing, but turning that digital stream into a quality analog output is another thing entirely. You need only look at audiophile forums for enough mis- and disinformation for that evidence.

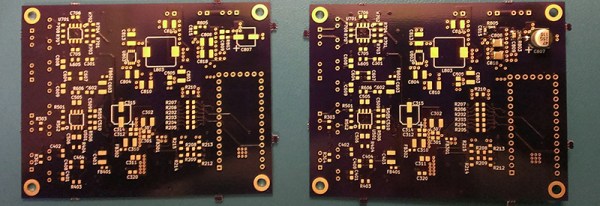
For his Hackaday Prize entry [William Hollender] is building an audio board for the Teensy 3.x. It features very high-end opamps, the right filters, and the correct topology to turn a digital audio stream into an analog signal that would please the most temperamental ear.

The Teensy Super Audio Board uses the Cirrus CS4272 audio codec chip, a high quality chip that can handle sample rates of up to 192kHz at 24 bit depth. This chip doesn’t include the analog input and output buffers, and this means [William] has quite a build in front of him. This means using high quality opamps, low noise power supplies, and knowing how to build a circuit and measure its noise.

So far, the tests revealed incredible dynamic range, flatness, and frequency response of this tiny little board. It also works with the Raspberry Pi. Now it’s just a matter of getting a few more of these boards put together for the Best Product part of the Hackaday Prize.


The 2015 Hackaday Prize is sponsored by:

Simple One-Chip Regenerative Receiver

Crystal radios may be the simplest kind to make, but regenerative receivers are more practical and only a little more complicated. A recent design by [Selenium] is super simple because it uses a single LM386 audio amplifier IC.

You might be surprised that you can convert an audio amplifier to a receiver using just a handful of components (a variable capacitor, a coil, a handful of capacitors, and a speaker). However, [Selenium] realized he could subvert the gain and bypass pins to cause regeneration and wound up with a very simple receiver.

If you haven’t looked at regenerative receivers before, the principle is simple (and dates back to 1912). An oscillator is an amplifier that gets (theoretically) an infinite amount of gain at one particular frequency. A regenerative receiver is just an amplifier that is almost (but not quite) at the point of oscillation. This gives it very high frequency-specific gain and a measure of selectivity. You can also nudge the receiver just into oscillation to receive CW or SSB signals.

[Selenium] built his prototype on an old receiver chassis because it had the IC and the variable capacitor already in place. However, others have built successful copies on breadboards ([Austin Heller] created several good looking breadboard versions) and on PCB material. [Selenium] also released some other unique LM386-based designs that use more parts (and, probably, have better performance). Looks like a simple way to build a practical receiver.

Lithium Ion Upgraded Lawnmower

Upgraded LiPo Lawnmower Now Has Plenty Of Juice

Back in 2010, [Dave] took a stand. He gave up his dependence on gasoline for his lawn mower, and bought a CubCadet CC500 48V lead acid powered electric lawnmower. Within two years, the batteries had already kicked the bucket. Unwilling to let go, he replaced half of the batteries, but that wasn’t enough. It now took him two charging cycles to mow his lawn once

Enough was enough. He had to replace the whole set — but this time, with LiPo.

As an avid lover of drones, he’s been using LiPo batteries for other things for quite a while. He did some calculations and figured he would only need about 10,000mAh at 48V for a 40 minute run time, which would still be a pretty pricey upgrade. So instead he started with 2 x 22.2V 5,200mAh packs instead ($200). As it turned out, that was more than enough.

The circuitry in the CubCadet was pretty straight forward, so it was almost a drop in replacement, minus the need to use a different charger. He added in a switch to flip between charging and mowing modes to allow him to use the LiPo charger without damaging anything.

Now all he needs to do is give it an Internet connection or maybe make it remote-controlled…

Hacking Cheap Chinese PID Temperature Controllers

[Harvs] hacked a cheap PID controller he found on eBay to improve its performance. The controller originally used a K-type thermocouple but lacked cold junction compensation. As thermocouples only provide a differential measurement between the measurement junction and cold junction, this meant the controller was assuming the cold junction was at room temperature, and would in many cases be significantly inaccurate. The system also used a no-name brand Chinese microcontroller making firmware hacks impractical.

[Harvs] decided that even with cold junction compensation a K-type thermocouple wasn’t ideal for his application anyway, and designed a replacement PCB to interface to the display and power supply. The new PCB is based around a Cypress PsoC (a popular choice for its great analog functionality) with a DS18B20 temperature sensor. At the lower temperature ranges [Harvs] is interested in the DS18B20 is far more accurate and easy to use than the thermocouple.

Though the project hasn’t been updated recently, [Harvs] was planning on adding an ESP8266 for remote monitoring and control. Great work [Harvs]!

Thanks to Peter for the tip.

Shedding Light On The Mechanics Of Film Projection

Do you know how a film projector works? We thought we did, but [Bill Hammack] made us think twice. We have covered the Engineer Guy’s  incredibly informative videos many times in the past, and for good reason. He not only has a knack for clear explanation, the dulcet tones of his delivery are hypnotically soothing. In [Bill]’s latest video, he tears down a 1979 Bell & Howell 16mm projector to probe its inner workings.

Movies operate on the persistence of vision (POV) principle, which basically states that the human brain creates the illusion of motion from still images. If you’ve ever drawn circles and figure eights in the nighttime air with a sparkler or perused a flip book, then you’ve experimented with POV.

A film projector is no different in theory. Still images on a strip of celluloid are passed between a lamp and a lens, which project the images on to a screen. A device called a shuttle advances the film by engaging its teeth into the holes on the edge of the film and moving downward, pulling the film with it. The shuttle then disengages its teeth and moves up and forward, starting the process again.

shutters
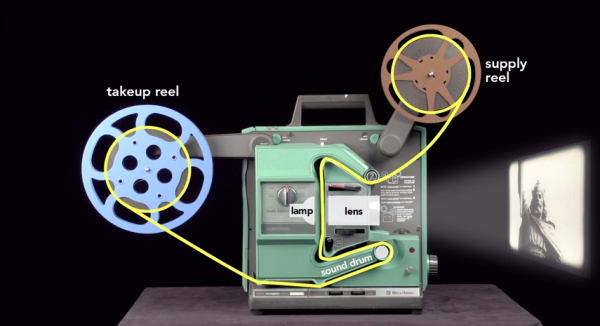
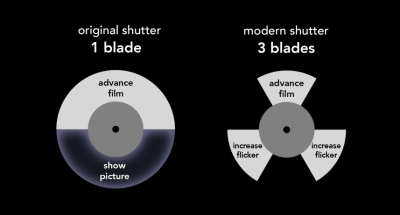
Film is projected at a rate of 24 frames per second, which is sufficient to create the POV illusion. A projector’s shutter inserts itself between the lamp and the lens, blocking the light to prevent projection of the film’s physical movement. But these short periods of darkness, or flicker, present a problem. Originally, shutters were made in the shape of a semi-circle, so they block the light half of the time. Someone figured out that increasing the flicker rate to 60-70 times per second would have the effect of constant brightness. And so the modern shutter has three blades: one blocks projection of the film’s movement, and the other two simply increase flicker.

[Bill] explains how the projector reads the optical soundtrack. He also delves into the mechanisms that allow continuous sound playback alongside intermittent projection of the image frames. You’ll never look at a projector the same way again.

Want to know more about optical soundtracks? Check out this Retrotechtacular that explores the subject in detail.

Continue reading “Shedding Light On The Mechanics Of Film Projection”

A Handheld CNC Router

Over the last few years, the state of the art in handheld routers has been tucked away in the back of our minds. It was at SIGGRAPH in 2012 and we caught up to it at Makerfair last year. Now, it’s getting ready for production.

Originally called Taktia, the Shaper router looks a lot like a normal, handheld router. This router is smart, though, with the ability to look at a work piece marked with a tape designed for computer vision and slightly reposition the cutter in response to how the user is moving it. A simple description doesn’t do this tool justice, so check out the video the Shaper team recently uploaded.

With the user moving the Shaper router over a work piece and motors moving the cutter head, this tool is able to make precision cuts – wooden gears and outlines of the United States – quickly, easily, and accurately. Cutting any shape is as easy as loading a file into Shaper, calling that file up on a touch screen display, and turning on the cutter. Move the router around the table, and the Shaper takes care of the rest.

Accuracy, at least in earlier versions, is said to be on the order of a hundredth of an inch. That’s good enough for wood, like this very interesting bit of joinery that would be pretty hard with traditional tools. Video below.

Thanks [martin] for the tip.

Continue reading “A Handheld CNC Router”

The Three Dollar Frequency Standard

[Paulie] over on the EEVBlog forums picked up an inexpensive frequency counter on eBay and realized it was just a little bit off. As a result, he decided to build a frequency standard. His build wound up costing him about $3 and he shared the design and the software for it.

The hardware design is very simple: a TCXO (also from eBay), an ATMega8, a pushbutton, and a AA battery with DC to DC converter to power the whole thing. The software does all the work, providing frequencies from 10MHz down to a few hundred hertz (including some common audio test frequencies).

If you haven’t worked with a TCXO before, it is a crystal oscillator that includes a temperature compensation circuit to pull the crystal frequency up or down depending on temperature. Although crystal oscillators are pretty accurate already, adding this temperature compensation improves accuracy over the design temperature dramatically (typically, 10 to 40 times better than a naked crystal oscillator). If you want to learn more about TCXOs, here’s a good write-up.
A TCXO isn’t as good as an OCXO (where the first O stands for Oven). However, OCXOs cost more, are larger, and drain batteries (after all, it is running an oven). You can even hack your own OCXO, but it is going to cost more than $3.

If you want to see the real guts of one TCXO, check out the video.

Continue reading “The Three Dollar Frequency Standard”