EPROM Coffee Table

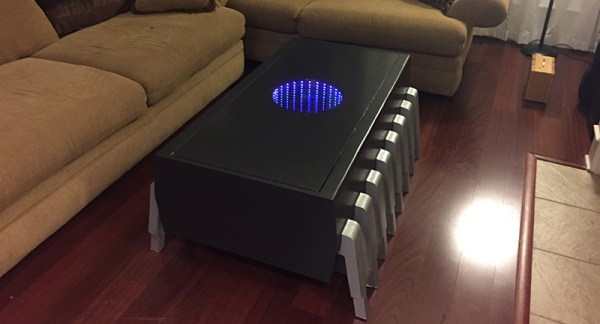
Either in need of a coffee table or suffering a severe lack of upscaled electronics, [Darren] just finished up a great build for his living room. It’s a huge, scaled up version of a UV erasable EPROM with an infinity mirror in place of the fused quartz window.

[Darren]’s coffee table was inspired by an earlier build by the geniuses at Evil Mad Scientist. A few years ago, they built a 555 footstool that was scaled up about 30 times its normal size. Even at footstool scale, the 555 is still relatively tiny.

[Darren] is using a similar construction technique by forming the legs of the EPROM out of laminated plywood. Since this build is significantly larger, building the entire device out of solid, laminated plywood would result in an unwieldy and expensive piece of furniture. Instead, [Darren] constructed the legs and sides out of plywood laminations, covering the ends, top, and bottom with plywood panels. The result is a hollow EPROM/coffee table that’s still structurally sound.

If you’re a bit confused after counting the number of pins on the coffee table, you’re in good company. This is technically a scaled-up version of a 16-pin 0.600″ PDIP, something that a quick googling suggest isn’t historically accurate. Maybe there was an EPROM with a 4-bit wide data bus somewhere in the annals of electronics history, but we’re happy with saying that a completely accurate scaled-up ROM would be far too big for [Darren]’s living room.

Continue reading “EPROM Coffee Table”

Giant Spirograph Delights Children, Dwarfs Banana

giant spirographLate last year at a craft show, [hahabird] and a friend came across a laser-cut Spirograph and they both had a go at it. After mocking his friend’s lack of fine motor skills, [hahabird] was struck with the idea of making a giant-scale Spirograph that would (hopefully) be less frustrating for kids of all ages.
He generated the gears using an InkScape plugin, and then moved the project to Illustrator for adjustments. After nesting the inner gear drawings, he was able to print them out on one 3×3′ piece of paper at the local FedEx-Kinko’s. To make a template for routing he pieces that make up the eight-foot diameter outer ring, [hahabird] first cut it out of MDF and then bolted that to plywood. The outer ring’s size was dictated by the number of sections that fit on a 4×8 piece of plywood.

The challenge of the inner cogs was to make them move smoothly and still mesh with the teeth of the outer ring. [hahabird] solved this by mounting casters on raised platforms, which double nicely as handles. Each inner cog has a series of PVC couplers that take the 1″ PVC chalk holder insert.

So far, [hahabird] has cut 22-, 35-, and 44-tooth cogs, all of which are painted in nice, bright colors. According to his reddit comments, he will have a video or gif of it in a few days. We hope he makes the plus sign cog and the tongue depressor piece, too.

Revenge Of The Glueless Stool And A New Folding Chair

glueless stool

[Vincent] is at it again, with the final iteration of his glueless stool and a new project.

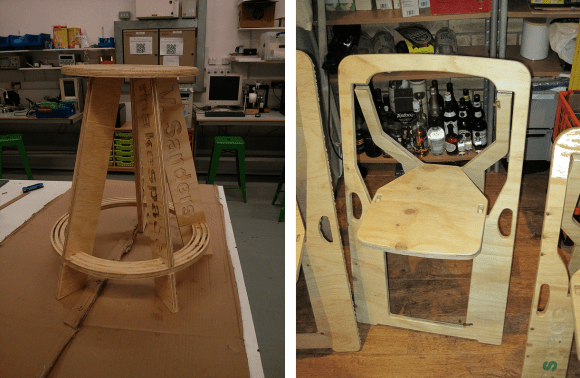
As many of you commented on the original post, three legs might not be enough. He might have taken note, as the final design contains not 3, not 4, but five legs. After the break we have a clip of it being used, and it looks quite sturdy!

But is that it? Is [Vincent] done with innovative wood furniture? Nope. Not since his wife came up with a challenge to create a practical, foldable, and especially, not ugly — chair. He began by researching the dry subject of chairs and determined the approximate popliteal height that his chair should provide. Keeping with the theme, he wanted this chair to be cut from a single piece of wood, just like the stool. A few sketches later and he had a basic design ready, still glueless, but unfortunately this time requiring hinges. After a few hiccups in his CNC program, he had a working foldable chair, but our guess is it’s not quite the final design.

Just like last time, all the files are freely available from his Github, so if you happen to have a CNC router, or maybe a laser cutter, you can make your own!

Continue reading “Revenge Of The Glueless Stool And A New Folding Chair”

Many Iterations Of A Plywood Stool That Requires No Glue

cnc-router-stool-design

At his local hackerspace [Vincent Sanders] noticed an interesting problem. The stools that they had were great in most cases, but there was one workbench which was very much the wrong height for them. So began his quest to design and fabricate plywood stools which use no glue for their joints.

The Cambridge Makespace (in the UK) turns out to be a perfect environment for this type of project. They already had a CNC router which can cut the plywood pieces, and there are other members who were willing to help train [Vincent] on the equipment. He found a design on Thingiverse which fit the bill, except for the actual measurements. He needed metric units to match the sheet stock available to him. Once converted he put together a stool that didn’t work at all. The thickness of the plywood just didn’t mesh with the tolerances of the joints. After wandering around to different suppliers in town, digital calipers in hand, he came up with a range of actual thicknesses and adjusted his joint design accordingly.

Of course this wasn’t the last revision. Even with the joints working the seat was still a little rickety. He moved to the next plywood thickness offered, redesigning the files to match. His final stool works like a charm, with five or six of them fitting on one standard sheet of plywood.

Laminated Wooden Case Brings A Dropped Coffee Grinder Back From The Junk Heap

coffee-grinder-fix

Instead of giving it up for dead, [Suprise Pink Mist] fabricated a replacement case for the motor and blade of his broken coffee grinder. The original enclosure was made of plastic, which didn’t survive being dropped. There isn’t an image of what those plastic parts looked like, but we have to think they were nowhere near as neat as the replacement.

The first step was to cut a set of plywood discs to the approximate outside dimensions. Since the base of the motor has several different diameters each disc had a void cut out of its center to match. The image to the right shows the motor sitting upside down next to the stacked plywood. The black electrical tape seals around the mason jar ring which was a perfect friction fit with the original bowl of the grinder. Once everything was glued together the outside edges were flattened on a belt sander and the mason jar was screwed in place to house the beans during grinding.

[via Reddit]

A Folded Horn Enclosure To Make The Most Out Of A Subwoofer

To make the most out of his home theater sound system [Baccula] built this folded horn enclosure for as much bass sound as possible. The design was conceived by [Bill Fitzmaurice] who thought there needed to be a better way to use the subwoofers which are typically used in home systems. His design is called the Tuba HT and it is aimed at a 15″ speaker. [Bill] charges for the building plans, but we don’t mind living vicariously through [Baccula’s] construction album.

As you can see, there are a lot of wood parts that went into the cabinet. It starts with a base of 2×4 framing. From there the plywood sawdust really starts to fly as each component is produced. During assembly [Baccula] is careful to fully glue each joint — you don’t want to find out that your sub cabinet vibrates after you get everything installed. All together the new piece of living room furniture stands three feet tall and deep and two feet wide.

The album has no captions but you can read a bit more about the project in the Reddit comments.

A Mixer (re)built To Travel

[Toby Cole] likes to mix tunes whenever he gets a chance. But the size of his DJ equipment made it a real bother to lug around with him. He does own a Behringer portable mixer but without cross faders it’s not really all that usable, and most of the other offerings don’t get good reviews. He ended up replacing the enclosure of a proper mixer in order to make it light and small. The growing availability of affordable laser-cut parts made this project possible.

Build Brighton, [Toby’s] local Hackerspace, has a laser cutter. So he knew that if he could figure out a smaller case design it would be a snap to get his parts made. He cracked open the heavy metal case on the KMX 100 mixer and found it had a ton of extra room inside. He designed all of the plates using a digital calipers to properly space the holes and text labels. These designs were combined with BoxMaker to produce the files the laser cutter needed. The first prototype was cut from cardboard, with the finished product cut from 3mm plywood.