The 6502 Watch, Because Someone Had To Make One

We are very familiar with retrocomputers, and if you want you too can build a computer that could have been made in the late ’70s on a breadboard. Just grab your CPU of choice, add some RAM, some ROM, a ton of jumper wires, and give it some way to talk to the outside world. The problem with the computers inspired by yesteryear is that they all, inexplicably, use through-hole parts. If only someone used the small QFP parts instead of the big chonkin’ PDIPs, we could have really small retrocomputers. That’s exactly what [NotArtyom] did, and he managed to come up with a wearable 6502 watch.

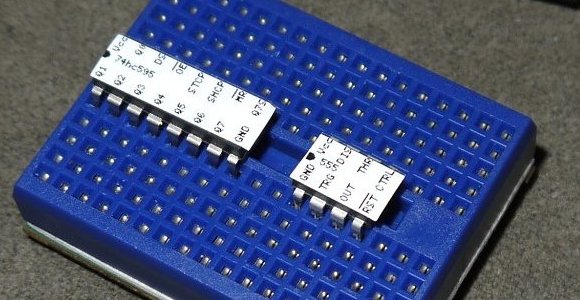
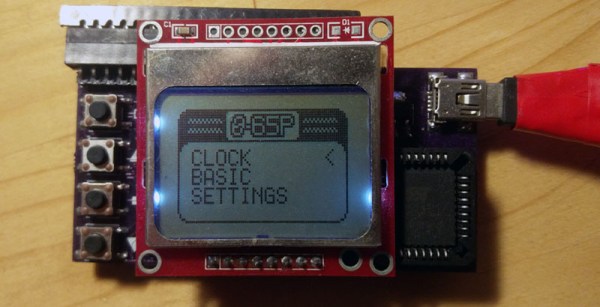
The system design for this 6502-based watch is fairly standard for what you would find in any other retrocomputer. There’s a PLCC 6502, 32k of SRAM, 16k of ROM, and a PLLC’d 6522 for a bit of IO. There are a few peripherals hanging off the 6522, and since this thing is a watch the most important is a real time clock. There’s also a Nokia LCD and a 20-pin Commodore keyboard connector.

Software-wise, most of the ROM is dedicated to G’Mon, a generic monitor that can view and modify memory. There’s also EhBasic, and a kernel to handle the RTC, keyboard, and display.

Whether or not this is a useful smartwatch isn’t the question; this is one of the first retrocomputer projects we’ve seen that lean into the non-PDIP versions of these classic chips. This is a bit surprising, because you can still buy these parts, PDIP or not, new from the usual vendors. If nothing else, it’s a demonstration of what can be done with modern IC packages.

EPROM Coffee Table

Either in need of a coffee table or suffering a severe lack of upscaled electronics, [Darren] just finished up a great build for his living room. It’s a huge, scaled up version of a UV erasable EPROM with an infinity mirror in place of the fused quartz window.

[Darren]’s coffee table was inspired by an earlier build by the geniuses at Evil Mad Scientist. A few years ago, they built a 555 footstool that was scaled up about 30 times its normal size. Even at footstool scale, the 555 is still relatively tiny.

[Darren] is using a similar construction technique by forming the legs of the EPROM out of laminated plywood. Since this build is significantly larger, building the entire device out of solid, laminated plywood would result in an unwieldy and expensive piece of furniture. Instead, [Darren] constructed the legs and sides out of plywood laminations, covering the ends, top, and bottom with plywood panels. The result is a hollow EPROM/coffee table that’s still structurally sound.

If you’re a bit confused after counting the number of pins on the coffee table, you’re in good company. This is technically a scaled-up version of a 16-pin 0.600″ PDIP, something that a quick googling suggest isn’t historically accurate. Maybe there was an EPROM with a 4-bit wide data bus somewhere in the annals of electronics history, but we’re happy with saying that a completely accurate scaled-up ROM would be far too big for [Darren]’s living room.

Continue reading “EPROM Coffee Table”

Using Surface Mount Devices On A Breadboard

[Czar] was working on a project with the Raspberry Pi using the MCP3008 analog to digital converter. The surface mount SOIC version of this chip was slightly cheaper, and there’s always a way to make that work (Portuguese, Google Translation). How [Czar] did it is fairly impressive, as it’s a bit more flexible for breadboard designs than a through-hole version, and done correctly, is an extremely sturdy hack.

A few new leads needed to be soldered onto the SOIC package, and for this [Czar] chose jumper wires. This makes each pin easy to plug into a solderless breadboard, and since [Czar] was extremely clever, all the wires for power, ground, analog, and SPI are color coded.

Simply soldering a few jumper wires onto a chip won’t last for very long. To solve this problem, [Czar] potted the entire chip and its connections with hot glue. Probably not the best solution, and a heavy-duty epoxy would have been better, but the current build is more than enough to stand up to the relatively minor abuse it will receive on the workbench.

Script Makes Custom Pinout Labels For Your Chips

cusom-pinout-labels

After years of prototyping hobby electronics we’ve learned (several times actually) that when something’s not working it’s a problem with the hardware. Usually the jumper wires aren’t hooked up correctly, or we needed to throw a pull-up resistor in and forgot to. One thing that can really help sort these problems out quickly is a pinout label for each chip like the ones seen above. This is a project which [John Meacham] came up with. It uses a script to generate chip pinouts on a label maker.

The label maker he started with is a Brother PT-1230PC. It connects to a computer via USB and can use a few different widths of self adhesive label tape. [John] found that the 1/4″ wide tape is nearly a perfect fit for PDIP components.

His script takes a YAML file as the input. This formatting standard makes is quick an easy to whip up a label for a new chip using just your text editor. From there his Pearl script turns the data into a Portable Network Graphics (.png) file with the labels spaced for the 0.1″ pitch of the chip. Send this graphic to your label maker and you’ve got an adhesive reminder that will help reduce the time you spend pawing through datasheets just for the pinouts.

Hackaday Links: January 24, 2012

Open source engraving

[Scott] wanted to do some v-carving with a CNC router, but couldn’t find software to generate GCode that didn’t cost hundreds of dollars. He ended up doing the sensible thing and wrote his own that will generate tool paths from CXF fonts. We’ll be bookmarking this for when our router project is done.

Improving Genesis sound output

Dissatisfied with the sound output on his Sega Genesis, [Drakon] installed a few mods into his console. How much could it really affect the sound? Listen to the video. The changeover happens at 0:50. Impressive. Now if only the chiptune scene would get into Segas.

Yes, we did, and now we’re seeding

Here’s an alternative to Thingiverse: The Pirate Bay has a new category for 3D-printable objects. The best file so far? A 1970 Chevelle. US Copyright law does not protect (most) physical objects, so it’s not illegal. Honestly, we can’t wait for somebody to take this to the courts; It’s sure to be an interesting case. Somebody upload a ship hull design and give the EFF a buzz.

Just be glad it’s not a QFN

[Mikey] was pulling a PDIP ATMega8 out of a socket with pliers and a screwdriver and broke the RESET pin. Ouch. He fixed it by soldering on a lead from a resistor. We’ve all done this before, but [Mikey]’s results look really good. Here’s the gallery.

This might be fake

If you want a second analog stick for your 3DS, you could wait a month and buy a Circle Pad Pro, or install a PSP analog stick. We’re not sure how this would work – the Circle Pad Pro works over IR, and we’re not seeing an IR transmitter on this build. Here’s the source if anyone wants to give this a shot.