This week we’re taking another departure from the ordinarily campy videos featured in the Retrotechtacular section. This time around the video is only two years old, but the subject matter is from the early 1980’s. [David Crane], designer of Pitfall for the Atari 2600 gave a talk at the 2011 Game Developer’s Conference. His 38-minute presentation rounds up to a full hour with the Q&A afterwards. It’s a bit dry to start, but he hits his stride about half way through and it’s chock-full of juicy morsels about the way things used to be.
[David] wrote the game for Activision, a company that was started after game designers left Atari having been told they were no more important than assembly line workers that assembled the actual cartridges. We wonder if any heads rolled at Atari once Pitfall had spent 64-weeks as the number one worldwide selling game?
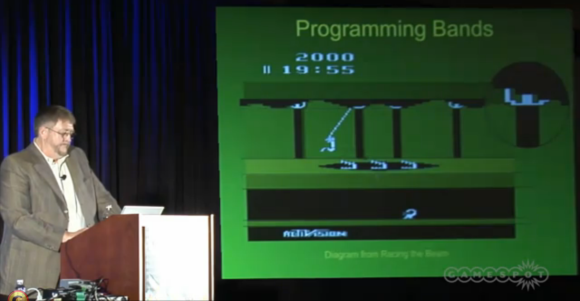
This was a developer’s panel so you can bet the video below digs deep into coding challenges. Frame buffer? No way! The 2600 could only pump out 160 pixels at once; a single TV scan line. The programs were hopelessly synced with the TV refresh rate, and were even limited on how many things could be drawn within a single scan line. For us the most interesting part is near the end when [David] describes how the set of game screens are nothing more than a pseudo-random number generator with a carefully chosen seed. But then again, the recollection of hand optimizating the code to fit a 6k game on a 4k ROM is equally compelling.
If you like this you should take a look at an effort to fix coding glitches in Atari games.
Continue reading “Retrotechtacular: How I Wrote Pitfall For The Atari 2600”