oscope-reverse-engineering

Reverse Engineering An Oscilloscope Circumvents Vendor Crippleware

The crew over at the Hungarian Autonomous Center for Knowledge (H.A.C.K.) say they aren’t the most well-funded organization out there, so they were stoked when they found they could afford to bring a slightly used UNI-T UT2025B digital oscilloscope into the shop. As they started to tinker with it, the scope revealed one major shortcoming – screenshots were only accessible via a USB connection to a Windows computer.

Since they didn’t have any Windows boxes in house, [András Veres-Szentkirályi] decided he would try reverse-engineering the protocol so they could get access to this useful feature.

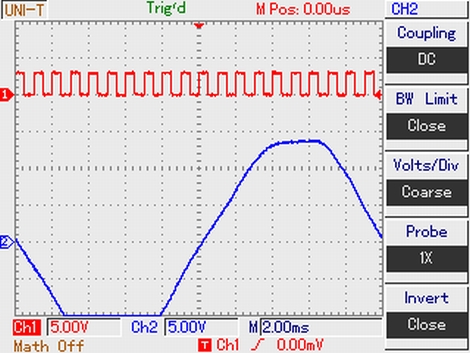
He set up a Windows VM, and using Wireshark on the host Linux box, [András] sniffed the data passing over the scope’s USB interface. He was able to identify what looked like image packets being sent to the VM, which he was able to decode using a small Python script. The resultant images were monochrome and they didn’t look quite right, but it was a start. As he dug further [András] found that he was overlooking some of the color data packed into the images, and after a bit of fiddling he got the sharp, colorful image you see above.

It turns out that while the scope has a monochrome LCD, it sends 16-bit color images over the USB interface – images that the Windows’ client degrades before displaying them on the screen. So in the end, he was not only able to get the scope working on any OS with the ability to run Python, he was able to grab far better images than the manufacturer ever intended – A very nice hack if we do say so.

Be sure to swing by the H.A.C.K. wiki as well as the project’s github repository if you have one of these scopes and are looking to wring some better images out of the hardware.

Simple Hardware And Python Drive This Splunk LED Meter

Want to monitor the company system without continually loading up the Splunk dashboard? It turns out that they’ve got their own Python package which makes pulling down data a snap. All [Rick] needed to do was hook up an LED meter as an external display.

It used to be that this would take a lot of wire and bit of soldering (or some special Christmas lights), but the advent of affordable LED strips has really taken the guess-work out of it. He’s using an RGB version acquired from Adafruit Industries. These strips are driven using SPI and multiple-colors mean you can display multi-dimensional data using one column. He chose to use a Teensy microcontroller, grabbing some plastic packaging for welding rods as the enclosure. These strips are extremely bright and to help soften the impact he added wax paper to the inside of the enclosure to act as a diffuser.

Looking for more projects that use strips like this one? They make fantastic addressable accent lighting for your home.

Python PIC Useful When Attached To A Computer

[Richard] sent in a link to the Python controlled microcontroller he’s been working on. Unlike the previous portable Python boards we’ve seen, [Richard] thinks his pyMCU isn’t best used autonomously. This board is meant to be used only when connected to a computer and to serve as a bridge between the digital world of computers and our analog world.

We’ve seen boards running lightweight Python interpreters, but we’re fairly intrigued by the idea of this board only being useful when plugged into a computer. The on-board PIC 16F chip has enough digital, analog and PWM pins to just about any task imaginable, and there’s also a 16-pin LCD display header if you’d like some output with your microcontrollers.

[Richard] says he’s been working with PICs for longer than the Arduino is around, but depending on the level of interest he’ll consider developing an Arduino version of the pyMCU. All we know is that the pyMCU would be awesome to teach electronics and programming to the younglings, and we could certainly find a few more uses for the board when they’re done with it.

Kicad Symbol Generating Script Shows Promise

Kicad is a fantastic PCB layout tool. We think creating a part for use with Kicad is in many ways easier than in Eagle, but it never hurts to have a few shortcuts. Here’s a new way to quickly get your parts into the schematic editor. It’s a Python script that generates symbols from an XML input file. You create the XML file with a list of all the pins on your part and the function they will serve. The Python script will then format that as a library file which can be imported by Kicad.

It’s a little bit clunky due to the number of steps in the process. But it is possible to use a CSV file generated in a spreadsheet program to create the XML needed by the script. We’ve used the online component builder ourselves, and appreciate the possibility of mass pin assignments instead of the drop-box for every pin as used by the web interface. One time we were 20 pins into the naming process and accidentally refreshed the page… ugh!

The code is available in their git repository, with a description of the XML format, and a wiki tutorial outlining the component building process. After you give it a try we’d love to hear what you think in the comments.

Web Game Bot Coded With Python

We find the programming challenge of game-playing bots to be fascinating. Take a look at this Python bot which plays Burrito Bison all the way through (video after the break). This is a totally pedantic exercise which has no purpose, other than to hone your mastery of a certain programming problem. And to that we say Bravo!

We looked in on a similar project which used some C# code to dominate the game Bejeweled Blitz. We’re not fantastic at C# and that code was never made public. But [Audionatics] has released this code through Github, and it’s written in Python which is a language in which we’re well versed.

The script monitors pixel locations to use as an input, which [Audionautics] admits is very error-prone. But if everything is setup just right it works like a charm. He’s also using the PyWin package which we believe is what lets the script move the cursor and register button clicks. We think this is really fun, but it make us wonder about the black-hat possibilities. What are the chances this could be turned into a gambling bot? Scary thought, huh?

Continue reading “Web Game Bot Coded With Python”

Python Maps Mouse Movements On An LED Matrix

[Vinod Stanur] is working with a mouse input and a microcontroller driven LED matrix. The mouse cursor is tracked inside of a window by Python and the resulting coordinates on the LED grid are illuminated. He calls it an LED matrix “Paint Toy” because one of the features he’s included lets the user create pixel art like in MS Paint.

The 10×8 grid of lights is controlled by a PIC 16F877A. This display orientation is perfect for the 8-bit controller, which uses an array of ten bytes to keep track of the pixel data. A computer running his Python application (which uses the Pygame module to track the mouse movements) communicates with the display board via an RF connection. Five bytes plus a stop character make up the communication packet. The first two bytes contain the coordinates of the cursor, the other three bytes contain mouse button status.

As you can see in the demo after the break, the system is very responsive. The mouse can be moved quickly without latency issues, and if the cursor leaves the tracking window it gets picked up right away when it re-enters.

Continue reading “Python Maps Mouse Movements On An LED Matrix”

Computer-aided Paint Brush

[Nirav] painted this masterpiece by hand… with a little help from a computer. He calls it the semi-automatic paintbrush because you do need to move it over the canvas by hand, but a computer decides when to dispense the ink.

He’s using a piece of hardware we looked at back in September called the InkShield that got a boost from Kickstarter. It’s an Arduino shield that drives an inkjet printer cartridge. The trick is how to know when the cartridge is in position for printing.

The system uses visual processing for that. [Nirav] added an IR led to the cartridge, and uses a camera to extrapolate its position. He actually reused a Python homography module which he had written for use with a projector. That setup was developed as a digital white board, but works just as well for this purpose.

He mentions that results like this won’t be featured in an art museum. But the look is unique, and we’d love to make a set of geeky thank-you notes using the technique.