It’s a bit of a truism that bigger sensors lead to better pictures when it comes to photography. Of course everyone who isn’t a photographer knows that moar megapixles is moar better. So, when [Gigawipf], aka [Yannick Richter] wanted to make a camera, he knew he had to go big or go home. So big he went: a medium format camera with a whopping 3.2 gigapixel resolution.
Now, getting a hold of a sensor like that is not easy, and [Yannick] didn’t even try. The hack starts by tearing down a couple of recent-model Kodak scanners from eBay to get at those sweet CCD line sensors. Yes, this is that classic hack: the scanner camera. Then it’s off to the oscilloscope and the datasheet for some serious reverse-engineering to figure out how to talk to these things. Protocol analysis starts about 4 minutes in of the embedded video, and is worth watching even if you have no interest in photography.
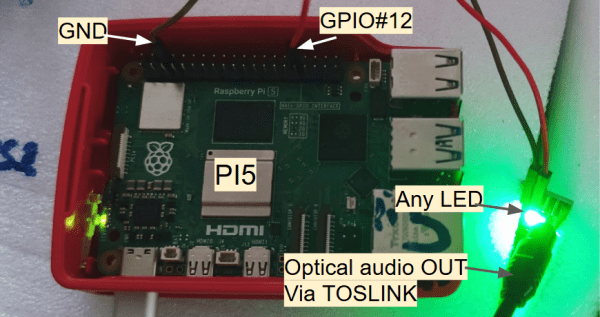
As for what the line sensor will be talking to, why, it’s nothing other than a Rasberry Pi 5, interfacing through a custom PCB that also holds the stepper driver. Remember this is a line sensor camera: the sensor needs to be scanned across the image plane inside the camera, line by line, just as it is in the scanner. He’s using off-the-shelf linear rails to do that job. Technically we suppose you could use a mirror to optically scan the image across a fixed sensor, but scanner cameras have traditionally done it this way and [Yannick] is keeping with tradition. Why not? It works.
Since these images are going to be huge an SD card in the Pi doesn’t cut it, so this is perhaps the only camera out there with an NVMe SSD. The raw data would be 19 GB per image, and though he’s post-processing on the fly to PNG they’re still big pictures. There probably aren’t too many cameras sporting 8″ touchscreens out there, either, but since the back of the thing is so large, why not? There’s still a CSI camera inside, too, but in this case it’s being used as a digital viewfinder. (Most of us would have made that the camera.) The scanner cam is, of course, far too slow to generate its own previews. The preview camera actually goes onto the same 3D-printed mount as the line sensor, putting it onto the same focal plane as the sensor. Yes, the real-time previews are used to focus the camera.
In many ways, this is the nicest scanner camera we’ve ever featured, but that’s perhaps to be expected: there have been a lot of innovations to facilitate this build since scanner cams were common. Even the 3D printed and aluminum case is professional looking. Of course a big sensor needs a big lens, and after deciding projector lenses weren’t going to cut it, [Yannick] sprung for Pentax 6×7 system lenses, which are made for medium format cameras like this one. Well, not exactly like this one– these lenses were first made for film cameras in the 60s. Still, they offer a huge image, high-quality optics, and manual focus and aperture controls in a format that was easy to 3D-print a mount for.
Is it the most practical camera? Maybe not. Is it an impressive hack? Yes. We’ve always had a soft-spot for scanner cameras, and a in a recent double-ccd camera hack, we were lamenting in the comments that nobody was doing it anymore. So we’re very grateful to [Manawyrm] for sending in the tip.
Continue reading “Medium Format, 3 GigaPixel Camera Puts It All On The Line (Sensor)” →