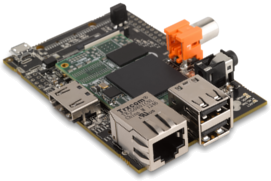
Raspberry Pi Smart TV

[Tony] decided his “smart” LED TV wasn’t quite smart enough. So he stuffed a Raspberry Pi in it.

Upon opening the case of his 40″ Hisense Smart LED TV, he discovered that the logic board actually had two unused USB pads — what luck! He tapped off of them to get 5V @ 500mA to power the Pi… Later on he realized this wasn’t the ideal solution — when the TV turned off, it cut the Pi’s power too. So he pulled out his multimeter and probed the board, this time finding a 5V source that remained on while the unit was plugged in.

Next up was the placement of the Raspberry Pi. The included speakers on this particular TV weren’t that good, and since [Tony] uses a surround sound system anyway, he decided to make use of their space better. Cutting out the grill and removing the whole assembly left him with more than enough room to store the Pi and mount a 3D printed LAN and USB port cover!

He’s running Raspbmc which lends the TV tons of functionality. If you don’t mind voiding your warranty, this is a great hack!

Retropie Gaming Table

rasp pi gaming table

[Jody] just finished the write up on this awesome coffee table he’s been working on. It’s an all-in-one gaming table that makes use of Retropie.

When they finally got rid of the kids’ train-play-set table, they needed something to replace it. Eager to use his new collection of tools (including a 3D printer and a laser cutter!), [Jody] decided to build this thing from scratch. He admits he isn’t a very skilled woodworker, but we think he did an excellent job!

The screen is an old laptop LCD that [Jody] took apart and refitted into the nice wood frame you see above. He’s added speakers with 3D printed grills, and the whole thing turns on and off when the screen is lifted, all thanks to a pantry door switch he installed. In the side compartments he has wireless keyboards, mice, and xBox 360 controllers to play the games with. He and his son have already put many hours into the classic Cave Story, first released back in 2004.

There’s a great build log on his site, so if you’re interested in making your own, check it out!

Google Glass? How About This Home-brew Solution?

[Codeninja] has been sending us some great hacks over the years, and we’ve just learned that his attention has been on building wearable computers lately! He’s currently on his third iteration of a Google Glass-like prototype, which features a motorized element which allows for the retraction of the screen.

There’s not too much info on his blog about them, but we do know he’s using a Raspberry Pi, a few small servos, and a pico LCD screen. Most of the frame is 3D printed, and it also features a hidden camera, accelerometers, and a few environmental sensors.

He’s uploaded an animated gif of the mechanism that moves the display away from his eye, and it looks straight out of some science fiction movie — check it out after break!

Continue reading “Google Glass? How About This Home-brew Solution?”

Battery Backup For RasPi Keeps Your Data Safe

We’ve all raised a clench fist in anger over lost data, and it’s usually the result of unjustified optimism and lack of planning. [George] shared his solution that prepares for the worst: a circuit that provides backup power to a RasPi and its hard drives. [George’s] Pi setup runs as both an Apple Time Machine server and a website backup server, and a power outage could corrupt the data stored on the Pi’s attached hard drives.

Rather than turn to commercial solutions, however, [George] wanted to take advantage of the Pi’s low power consumption and create an inexpensive custom circuit that would safely and automatically power down the devices upon loss of power. To detect a power failure, the build connects one of the Pi’s GPIOs to an opto-isolator, which—through a zener diode—connects to the 12V wall adapter: though [George] welcomes suggestions for alternative methods of safely identifying a mains power loss. The rest of the circuit serves as a trickle charger for the two attached 9V batteries and as a regulator to supply the correct voltage to the RasPi. Power MOSFETs connected to a GPIO handle the delayed power off.

You can view (and edit!) the circuit online here and find the relevant source code on [George’s] website. If you want to build your own RasPi file server, try cramming all the parts into an old optical drive enclosure.

Unbricking A Router With A Raspi

About a decade ago, [Mansour] learned of the Linksys WRT54G, a wireless router that’s been shoved into just about every project under the sun. After learning of this device’s power, he decided a firmware upgrade was in order. Unfortunately, he accidentally bricked this router and left it sitting on a shelf for a few years.

Idle devices are the devil’s playthings, and when [Mansour] discovered a Samsung hard drive with a an SDRAM that was compatible with the WRT54G, he decided he would have a go at repairing this ancient router. There was only one problem: the most popular utility for programming the router through the JTAG header required a PC parallel port.

No problem, then, as [Mansour] had a Raspberry Pi on hand. The parallel port utility bit-banged the new firmware over to the router, something the GPIO port on the Pi could do in spades. By adding Pi support to the debricking utility, [Mansour] had a functional WRT54G with just a little bit of patience and a few wires connecting the GPIO and JTAG header.

Upstagram: A Flying Raspberry Pi

Upstagram Pre-flight

This tiny paper house, modeled after the one in Disney’s UP, contains a Raspberry Pi, battery pack, camera, and 3G stick. The Upstagram, built by the folks at HackerLoop, took to the skies of Paris to snap and share photos on Instagram.

We’ve seen Raspberry Pis in flight before, but this build pulls it off using simple party balloons. It took around 80 balloons to get the house to a height of 300 feet. A kite string was used to tether the device and control its flight.

This hack also required some reverse engineering of Instagram. Since the photo sharing service only allows the official Android and iOS apps to upload, they had to use a reverse engineered Instagram client. This allows the unsupported Raspberry Pi to interact with the service, snapping pictures periodically and sharing them on the device’s stream.

After the break, check out a quick video overview of the project.

Continue reading “Upstagram: A Flying Raspberry Pi”

Detect Disguises With A Raspberry Pi

maskdetect

Computer vision based face detection systems are getting better every day. Authorities have been using face detection and criminal databases for several years now. But what if a person being detected is wearing a mask? High quality masks have been making their way out of Hollywood and into the mainstream. It isn’t too far-fetched to expect someone to try to avoid detection using such a mask. To combat this, [Neil] has created a system which detects face masks.

The idea is actually rather simple. The human face has a well-defined heat signature. A mask will not have the same signature. Even when worn for hours, a mask still won’t mimic the infrared signature of the human face. The best tool for this sort of job would be a high resolution thermal imaging camera. These cameras are still relatively expensive, so [Neil] used a Melexis MLX90620 64×8 16×4 array sensor. The Melexis sensor is interfaced to an Arduino nano which then connects to a Raspberry Pi via serial.

The Raspberry Pi uses a Pi camera to acquire an image. OpenCV’s face detection is then used to search for faces. If a face is detected, the data from the Melexis sensor is then brought into play. In [Neil’s] proof of concept system, a temperature variance over ambient is all that is needed to detect a real face vs a fake one. As can be seen in the video after the break, the system works rather well. Considering the current climate of government surveillance, we’re both excited and a bit apprehensive to see where this technology will see real world use.

Continue reading “Detect Disguises With A Raspberry Pi”