Hackaday Links: September 21, 2012

And then Obi-wan said, “you were supposed to be the chosen one!”

Yesterday, a little bird told us Makerbot will be moving to a closed source model for their newest printer. This was confirmed, and now [Zach Smith] a.k.a. [Hoeken] – creator of the RepRap Research Foundation and co-founder of Makerboth Industries is weighing in with his take on the situation.

Hey! Free stuff!

Remember that DIP28 ARM chip with BASIC? Remember how I told you Coridium will be giving a few hundred away as samples? Yeah, that’s happening now.

Replacing a scroll wheel with titanium

[Rhett] has been using a Logitech mouse for a few years now. Recently the scroll wheel became corroded, so [Rhett] replaced it with a titanium version. The perfect match for the trusty battle axe, theIBM Model M keyboard.

Web-based IDE for the Raspi

[Phil Torrone] sent in a video of something he and [ladyada] are working on. It’s a web-based IDE for the Raspberry Pi. We’ll do a full review of this when it’s released.

Intro to software defined radio

So you have one of those TV tuner dongles and want to get in to software defined radio. Where do you start? [Al Williams] over at Dr. Dobbs has a great introduction to SDR, and gives a few pointers that should help you get that cool looking waterfall plot very quickly. Thanks for sending this in, [Chris].

3D Printer Control For The Raspi

Instead of dedicating his laptop to control his RepRap all night, [Walter] is using a Raspberry Pi as an Internet-enabled front end for his 3D printer.

Before [Walter] got his hands on a Raspberry Pi, he set up his laptop next to his RepRap and let the machine do its work for hours on end. Obviously, this tied up his laptop for a while so when his Raspi was delivered he was eager to offload the responsibilities of controlling a printer to his new Linux board.

Right now, [Walter] has his Raspberry Pi set up as a web interface able to control his printer similar to Pronterface. We have to note that the Raspberry Pi isn’t driving servos or feeding filament onto the bed; those responsibilities are still handled by the RepRap electronics, but the ability to use a 3D printer over the web is still pretty cool.

[Walter] is putting the finishing touches on his 3D printer web interface, after which he’ll upload everything onto the git. Planned features for future updates include uploading gcode from the web and an option to connect a webcam for visual feedback when controlling a remote printer.

Video demo after the break.

Continue reading “3D Printer Control For The Raspi”

Multicolor Print Head Allows RepRap To Print Rainbows

Multicolor 3D printers have been around for a while, but most of these machines – like the Makerbot Replicator – suffer from alignment problems and the inability to mix colors on the fly. [RichRap] came up with an interesting solution to this problem by having three filament extruders feed into a single hot end, allowing him to change and mix colors on the fly.

To print in multiple colors, [RichRap] developed a three-extruder x carriage that sends colored filament to a single hot end. Unlike the Makerbot Replicator, [Rich]’s extruder can mix and blend different colors into each layer of a print.

The electronics portion of the build, [RichRap] controlled the X, Y, and Z axes of his printer with a RAMPS board, but used a slightly modified Sanguinololu board for the extruder motors. A single motor driver for the extruders is connected to a trio of toggle switches, allowing [RichRap] to switch between filaments on the fly.

[Rich] has a very cool build on his hands, but it’s far from a perfect solution. Right now, any one of the three colors can be used to print, but printing with two or three colors simultaneously requires a change in the firmware. We expect someone to solve this problem in the near future, allowing the holy grail of a CMYK print head to come to fruition.

You can see a demo video of [RichRap]’s tri-color print head after the break.

Continue reading “Multicolor Print Head Allows RepRap To Print Rainbows”

Help Us Decide If This Huge Reprap Array Is The Largest Fleet To Date

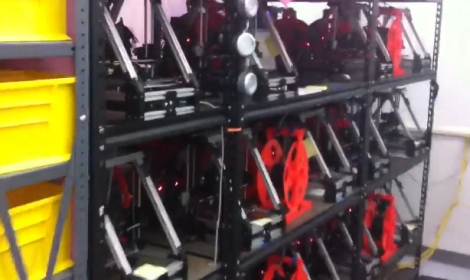
30-repraps

Take a minute to think about what your dream job might be.

Done imagining you are a ridiculously wealthy bachelor?  Good.

Back here in the real world, [Caleb Cover] has come into what might be one of the coolest hacking-related jobs we’ve seen in awhile. He recently snagged a gig working for Aleph Objects as the fleet master for a large array of 3D printers. His duties include the care and feeding of 30 MiniMax-style repraps, a job description we sure wouldn’t mind having.

Aside from merely gloating about his newfound employment, [Caleb] wrote in asking if we knew of a reprap setup larger than the one he is responsible for. We couldn’t come up with one, but perhaps you can.

Right now, [Caleb] says that he’s working on seeing how well the machines can produce parts to replicate themselves, which will certainly make this the largest collective set of production 3D printers sooner or later.

While you hunt down other large reprap setups at your monotonous desk job, check out the video below to hear the symphony of 3D printing that greets [Caleb] at the door each day.

Think you might have seen a 3D printing setup more massive than this one?  Pics Vids or it didn’t happen.  Seriously, we want to see em!

Continue reading “Help Us Decide If This Huge Reprap Array Is The Largest Fleet To Date”

Toorcamp: Type A Machines

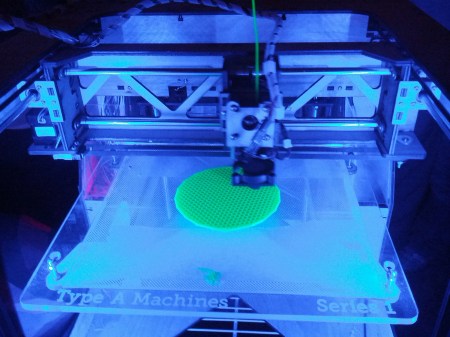
Type A Machines designs and builds 3D printers in San Francisco. [Miloh], one of the founders, brought two of their flagship Series 1 printers to Toorcamp. He printed out a variety of models including water tight cups and quadcopter arms.

The RepRap Arduino MEGA Pololu Shield (RAMPS) is used to drive the stepper motors for each axis, as well as the extruder. This is attached to an Arduino MEGA running the Marlin RepRap firmware. Type A Machines ships the printer with Polylactic Acid (PLA) filament, which is biodegradable.

On software side, you start with a 3D model in STL format. This can be exported from 3D software such as Google SketchUp or Autodesk 123D. You then need a slicer to generate G-code and machine control software to command the printer. [Miloh] used Slic3r and Repetier for his workflow, but he also pointed out a good summary of 3D printer workflows.

The Series 1 was launched at the Bay Area Maker Faire this past May. It has a print volume of 1200 mL, which is the largest print volume of any desktop printer around. The Series 1 brings another option into the low-cost 3D printer market.

TangiBot And The Perils Of Open Source Hardware

I’ve commented before on the terrible inefficiency and artificially high expense of the current crop of 3D printers. It simply doesn’t make sense to produce the plastic parts of 3D printer kits on a printer farm when there are literally thousands of Chinese injection molding companies that will make those parts cheaper. It looks like [Matt Strong] heeded my call and now has a Makerbot Replicator clone up on Kickstarter that costs $700 less than the official version. We assume the Makerbot lawyers are having a busy morning.

From the info on the Kickstarter page, [Matt] is used parts from his Makerbot Replicator to design a one-to-one copy. Every part and component on [Matt]’s TangiBot is 100% compatible – and seemingly 100% identical – with the Makerbot Replicator. Like the Replicator, [Matt] is offering a dual extruder version that allows you to print in two colors.

At the bottom of the Kickstarter page, under a section titled, “How is 3DTangible able to make a Replicator Clone?,” you’ll see [Matt]’s reasoning for cloning the MakerBot replicator. He says everything is open source, and, “MakerBot used other open source designs when designing and producing their 3D Printers.” We’ll agree that MakerBot used existing extruder designs (and improved upon them), but MakerBot was not this blatant in borrowing from the RepRap project.

For want of editorializing, I’ve complained about the stupid inefficiency of manufacturing 3D printers with 3D printers before. It was only a matter of time before someone realized current manufacturing techniques can be used to make 3D printers cheaper. [Matt] – dude – you were supposed to clone a RepRap. Makerbot has done some really incredible things for the community such as building Thingiverse and generally being an awesome cheerleader for the 3D printing community. Taking the flagship Makerbot printer and making it cheaper will not make [Matt] any friends on the Internet, but at least the laws of economics are coming to the world of 3D printers.

Thanks [Brad] for sending this in.

Melting Plastic Powder Together, One Layer At A Time

[youtube=http://www.youtube.com/watch?v=vVOtKSKyIvI&fw=470]

Here’s an interesting development in the world of 3D printers: A rapid prototyping machine that melts plastic powder together to create objects with extremely good resolution

The Blueprinter works by drawing a 0.1 mm thick layer of plastic powder over the build platform. After that, a very hot needle-shaped probe melts the plastic together. This process continues at a rate of 10mm an hour on the z axis, and a very precise plastic model eventually appears in the powder.

There is no price ( or solid release date ) for the Blueprinter, but this 3ders.org article from earlier this year tells us the price for the machine will be €9,995, with a material cost of €49 per kg. Pricey, yes, but seeing as how the RepRap community already has the techniques behind melting plastic down pat, it might now be too hard to build your own plastic sintering printer.

If you know of any current projects or builds that are trying to emulate this plastic powder melting technique, drop us a note on the tip line. We’d love to see a version of this printer up and running. Until then, you can check out the render showing a rendered Blueprinter in action, along with a demo of a plastic clip printed on this sintering printer.

Continue reading “Melting Plastic Powder Together, One Layer At A Time”