3D DLP Printer Builds An Orange TARDIS

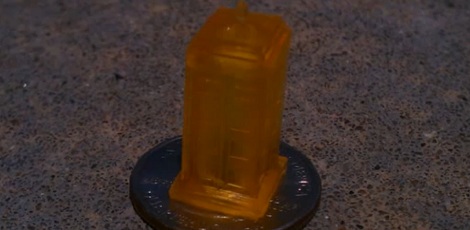
This micro-sized TARDIS is the latest print from [Ron Light]’s Sedgwick 3D DLP printer. Yes, it’s orange, but the print quality for such a small object is pretty astounding.

The Sedgwick 3D printer is currently available as a kit on Kickstarter. For five hundred bones, the Sedgwick provides all the parts – minus a DLP projector and resin – to make your own miniature Type 40 with a broken chameleon circuit. There’s a lot more this printer can do, from miniature cathedrals to hollow geodesic spheres.

This is the latest in what will be a long line of DLP projector / resin 3D printers, and the most affordable one to date. The last one we saw was an awesome $2400 machine that included a projector and resin. At $500 for a projector-less kit, the Sedgwick still handily beats even the cheapest option we’ve seen so far.

[Ron Light] is from Kansas City, and our boss man [Caleb] ran into him at the KC Maker Faire a few weeks ago. You can check out that little interview and a few videos of the Sedgwick doing its thing after the break.

Continue reading “3D DLP Printer Builds An Orange TARDIS”

Free Formed Circuit Protected By A Brick Of Crystal Clear Resin

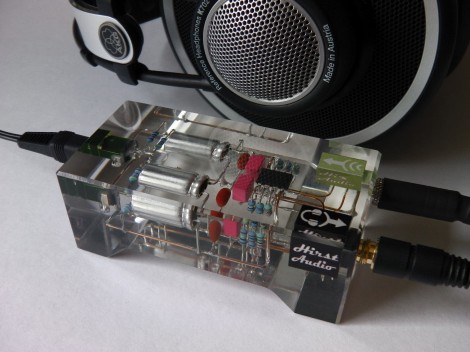
The look of this crystal clear resin brick is pretty amazing. [Rupert Hirst] decided to encase his amplifier circuit in a block of polyester resin. We just hope he got everything in his circuit right because there’s no way to replace any of those parts now!

He deserves a lot of credit for working out a visually pleasing way to mount each component. There wasn’t any type of substrate used, but a few lower gauge wires were picked as the rails and they add some mounting stability. Before casting, he took the case of each of the three jacks apart and sealed the seams with some of the casting resin to prevent the final pour from filling them up.

Eagle CAD was used to design the mold. He printed it out on some card stock, then used a hobby knife to cut the pieces out and super glue to assemble them. A second layer of super glue was run on each seam to ensure they’re water tight. After the casting was made [Rupert] spent plenty of time sanding, routing, and polishing the brick to achieve this look.

This makes us wonder about heat dissipation. Do you think it will be a problem? Tells us what your opinion by leaving a comment.

A Six-year Adventure Into The World Of CNC Fabrication

Hackaday doesn’t always get the entire back story of a build. The usual assumption is that someone decided to build something, and with just a little bit of effort the project makes it into the Hackaday tip line. This doesn’t do justice to the builder, with skills honed after years of practice and experience. A 200-word summary is deceiving, and makes everything look almost too easy. [Michal] decided to buck that trend and sent in his half-decade long adventure of becoming one of the best micro-scale machinists we’ve ever seen.

In 2006, with years of robots made out of hot glue and cardboard behind him, and the quality of 3D printers not up to his exacting specifications, [Michal] snapped. He sunk the better part of $3000 into a Roland MDX-15 desktop mill. After several months of futzing about with acrylic sheet, [Michal] came across the wonderful machining properties of modeling board.

Determined to do something useful with this modeling board, [Michal] started looking into resin casting. Casting in resin is a common technique in the artist and model maker communities to mass produce small plastic parts. After getting his hands on eight liters of polyurethane resin, [Michal] made a useful part guiding the direction his skill set would grow in the coming years.

After years of experimenting with techniques, materials, and mediums, [Michal] eventually honed his craft and was able to finally start building real robots. These projects were a far cry from the cardboard and milk jug contraptions made earlier in his career. [Michal] was now producing incredibly precise gear assemblies with accuracies within 0.002 mm.

You may remember [Michal] from his robot with pivoting wheels we showcased last week. He got a lot of email from people wanting to know how to start delving into his unique blend of artistry, engineering, and craftsmanship. The good news is you can now learn from his mistakes, so a planetary gearbox shouldn’t take more than a few months to finish.

Who Needs Mecanum Wheels?

Skills are all that’s needed to solve a problem. Take this four-wheeled robot as an example. [Michal Zalewski] wanted it to be omnidirectional but wasn’t very satisfied with the concept of mecanum wheels and the like. So he designed a chassis with wheels at each corner that can pivot as one to change orientation. The image may look like a rendering at first glance, but this is actually the physical prototype. See what we mean about skills?

Okay, so the robot design is pretty cool. But we’re more excited about the build process. We’ve looked at [Michal’s] work before. He wrote a thorough guide about CNC mold making. These parts are all cast from epoxy. This starts with a rough milled mold, which is given a second pass for the fine details before being painted with a release agent and used to make a silicone mold. From this the parts are produced. Check out the Flickr set showing the casting process for the planetary gear box on each motor. If only these results were as easy to achieve as he makes it look.

[via Reddit]

Color Changing Door Handles

This color changing door handle was made using a very simple manufacturing process. [Barmak] already had experience working with polyester resins when making passive component filled drawer pulls (he included a couple of pictures at the end of his post). The same process was used here except that instead making it from one solid chunk of clear resin he decided to use alternating layers of dyed resin.

The build begins with a mold made out of MDF. This material has a very smooth surface finish which will help with the final look of the door handle. Threaded rod is inserted through carefully placed holes in the side of the mold — these will serve as the mounting hardware when complete. He then pours thin coats of resin to build up the complete handle.

An RGB LED strip is incorporated in the side of the handle that will go toward the door. It seems like the wires to control the device pass through a hollow spacer surrounding the threaded rod. He makes some mention of using a 555 timer to control the colors, but there’s not much more information than that. Still, the reflected light is a unique feature if you’ve got a place in your home that needs to be spiced up.

Once you’re done, you can use any leftover resin to make your own project boxes.

Devil Horns Adorn The Hood Of My Truck

When you’re hunting zombies you’ve got to give them something to fear. [Shannon Larratt] is getting ready for that eventuality by adding devil horns as his hood ornament. It looks awesome from afar, but when you see the close-up images you realize how lifelike this is. That’s because it’s not a sculpture. [Shannon] cast the ornament in a mold made from his own hand.

The process started with some dental alginate which he slobbered all over his hand as he held the devil horns pose. After the mold had hardened he cast the ornament using fast-curing black plastic resin.

With the ornament now in hand he needed a way to secure it to the hood of his vehicle. He picked up a threaded U-bolt. A hole and a slot were carved in the base of the ornament to receive the U-bold and a straight bolt for a trio of anchor points. More of the black resin fills the holes, securing the bolts and making it a snap to mount the ornament by drilling through the hood.

We also find it awesome that during this process [Shannon] took the time to cast his daughter’s fist for use as a door knob at home.

3D Printer Gets A Big Resolution Improvement

[Jose Carlos Veloso Junior] has been working on his 3D printer to improve the resolution. We looked in on his project back in October when he was printing the blue busts like the one seen above.

We were impressed by the resolution he was able to achieve back then, using liquid resin that is cured with visible light. The resin creates a thin layer on a glass tray, and is cured when a projector shines precisely positioned light from below. The cured resin is then lifted on the Z-axis, and the next layer in the printing process is hardened by the projector’s light.

Well, this newest rendition far outperforms the initial iteration. The bust on the right looks like it’s been hand-buffed to remove the layer lines, but it actually just came off of the printer. [Jose] made a video of the new equipment in action, which you can watch after the break. He’s keeping most of the juicy bits to himself but he did tell us that the improvement he achieved were due to multiple changes in the process. He tweaked the software to use a more precise curing time, the resin formula has been improved, the ability to isolate pixels without hardening resin around them has been stepped up, and he’s made changes to the way the printer is calibrated and how it lifts the hardened model.

This is fantastic. Kudos to you sir!

Continue reading “3D Printer Gets A Big Resolution Improvement”