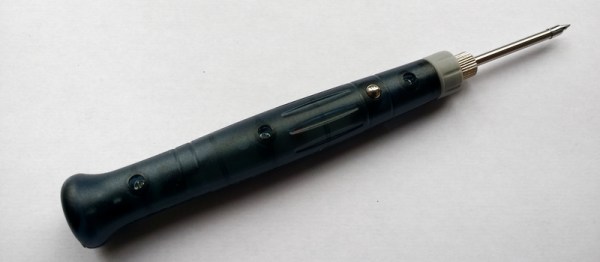
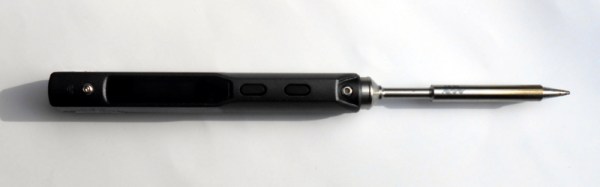
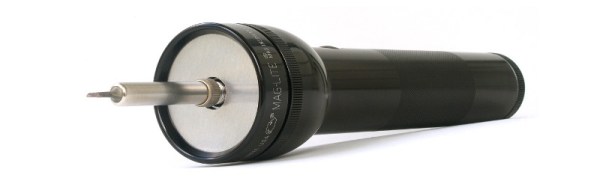
Tetris On A Soldering Iron

Our commenteers have all said good things about the open-source TS100 soldering iron pencil: things like “it solders well”. But we’ve all got soldering irons that solder well. What possible extra value does having open-source firmware on a soldering iron bring? [Joric] answered that question for us — it can play Tetris. (Video embedded below.)

While that’s cool and all, it wasn’t until we were reading through the README over at GitHub that the funniest part of this hack hit us. Every time you lose a game, the iron tip temperature increases by 10 degrees. Tetris for masochists? The makings of some horrible bar bets? We’re just glad that it’s open-source, because we’re not that good and it would get too hot to handle fast.

We haven’t tried out a TS100 yet, but this hack is almost pushing us to impulse purchase. There are alternative versions of the firmware if you just don’t like the font, for instance. And now, Tetris. Will this become the hot new gaming platform that you’ve been waiting for? Let us know in the comments.

Continue reading “Tetris On A Soldering Iron”

DIY Induction Soldering Iron

[Kasyan TV] shows us how to make a really simple DIY induction soldering iron complete with DIY soldering tips.

This is a pretty cool project. Most of us are used to temperature controlled ceramic heating elements, but there are other ways to get those irons up to temperature. Using scraps from older, presumably broken, soldering irons and some pieces of copper and iron along with a thermocouple for temperature management, [Kasyan TV] manages to throw together an Inductively heated soldering iron. To insulate the coil from the iron they use Kapton tape. The video goes on to show how to make your own induction iron, although missing is a power supply. We are sure a quick eBay search for an induction heater module should bring up something suitable to power the iron, or you could just wait and watch the their next video that will go over power supplies. The soldering tips are simply made from thick copper wire sculpted into the correct shape.

There are advantages to using a soldering iron like this, for example they are pretty durable and will take a knock or two, Our concern is that magnetically sensitive parts may not be happy, and the iron might destroy what you are trying to build. Either way we’ve put the video below the break, so take a look.

Hackaday has featured a few different DIY soldering irons and some pretty cool DIY Soldering Stations over the years. What is your soldering iron of choice and why?

Continue reading “DIY Induction Soldering Iron”

One Soldering Controller To Rule Them All

If your favourite programming language is solder, they you’ve surely worked your way through a bunch of irons and controllers over your hacker existence. It’s also likely you couldn’t pick one single favourite and ended up with a bunch of them crowding your desk. It would be handy to have one controller to rule them all. That’s just what [sparkybg] set out to do by building his Really Universal Soldering Controller. His intent was to design a controller capable of driving any kind of low voltage soldering iron which used either an in-line or separate temperature sensor (either thermocouple or resistive PTC).

This project has really caught on. [sparkybg] announced his build about two years back and since then many others have started posting details of their own Unisolder 5.2 builds. [zed65] built the version seen to the right and [SZ64] assembled the boards shown at the top of this article.

The controller has been proven to work successfully with Iron handles from Hakko, Pace, JBC, Weller, Ersa, as well as several Chinese makes. Getting the controller to identify one of the supported 625 types of iron profiles consists of connecting two close tolerance resistors across the relevant pins on the 9-pin shell connector. This is a brilliant solution to help identify a large variety of different types of irons with simple hardware. In the unlikely situation where you have a really vague, unsupported model, then creating your own custom profile is quite straightforward. The design is highly discrete with an all analog front end and a PIC32 doing all the digital heavy lifting.

To get an idea of the complexity of his task, here is what [sparkybg] needs to do:

“I have around 200 microseconds to stop the power, wait for the TC voltage to come to its real value, connect the amplifier to this voltage, wait for the amplifier to set its output to what I want to read, take the measurement from the ADC, disconnect the amplifier from the TC, run the PID, and eventually turn the power back on. The millivolts to temperature calculation is done using polynomial with 10 members. It does this calculation using 32bit mantissa floating point numbers and completes it in around 20 microseconds. The whole wave shaping, temperature calculation, PID and so on is completed in around 50-60 microseconds. RMS current, voltage and power calculations are done in around 100 microseconds. All this is done between the half periods of the mains voltage, where the voltage is less than around 3 volts.”

The forum is already over 800 posts deep, but you can start by grabbing the all important schematic PDF’s, Gerbers, BoM and firmware files conveniently linked in the first post to build your own Unisolder5.2 controller. This Universal Controller is a follow up to his earlier project for a Hakko T12/T15 specific controller which gave him a lot of insight in to designing the universal version.

[sparkybg] has posted several videos showing the UniSolder5.2 controlling several types of Irons. In the video after the break, he demonstrates it controlling a Weller WSP80.

Continue reading “One Soldering Controller To Rule Them All”

Review: Antex TCS 50W Digital Temperature Controlled Soldering Iron.

Sometime last summer, I suffered a very sad loss indeed. My soldering iron failed, and it was not just any soldering iron, but the Weller Magnastat temperature-controlled iron that had been my iron of choice since my student days. It was time to buy a replacement, and a whole world of soldering equipment lay before me. In the end I settled on a choice that might seem unexpected, I bought an Antex TCS 50W temperature controlled iron with a digital temperature controller and LCD display in its handle.

No room for a poor iron

When looking at a new iron it’s worth considering for a moment what requirements you might have.  After all, while we’d all love to own a top-of-the range soldering station it’s sometimes necessary to target your purchase carefully for an acceptable blend of affordability, reliability, and performance. It’s possible to find temperature controlled irons for astoundingly low prices these days, thanks to the wonders of globalised manufacturing. But the irons themselves will not be of good quality, their bits will be difficult to replace, and sometimes they are better described as variable temperature rather than temperature controlled. If I was to escape a poor choice I’d have to set my sights a little higher.

Antex are a perennial in the world of British electronics, their signature yellow-handled irons have been around for decades. They aren’t priced at the top end of the market yet they have a pretty good reputation, but could their all-in-one temperature controlled iron be a good alternative to a unknown-name iron that came with a soldering-station-style controller? I parted with my £55 (about $68) before taxes, and waited for the delivery.

All-in-one, win or bin?

The iron I chose is the latest in a long line of their all-in-one temperature controlled irons, and so the blurb tells me, the first with digital control. Previous models had an analogue adjustment which if I recall correctly was achieved by means of a screw, while this one has an LCD display with up and down buttons on its handle.

I haven't bothered with the supplied stand, as you can see.
I haven’t bothered with the supplied stand, as you can see.

In the box are the iron, a rather useless stand made from metal sheet, and an instruction leaflet. Fortunately my requirements included a decent stand, so I’d already ordered the more substantial companion product with a sponge. Out went the sponge and in went a bundle of brass turnings, but the stand itself is fine.

The iron has the usual Antex bit that fits as a sleeve over the cylindrical element. I bought a range of bits of different sizes, it’s never a bad thing to have choice. The handle is bigger than their standard irons as you might expect, but has a flattened and curved profile that’s easy on the hand. It’s noticeably lighter than the Magnastat, which along with its extra-flexible silicone cable makes it easier to use than its predecessor.

In use, the extra length of the handle doesn’t compromise soldering ability. In the time since purchase it has been used to construct multiple projects, and everything from the smaller surface-mount components upwards are taken in its stride. The 50 W element has plenty of power for soldering to PCB planes that suck away the heat, though you probably wouldn’t use it to solder heavy-gauge copper.

The temperature range of 200 to 450 Celcius is ample for my requirements, in fact once I’d set it to my normal 360 degrees I’ve never changed it. Time from power-on to full working temperature is about 45 seconds, which isn’t the fastest on the block, but then again since I turn it on when I sit down it’s not ever been an issue.

A match made in heaven

So, based on quite a few months of regular use, I’m happy with my iron. The question is though, was it the best choice? I think so, given that the competition at the price would almost certainly not come with such readily available support. There’s almost an instinctive distrust of all-in-one temperature-controlled irons that I haven’t found to be justified by the reality. An alternative might have been to build one of the clever designs that adds a temperature controller to a Weller tip, but given that this is an iron I sometimes use to earn a living I’d rather be working for cash than working on my iron. There are certainly cheaper irons and there are probably better irons, but for me this one hits the sweet spot between the two sets of being a good enough iron without being too expensive.

60 Watt USB Soldering Iron Does It With Type-C

Some time back we ran a post on those cheap USB soldering irons which appeared to be surprisingly capable considering they were really under powered, literally. But USB Type-C is slated to change that. Although it has been around for a while, we are only now beginning to see USB-C capable devices and chargers gain traction. USB-C chargers featuring the USB-PD option (for power delivery) can act as high power sources allowing fast charging of laptops, phones and other devices capable of negotiating the higher currents and voltages it is capable of sourcing. [Julien Goodwin] shows us how he built a USB-C powered soldering iron that doesn’t suck.

He is able to drive a regular Hakko iron at 20 V and 3 Amps, providing it with 60 W of input power from a USB-C charger. The Hakko is rated for 24 V operating voltage, so it is running about 16% lower power voltage. But even so, 60 W is plenty for most cases. The USB-C specification allows up to 5 A of current output in special cases, so there’s almost 100 W available when using this capability.

It all started while he was trying to consolidate his power brick collection for his various computers in order to reduce the many types and configurations of plugs. Looking around, he stumbled on the USB-PD protocol. After doing his homework, he decided to build a USB Type-C charger board with the PD feature based on the TI TPS65986 chip – a very capable USB Type-C and USB PD Controller and Power Switch. The TI chip is a BGA package, so he had to outsource board assembly, and with day job work constantly getting in the way, it took a fair bit of time before he could finally test it. Luckily, none of the magic smoke escaped from the board and it worked flawlessly the first time around. Here is his deck of slides about USB-C & USB-PD [PDF] that he presented at linux.conf.au 2017 Open Hardware Miniconf early this year. It provides a nice insight to this standard, including a look at the schematic for his driver board.

Being such a versatile system, we are likely to see USB-C being used in more devices in the future. Which means we ought to see high power USB Soldering Irons appearing soon. But at the moment, there is a bit of a “power” struggle between USB-C and Qualcomm’s competing “Quick Charge” (QC) technology. It’s a bit like VHS and Betamax, and this time we are hoping the better technology wins.

Probably The Simplest Electronic Temperature Controlled Soldering Iron

We’re all used to temperature controlled soldering irons, and most of us will have one in some form or other as our soldering tool of choice. In many cases our irons will be microprocessor controlled, with thermocouples, LCD displays, and other technological magic to make the perfect soldering tool.

All this technology is very impressive, but how simply can a temperature controlled iron be made? If you’re of an older generation you might point to irons with bimetallic or magnetic temperature regulation of course, so let’s rephrase the question. How simply can an electronic temperature controlled soldering iron be made? [Bestonic lab] might just have the answer, because he’s posted a YouTube video showing an extremely simple temperature controlled iron. It’s not the most elegant of solutions, but it does the job demanded of it, and all for a very low parts count.

He’s taken a ceramic housing from a redundant fuse holder, and mounted it on a metal frame to make a basic soldering iron holder into which the tip of his unregulated iron fits. To the ceramic he’s fitted a thermistor, which sits in the gate bias circuit of a MOSFET. The MOSFET in turn operates a relay which supplies mains power to the iron.

Temperature regulation comes as the iron heats the ceramic to the point at which the thermistor changes the MOSFET and relay state, at which point (with the iron power cut) it cools until the MOSFET flips again and restarts the process. You may have spotted a flaw in that it requires the iron to be in the holder to work, though we suspect in practice the thermal inertia of the ceramic will be enough for regulation to be reasonably maintained so long as the iron is returned to its holder between joints. Nobody is claiming that this temperature controlled iron is on a par with its expensive commercial cousins, instead it represents a very neat hack to conjure a useful tool from very few components. And we like that. Take a look at the full video below the break.

Continue reading “Probably The Simplest Electronic Temperature Controlled Soldering Iron”

How To Make Your Weller Wireless

On occasion I have encountered portable soldering irons and my impressions of them have ranged from nearly usable to total rubbish. While using a popular butane powered model and pondering if it was really any better than a copper wire and a candle a thought occurred to me. A regular old Weller station runs on 24 volts AC and performs all of its temperature regulation in a magnetically activated thermostatic fashion and all of that goodness occurs within the hand piece itself. It stood to reason that it could perform just as well with a DC source.

In this instance we are ignoring the negative effects of switching DC current over AC current on mechanical contacts. After all we are “In the Trenches” wherever we might have need for such a device. Using a couple of gel cell 12 volt 7 amp hour batteries freshly removed from a UPS I strung them up, and there you have it, a totally battery operated  iron with performance equal to that of the one at my bench.

Connecting SMPS to the Weller Iron
Connecting Power to the Weller Iron

Right at 24 volts the iron Thermocycles at the same rate as it would be while using the bench top supply for it. Just sitting under no load it cycles about every ten seconds and there was no perceptible difference in heat capacity or performance. A fully charged pair of batteries will last all day. The on state current draw from a full charge (13.5 volts on each of the batteries) yielded about a 2 amp draw. As the voltage began to decrease the current off cycle would get shorter as one would expect, but no drop in heat transfer was noticed until the batteries were well depleted and that took most of a work day.

For this instance I used the hand piece from the venerable Weller WTCPT station. For ongoing use I would not recommend this due to the use of a mechanical contact within the unit and switching of DC can reduced the life of most mechanical switches. Currently I am awaiting the arrival of some cheap eBay Hakko handpieces; I am sure they are knockoffs, but fine to experiment with a simple PWM with a feedback loop controller as the basic Hakko design also utilizes a 24 volt source. An automatic shut off timer would also be handy to avoid premature battery abuse due to a forgetful operator.

IMG_2505