Designing The Atom Smasher Guitar Pedal

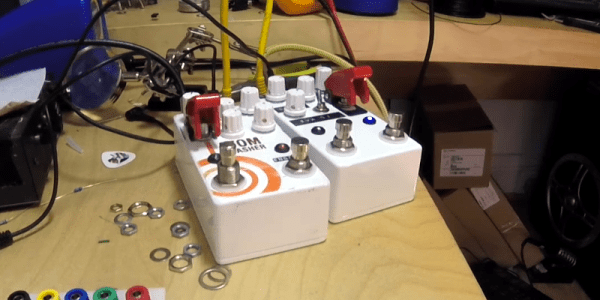
[Alex Lynham] has been creating digital guitar pedals for a while and after releasing the Atom Smasher, a glitchy lo-fi digital delay pedal, he had people start asking him how he designed digital effects pedals rather than analog effects. In fact, he had enough interest, that he wrote an article on it.

The article starts with some background on [Alex], the pedals he’s built and why he chose not to work on pedals full-time. Eventually, the article gets to the how [Alex] designed the Atom Smasher. He starts by describing the chip he used, the same one that many hobbyists, as well as commercial builders, use for delay based effects – the SpinSemi FV-1.

The FV-1 is a SMD chip used for digital delays and other effects that require a delay line – reverbs, choruses, flangers, etc. It’s programmed with an assembly-style language called SpinASM. [Alex] goes over some of the tools and references he used when designing for the pedal. He also has a list of tips for would-be effect pedal designers which work whether you’re designing digital or analogue effects.

[Alex] ends his article saying that, in the future, he might make the schematic and code available, but for the moment he’s not. The FV-1 is an interesting chip, and [Alex]’s article gives a nice high-level look at its features and how to develop for it. For some interesting guitar pedal related articles, check out this one using effects pedals to get better audio in your car, and here’s one about playing with DSP and designing a pedal with it.

Continue reading “Designing The Atom Smasher Guitar Pedal”

This Method Of Gluing Onto Curves Sucks!

Sometimes the right tool for a job can be unusual, and this sucked only in the sense that vacuum sealing was involved. Recently [Martin Raynsford] found himself in a situation of needing to glue a wood veneer onto a curved surface, but faced a shortage of clamps. His clever solution was to vacuum-seal the whole thing and let the contour-hugging plastic bag take care of putting even pressure across the entire glued surface. After the glue had set enough to grip the materials securely, the bag was removed to let the whole thing dry completely. Gluing onto a curved surface has never been so clamp-free.

The curved piece in question was made from dozens of layers of laser-cut plywood, stacked and glued to make the curved lid of a custom-built chest. It might have been just the right shape, but it wasn’t much to look at. As you can see, giving it a wood veneer improved the appearance considerably. Wood veneers are attractive and versatile; we’ve seen for example that LEDs will shine through wood veneer quite easily.

DIY Illuminator For UV Fluorescence Photography

The image shown is the mineral Hackmanite, which fluoresces under ultraviolet lighting. However, not all UV is created equal, and that makes a difference if you’re into UV imaging. The image for this article is from [David Prutchi] and shows the striking results of using different wavelengths of UV. [David] goes into detail on how to make your own DIY Long, Medium, and Short-wave UV Illuminator complete with part numbers and wiring diagram. The device isn’t particularly complicated; the real work was determining the exact part numbers and models of lamp, filters, and ballasts required to get the correct results. [David] has done that work and shared it for anyone interested in serious UV fluorescence photography, along with a white paper on the process.

We’ve seen [David]’s work before. We featured his DIY short-wave UV imager in the past, and his DOLPi camera project was a 2015 Hackaday Prize finalist. It’s clear he really knows his stuff, and genuinely enjoys sharing his discoveries and work.

The Perfect Tourist Techno-Cap

How many times are you out on vacation and neglect to take pictures to document it all for the folks back at home? Or maybe you forgot just exactly where that awesome waterfall was. [Mark Williams] has made a Raspberry Pi Zero enabled cap that can take photos and geotag them with the location as well as the attitude of the camera.

The idea is to enable the reconstruction of a trip photographically. The hardware consists of a Raspberry Pi Zero W coupled with a Raspberry Camera V2 and a BerryGPS-IMU. Once activated, the system starts taking photos every two minutes. Within each photograph, the location of the photographer is recorded like most GPS enabled camera.

An additional set of data including yaw, pitch, and roll along with direction is also captured to understand where the camera is pointing when the image was taken. Even if he’s tilting his head at the time the photo was taken, the metadata allows it to be straightened out in software later.

This information is decoded using GeoSetter which puts the images on a map along with the field of view. Take a peek at the video below for the result of a trip around Sydney Harbour and the system in action. The Raspberry Pi Zero and camera combo are useful for a lot of things including this soldering microscope. Hopefully, we will be seeing some DIY VR gear with stereo cameras in the near future. Continue reading “The Perfect Tourist Techno-Cap”

Hackaday Prize Entry: Don’t Build This

The ESP8266 is a remarkable piece of hardware. What we originally thought — and what was originally marketed as — a simple UART to WiFi bridge with Hayes modem commands has turned into one of the best embedded platforms around. It’s a powerful little microcontroller, it has WiFi, and it can send raw frames. That last bit is awesome, because it allows for some mischief or mirth making, depending on your point of view.

For his Hackaday Prize entry, [Tejas] is building a WiFi Jammer with an ESP8266. It’s a small device that is able to disconnect anyone from a WiFi AP. Should you build it? No. Can you? Sure, why not.

The code for this WiFi hacking tool is taken from the creator of the ESP8266 deauth toolkit, [spacehuhn], although [Tejas] is violating the license for [spacehuhn]’s (non-Open Source) code. This fantastic piece of firmware uses management packets to send a deauthentication frame, effectively allowing anyone to disconnect any device from a WiFi router. Why would anyone want to do this? Mischief, of course, but there are also a few techniques that could allow an attacker to get a password for the WiFi.

While there are ways to protect against deauth attacks, most routers don’t have management-frame protection enabled. In any event, we’re going to see exactly how annoying deauth attacks can be this week at DEF CON. The smart money is on a small percentage of DEF CON attendees lulzing about with ESPs and the Caesar’s CTO being very, very unhappy.

Monster Mindstorms Delta Bot Delicately Picks Candy

A group of embedded developers from Sioux Embedded Systems in Eindhoven, the Netherlands, wanted to get experience working on Microsoft .Net. To make it fun they made it their project to produce a LEGO train with visitors at LEGO World, the official LEGO convention in the Netherlands. The team developed an application in C# to fully automate the train, with Mindstorms NXT and EV3 bricks as well as LEGO Power Functions motors controlling everything.

The train project carries a simple premise: the visitor chooses one of four colors, and the train goes and picks up a piece of simulated candy with the matching color. Called Sioux.net on Track, the project has produced a new train every year since 2012 with improvement goals in place to add features with every version. Ironically, the least interesting part of the setup is the actual train and track. The team’s creativity comes to the fore in two areas of the project: the method by which the candy color is selected, and the assembly that dispenses the correct color into the train car.

Team member [Hans Odenthal] has built candy-grabbers for various years’ trains. He learned about the ABB FlexPicker and this year decided to build a delta robot for the layout. It consists of huge girders constructed from 5×9 and 5×11 Technic beam frames held together with more Technic beams and hundreds of connector pegs. The three arms each move on a pair of turntables which are geared down to provide as much torque as possible — the fake candy pieces are light, but the arms themselves weigh a lot. [Hans] ended up revamping the gearboxes to up the ratio from 1:5 to 1:25.

Continue reading “Monster Mindstorms Delta Bot Delicately Picks Candy”

Hackaday’s Assistive Technology Challenge Begins Now

This morning marks a new challenge in the Hackaday Prize: we want to see what you can do with Assistive Technology. Twenty entries will win $1000 each, becoming part of the final round for a chance at the top prizes ranging from $5,000 to $50,000.

Assistive Technology means things that help people by improving their quality of life. This can take so many forms but broadly speaking this could make aging easier, turn disabilities into abilities, or enhance the access and delivery of health care.

We’ve seen great things in this area from the Hackaday community. The Grand Prize for the 2015 Hackaday Prize went to an assistive technology that linked motorized wheelchairs to gaze-controlled computers, called Eyedrivomatic. And at the 2016 Hackaday SuperConference we learned how common tools and crowd sourced skills can lead to a new take on physical rehabilitation with a robot-assisted elbow.

The Hackaday Prize challenges us all to Build Something that Matters. It’s hard to argue that there is a better place to take on this challenge than with Assistive Technologies. Enter your project today!