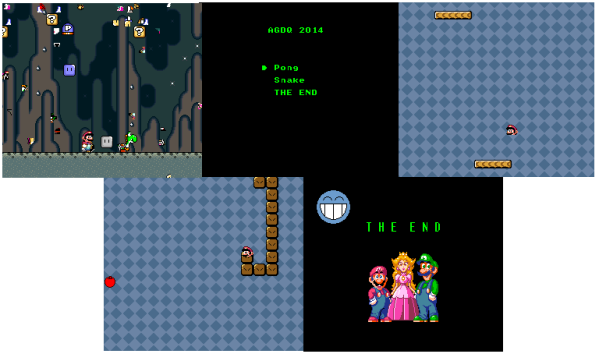
SNESoIP: It’s Exactly What It Sounds Like

prototype-small

Here’s a cool hack for those of you wishing to play some retro multiplayer SNES games online!

[Michael Fitzmayer] is a resident hacker at shackspace; der hackerspace in StuttgartHe’s come up with this clever little ethernet adapter network-bridge that can share local controller-inputs over the internet. The entire project is open-source, and readily available on github. It’s still in the early stage of development, but it is already fully functional. The firmware is small and will fit on an ATmega8, and by the looks of the component list it’s a fairly easy build.

He’s even integrated a switch mode (hold B and Y during boot), which avoids trying to figure out which controller will be player one! After all, don’t you remember untangling the controller cords, trying to figure out which one is which?

We know you had a favorite controller and would give the other “crappy” one to your guest.

Example video is after the break.

Continue reading “SNESoIP: It’s Exactly What It Sounds Like”

SNES Headphones Scream Out For Bluetooth Control

Here’s a build that just exudes nerd cred. It’s an SNES controller modified into a pair of headphones, straight from the workshop of [lyberty5].

The build began by stealing a controller from a PAL SNES and carefully dremeling the buttons and d-pad loose from their plastic frame. The PCB was cut in half, and the remaining plastic was carefully crafted into round speaker enclosures with the help of some epoxy. hot glue, and possibly a few pieces of styrene.

The result is a perfectly formed pair of SNES headphones, with a build quality right up there with the best case mods we’ve seen. Unfortunately, while the buttons are still attached to the PCB, they don’t do anything. We’re thinking a small Bluetooth adapter – or even repurposing a set of Bluetooth headphones with volume and play controls – would be a wonderful use for the 20-year-old, candy-like buttons.

Still, an awesome build, and [lyberty5] really shows off his craft by constructing these wonderful headphones. You can see the time-lapse of the build after the break.

Continue reading “SNES Headphones Scream Out For Bluetooth Control”

Hacking A PAL SNES To Output 50Hz Or 60Hz With A Single Switch

snes-pal-ntsc-mod

[Derecho] grabbed a PAL format Super Nintendo but wanted to make it play nicely with a 60 Hertz NTSC screen. His hack added a single switch to choose between 50 Hz and 60 Hz.

Take a look at the image above to see his alterations to the mainboard. The jumpers soldered to the two chips at the top are by far the trickiest part of the project. Each of the pins he soldered to needed to first be lifted from the PCB pad so that they no longer make contact with the etched traces. The technique he used involves heating the pin with an iron, then gently lifting it with a pin or a razor knife/blade. If you’ve got some experience populating SMD boards with a handheld iron this shouldn’t prove too difficult. The rest of the hack involves adding a 3-position switch (along with a 2k2 resistor) to choose between output modes based on what format game is being played.

Retro Gaming Just In-case

retro-gaming-just-in-case

You can look and look, but you won’t find a Super Nintendo inside of this retro gaming rig. [Webrow] is giving his vintage hardware a rest, and taking this all-in-one game emulator suitcase wherever he goes.

The machine at the heart of his build is of course a Raspberry Pi. You really can’t beat the ubiquitous board for cost, power, and hardware extensibility. An LCD panel from a broken laptop comes along for the ride having been mounted in the lid. For a long time there was no hope for reusing these panels, but [Webrow] found an adapter board (for nearly the same price as the RPi) which converts the DVI from the Pi to the LVDS needed by the screen. The connections and mounting scheme for the screen were where most of the project work was done. Connecting the controllers simply involved soldering some SNES controller sockets to an RPi breakout connector. We do have to compliment him on the red bezel which hides all of the power cords and other unsightly bits. The case look sturdy and ready to play!

Super Nincoffee Jr.

Your morning routine doesn’t include enough old-school gaming. Break the caffeine habit and get your Mario on at the same time with the help of the Super Nincoffee Jr.

[Luigifreakout123] shares the details of the build in the video clip after the break. He starts by revealing that this is the second version he’s made. The first wasn’t a Jr., but instead used a full-sized Mr. Coffee unit. Neither make coffee, but instead serve as an enclosure for the gaming hardware. The on/off switch and original power cable are used to control the electricity to the console. Openings have been cut in the tops and front for a game cartridge and the two controller ports. A composite video and stereo audio cable comes out the back of the machine next to the power cord.

Yeah, it’s super simple, but sometimes that all it takes for a project to be a delight like this one is.

Continue reading “Super Nincoffee Jr.”

Interfacing SNES Controllers With Your Raspberry Pi

This lovely set of wires lets [Florian] connect stock Super Nintendo controllers to his Raspberry Pi. The IDC connector in the upper left plugs into the GPIO header on the RPi rather than going the route of using an intermediary USB converter.

The setup lets you connect two controllers at once, so you’ll have no trouble going head-to-head on Mario Kart as seen in the clip after the break. The ports themselves were pulled from a pair of SNES extension cables. Since button signals are pushed to the console via a shift register there’s just five wires needed for each (voltage, ground, data, clock, and latch). As far was we know the Raspberry Pi pins are not 5V tolerant so you probably want to add some level conversion to this circuit if you build it yourself.

[Florian] wrote a C program which shifts in data from the controllers and converts it to HID keyboard inputs. This should make it extremely flexible when it comes to emulator setup, and using the technique for different styles of controllers should also be pretty easy.

Continue reading “Interfacing SNES Controllers With Your Raspberry Pi”

Overclocking A Starfox Game Cartridge

Some of our younger readers will never have experienced this before, but back in the day your video games would slow way down if there were too many moving objects on the screen. The original Castlevania comes to mind, but many will remember the problem while playing the fantastically three-dimensional Super Nintendo game Starfox. [Drakon] isn’t putting up with that hardware shortfall any longer, he hacked this cartridge to run at 42 MHz, twice as fast as the design spec.

We only occasionally look in on the cart hacking scene so it was news to us that three different versions of a pin compatible chip were used in this hardware. The first two suffer from the slowdown problem, but the final revision (SuperFX GSU 2) doesn’t. It can also be overclocked as high as 48 MHz but because of the video frame rate you won’t see added improvement with the extra 6 MHz.

[Drakon] used a Doom cartridge as a guinea pig because it offers the most RAM, and set to work rerouting the traces for the ROM chip to an EEPROM so that the hardware can be used with different games. He also took this opportunity to patch in the faster clock signal.