Hackaday Prize Entry: Aspirin For Everyone

When it comes to the history of medicine and drugs, Aspirin, or more properly acetyl-salicylic acid, is one of the more interesting stories. Plants rich in salicalates were used as medicines more than four thousand years ago, and in the fourth century BC, [Hippocrates] noted a powder made from willow bark was an excellent analgesic. It was only in the 1800s that acetylated salicylic acid was first synthesized. In 1897, chemists at Bayer gave this ancient remedy a new name: Aspirin. It’s on the WHO List of Essential Medicines, but somehow millions of people don’t have access to this pill found in every pharmacy.

[M. Bindhammer] is working to make Aspirin for Everyone for his entry to the Hackaday Prize, using a small portable lab designed around chemicals that can be easily obtained.

The most common synthesis of Aspirin is salicylic acid treated with acetic anhydrate. Acetic anhydrate is used for the synthesis of heroin, and of course the availability of this heavily restricted by the DEA. Instead, [M. Bindhammer] will use a different method using salicylic acid and acetic acid. If you’re keeping track, that’s replacing a chemical on a DEA list of precursors with very strong vinegar.

[M. Bindhammer] even has a design for the lab that will produce the Aspirin, and it’s small enough to fit in a very large pocket. Everything that is needed for the production of acetyl-salicylic acid is there, including a reaction vessel with a heating element, a water/oil bath, flask, an Allihn condenser, and a vacuum filtering flask. Even if shipping millions of pills to far-flung reaches of the planet were easy, it’s still an exceptional Hackaday Prize entry.


The 2015 Hackaday Prize is sponsored by:

Hackaday Prize Entry: A Better KVM Switch

Now it’s not uncommon to have a desktop and a laptop at a battlestation with tablets waiting in the wings. Add in a few Raspis, consoles, and various cheap computers, and it’s pretty easy to have an enormous number of machines and monitors on a desk. Traditionally, a KVM switch would be the solution to this, sharing a keyboard, mouse, and monitor with many different boxes, but this is an ugly solution. [frankstripod] has a device that fixes that with some interesting software and a few USB hacks.

[frankstripod] is in love with a program called Synergy this program combines the keyboard, mouse, and display of several computers over a network so you’ll only ever have to use one keyboard and mouse; it’s as simple as dragging your mouse from one computer to the other. There are a few limitations, though: keyboards don’t work until the OS has loaded (no BIOS access, then), it doesn’t work if the network is down, and setup can be complicated. This project aims to replace the ‘server’ part of a Synergy setup with a small, networkable KVM.

Right now the plan is to use a small embedded board running Linux to read a USB keyboard and switch the output between several computers. A few scripts detect the mouse moving from one screen to another, and a microcontroller switches USB output between each computer. If it sounds weird, you’re right, but it does work: [frank]’s 2014 Hackaday Prize project was a mouse that worked with two computers at once.


The 2015 Hackaday Prize is sponsored by:

Hackaday Prize Entry: A Low Cost, Open Source MRI

This low cost magnetic resonance imager isn’t [Peter]’s first attempt at medical imaging, and it isn’t his first project for the Hackaday Prize, either. He’s already built a CT scanner using a barium check source and a CCD marketed as a high-energy particle detector. His Hackaday Prize entry last year, an Open Source Science Tricorder with enough sensors to make [Spock] jealous, ended up winning fourth place.

[Peter]’s MRI scanner addresses some of the shortcomings of his Open Source CT scanner. While the CT scanner worked, it was exceptionally slow, taking hours to image a bell pepper. This was mostly due to the sensitivity of his particle detector and how hot a check source he could obtain. Unlike highly radioactive elements, you can just make high strength magnetic fields, making this MRI scanner potentially much more useful than a CT scanner.

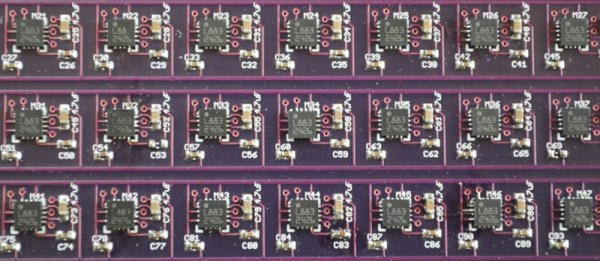
There are a few things that make a low-cost MRI machine possible, the first being a way to visualize magnetic fields. For this, [Peter] is using an array of Honeywell HMC5883L 3-axis magnetometers, the smallest sensors he could find with the largest range. These magnetometers are I2C devices, so with a few multiplexers it’s actually a relatively simple build.

Imaging with these magnetometers is not simple, and it’s going to take a lot of work to make a signal from all the noise this magnetic camera will see. The technique [Peter] will use isn’t that much different from another 2014 Hackaday Prize entry, A Proton Precession Magnetometer. When a proton in your body is exposed to a high strength magnetic field, it will orient towards the high strength field. When the large field is turned off, the proton will orient itself towards the next strongest magnetic field, in this case, the Earth. As a proton orients itself to the Earth’s magnetic field, it oscillates very slightly, and this decaying oscillation is what the magnetic camera actually detects.

With some techniques from one of [Peter]’s publication, these oscillations can be turned into images. It won’t have the same resolution as an MRI machine that fills an entire room, but it will work. Imagine, an MRI device that will sit on a desktop, made out of laser-cut plywood. You can’t have a cooler project than that.


The 2015 Hackaday Prize is sponsored by:

Hackaday Prize Entry: A Fixation On Nitrogen

The reason we can feed six or seven billion people isn’t GMOs. It’s the massive increase in the use of fertilizers over the past hundred years. Most of the nitrogen-based fertilizers are produced using the Bosch-Haber process, a bit of chemical engineering that consumes one percent of all energy worldwide.

For his entry in the Hackaday Prize this year, [Peter Walsh] is improving the Bosch-Haber process, making the production of nitrogen simpler with less equipment.

The Bosch-Haber process runs at temperatures 400°C and pressures of about 200 atmospheres. Right now, this process is run in huge pressure vessels. [Peter]’s idea is to use ultrasonic cavitation to produce the same environment in equipment that can sit safely on a workbench.

[Peter]’s idea is inspired by sonoluminescence, a phenomenon seen when tiny bubbles in water implode producing light. It’s estimated that pressures and temperatures inside these imploding bubbles reach 2000 atmospheres and 5000°C – more than enough for the Bosch-Haber process. By injecting hydrogen and nitrogen into a machine that creates these sonoluminescent bubbles, ammonia will be created and turned into fertilizers to feed the planet.


The 2015 Hackaday Prize is sponsored by:

An Exceptionally Small UV Sensor

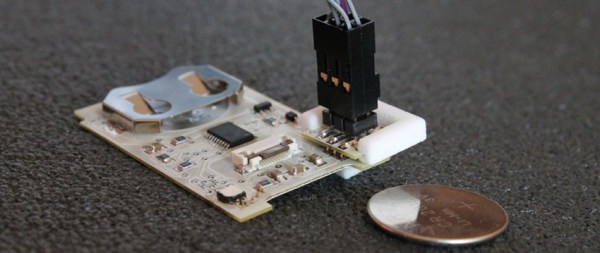
Most of the hacks we see hitting the tip line are exactly that – hacked up hardware projects held together with hot glue and duct tape. [x-labs]’ entry for the 2015 Hackaday Prize, the UV badge, is certainly not one of these projects. It’s a professional one-off, capable of displaying the UV index, temperature, humidity, and pressure in one tiny little enclosure.

The UV badge is designed to be used outdoors. This means any old display ripped from a Nokia phone won’t do; that will wash out in the sun. Instead, [x-labs] is using a very sunlight-readable Sharp Memory LCD. A nice choice, as it’s an exceptionally low-power device.

Inside the 54 x 34 x 7.1 mm 3D printed enclosure is a very thin PCB, and all surface-mount components. The device is powered by a single coin cell battery that should give months of run time.

With a product designed so well, we’re wondering if the UV badge will be in the running for the Best Product category of the Hackaday Prize this year. There aren’t many projects in the running, and the winner gets a enough funding, machinery, and experience to turn their project into a product.


The 2015 Hackaday Prize is sponsored by:

Hackaday Prize Entry: BS Free USB

Take a look at some old electronics magazines, or even a few blog posts from 10 years ago, and you’ll notice something strange: parallel ports. Those big ‘ol DB25 were the way to get bits out of a computer and into a microcontroller. There was a reason for this: it was exceptionally easy to do.

Now, we have USB to deal with, and that means VIDs and PIDs, drivers, enumeration, and a whole bunch of cruft that makes blinking an LED a surprisingly complicated process. [Colin O’Flynn]’s project for the 2015 Hackaday Prize aims to fix that with BSU – BS Free USB.

Instead of USB to serial chips attached to another microcontroller, [Colin] is using a few microcontrollers with a built-in USB interfaces. These chips are loaded up with firmware and controlled with a simple API on the computer side. If you want to blink a pin, just add a library to your project and set the pin high. Want some SPI on your computer? That’s just setting a few pins as MOSI, MISO, and SCK and typing in a few bytes. It’s basically a $2 Bus Pirate that you can stick into any project.

If [Colin]’s name sounds familiar in the context of The Hackaday Prize, it’s because he won second place with the ChipWhisperer last year. While a tiny USB thing isn’t quite as cool as a tool to break embedded encryption, the BSU certainly seems more useful to millions of hardware tinkerers around the world.


The 2015 Hackaday Prize is sponsored by:

Hackaday Prize Entry: Building A Car, From Scratch, Out Of Foam

Want an impressive example of what a few people can do in a garage? How about building an electric car, from scratch, starting with a gigantic chunk of foam?

The Luka EV from [MW Motors] had a few project aims: it should be all-electric, naturally, with a top speed of 130km/h or 80mph. It should have a range of over 300km, and it should look good. That last line item is tricky; it’s not too hard to build an electric car, but to make one look good is a challenge.

The design of the car actually started out as a digital file. A large block of foam was acquired and carefully carved into the desired shape. This foam is covered fiberglass, and parts are pulled off this fiberglass mold. This is a great way to do low-volume production – once the molds are complete, it’s a relatively simple matter to build another body for a second Luka EV.

With all the lights, accessories, windows, and trim installed, it’s time to put this body on a chassis. This was welded out of square tube and serves as a test rig that can be independent of the mess of fiberglass. In the chassis are batteries, suspension, motor controllers, and wheels loaded up with hub motors. It works well, even with one motor.

There’s a lot more to this project, including a great guide on building a road legal car in the UK. The team isn’t based in the UK, but it’s a much more friendly environment for ‘small series’ vehicles. The requirements are easy to meet – “have a horn”, for example – but there are a lot of them.

Already the car is beautiful, and that’s just with it sitting on a trailer. We can’t wait to see this thing hit the road.


The 2015 Hackaday Prize is sponsored by: