Bicycle-Powered Wimshurst Machine

A lot of great pieces of real technology were inspired (or, at least, look like) pieces of technology from science fiction of the past. Like the smartphones of today have a surreal resemblance to the Star Trek communicators of the 60s, [Steve] took inspiration from a story about a bicycle racing in space and set out to make his own.

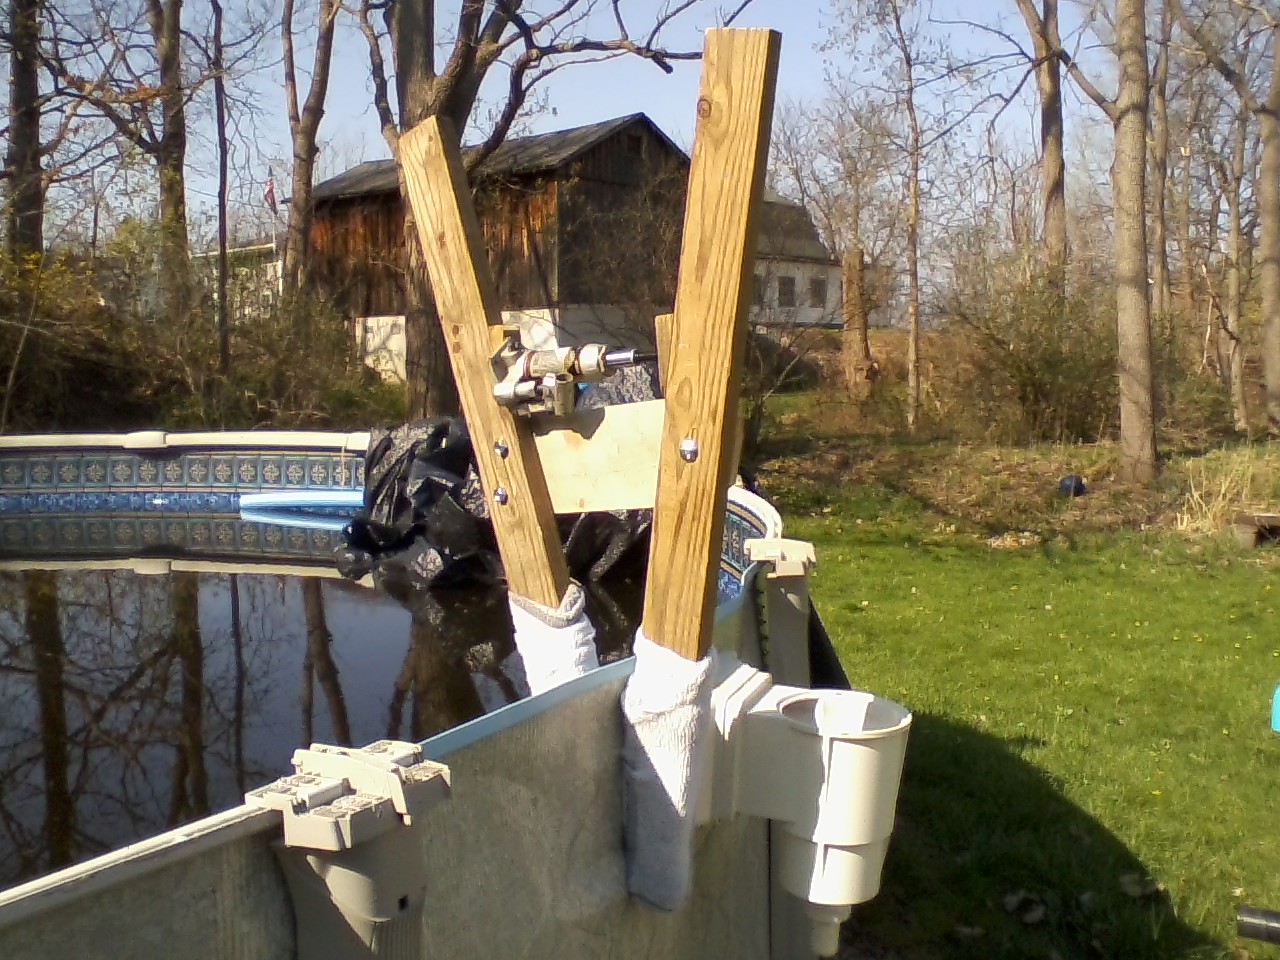
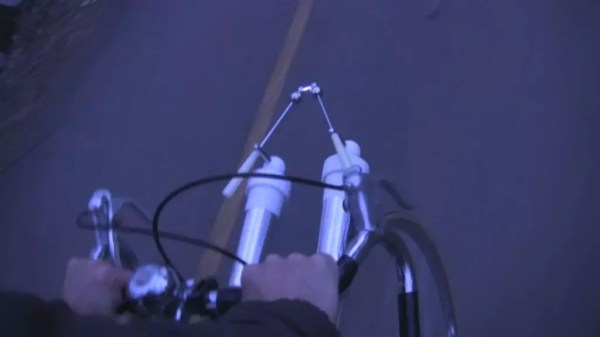
In the story, the bicycle wheels are replaced by electrostatic generators that power a type of (fictional) ion drive. Since an ion drive wouldn’t add much thrust to a bicycle operated on the Earth, [Steve] used the electrostatic generator he built to create a sparking light show. The generator is called a Wimshurst machine and has two counter-rotating discs which collect charge. The charge is dissipated across a spark gap which is placed where the bike light would normally go.

We don’t know if the sparks from the Wimshurst generator are enough for a proper headlight, but it’s definitely a cool effect. [Steve] also points out that it might also work as a bug zapper, but either way you should check out the video after the break to see it in action! While it’s not quite a tricorder it’s still a pretty impressive sci-fi-inspired build, and something that’s definitely unique in the bicycle realm.

There’s quite a collection of these Wimshurst projects beginning to come together. Here’s one made using a trio of soda bottles, and another example which used 3D printing.

Continue reading “Bicycle-Powered Wimshurst Machine”

Polar Coordinate Mapping And RGB LED Disks

Last week, Adafruit released the DotStar RGB LED Disk, a 240mm diameter disk packed with 255 individually addressable RGB LEDs. Because blinkey glowey projects are the best projects, [Adam] had to have one. His tests open up some interesting possibilities in the world of blinkey LED stuff, including a polar coordinate display that would be perfect for low-res games and LED clocks.

[Adam] found the Disk sufficiently bright and glowey, but there were two problems. The first was the JST SM connector on the input of the DotStar Disk; with 255 LEDs on the disk, it has a maximum draw of over 10A, while the connector can only supply 7A without getting unreasonably warm. Secondly, there aren’t 60 LEDs around the outer edge of the disk, limiting its application as a clock.

There’s another thing wrong with the DotStar Disk, until you realize it’s effectively a polar coordinate display. RGB LED libraries are usually written for strips or matrices, not circles. The LEDs are sequentially arranged on the DotStar disk spiraling inwards, and after mucking about with some terrible code, [Adam] realized he could control a pixel with only its distance from center and angle from the connector. This makes plotting circles easier, but it also opens this display up to some interesting applications; circular Pong would be cool, and LED clocks are the bees knees.

Hackaday Prize Entry: A Low Cost, Open Source MRI

This low cost magnetic resonance imager isn’t [Peter]’s first attempt at medical imaging, and it isn’t his first project for the Hackaday Prize, either. He’s already built a CT scanner using a barium check source and a CCD marketed as a high-energy particle detector. His Hackaday Prize entry last year, an Open Source Science Tricorder with enough sensors to make [Spock] jealous, ended up winning fourth place.

[Peter]’s MRI scanner addresses some of the shortcomings of his Open Source CT scanner. While the CT scanner worked, it was exceptionally slow, taking hours to image a bell pepper. This was mostly due to the sensitivity of his particle detector and how hot a check source he could obtain. Unlike highly radioactive elements, you can just make high strength magnetic fields, making this MRI scanner potentially much more useful than a CT scanner.

There are a few things that make a low-cost MRI machine possible, the first being a way to visualize magnetic fields. For this, [Peter] is using an array of Honeywell HMC5883L 3-axis magnetometers, the smallest sensors he could find with the largest range. These magnetometers are I2C devices, so with a few multiplexers it’s actually a relatively simple build.

Imaging with these magnetometers is not simple, and it’s going to take a lot of work to make a signal from all the noise this magnetic camera will see. The technique [Peter] will use isn’t that much different from another 2014 Hackaday Prize entry, A Proton Precession Magnetometer. When a proton in your body is exposed to a high strength magnetic field, it will orient towards the high strength field. When the large field is turned off, the proton will orient itself towards the next strongest magnetic field, in this case, the Earth. As a proton orients itself to the Earth’s magnetic field, it oscillates very slightly, and this decaying oscillation is what the magnetic camera actually detects.

With some techniques from one of [Peter]’s publication, these oscillations can be turned into images. It won’t have the same resolution as an MRI machine that fills an entire room, but it will work. Imagine, an MRI device that will sit on a desktop, made out of laser-cut plywood. You can’t have a cooler project than that.


The 2015 Hackaday Prize is sponsored by:

Building A Transistor Clock From Scrap

[Phil] has already built a few clocks with Nixies, VFDs, and LED matrices. When his son requested his own clock, he wanted to do something a little different. Inspired by the dead bug style of [Jim Williams]’ creations, [Phil] set out to build a clock made entirely out of discrete components. That includes the counters, driver circuits, and an array of LED.

There are a few inspiration pieces for [Phil]’s clock, starting with the Transistor Clock, a mains-powered clock that uses 194 transistors, 566 diodes, and exactly zero integrated circuits. Design patterns from a clock so beautiful it’s simply called The Clock are also seen, as is a Dekatron emulator from [VK2ZAY].

[Phil]’s creation has no PCB, and all the components are soldered onto tiny wires arranged into something resembling the clocks circuit. It’s a fantastic contraption, and while we’ll still have to give the design award to the clock, [Phil]’s creation shows off the functional circuits; great if he’ll ever need to debug anything.

Printing Puppy Prosthetics

When [aimzzz] met this puppy born without arms, the need for some assistive hardware was obvious. We love it that rapid prototyping techniques have become so accessible that something like building a wheelchair for a puppy is not just affordable, but a lot of fun too!

The main part of the projects is a cradle which will be comfortable for the dog. 3D printing is a great choice here because it can be customized to suit the needs of a particular dog. We remember seeing another dog named Derby who has 3D printed legs that make room for the biological legs that aren’t functioning correctly. In the case of this wheelchair, the cradle could be altered make room for legs.

The rest of the build is purely mechanical. Aluminum tubing, tubing connectors, and wheels combine with the printed cradle (and some padding material) to make for one sweet ride. It takes a bit of training to get used to, but as you can see after the break this makes mobility quite easy and intuitive for the pup.

Continue reading “Printing Puppy Prosthetics”

DIY Hydraulic Clamp Saves The Day

[Elton] wrote in to tell us about a little excitement they had after this year’s ridiculous winter. Their pool froze and as luck would have it, crumpled the edge of the liner. They asked around and their pool company said they’d better involve their insurance company because it would not be easy to repair — so they decided to try fixing it themselves.

Now since the pool liner is a fairly heavy gauge sheet metal, they wouldn’t be able to simply hammer it back into shape — so they started brainstorming ways to make their very own hydraulic clamp. What they came up with is a very clever application of physics. And all it cost was about $2 in hardware plus some scrap lumber and a bottle jack they had lying around.

Some of their first ideas included a scissor style clamp, and even a monkey wrench-like vice, but in the end, the following design was chosen — and worked.

actionShot

Ideally the hydraulic jack would be farther from the fulcrum, but since it’s rated for 2 tons it ended up being more than strong enough. To avoid scratching the liner, they also threw some socks on the end of the lumber. Still rather unwieldy, it was a two person job to pop it out. But once they got the major dents out, they were able to use a rubber mallet to finish the job off. Hooray for fluid power!

If you’re looking for the link, there isn’t one. [Elton] sent us his pictures and told us the story directly.

Logic Noise: Taming The Wild Shift Register

One of the best things about DIY synth building is that you can create devices that just don’t exist in the commercial marketplace. In this session, we’ll build a looper / sequencer the likes of which you may have never seen. And it’s groovy. Today we’ll also get back a little closer to the soul of the series. In this session, nothing is analog — this is pure Logic Noise.

The shift register is the centerpiece chip this session, and a great device in its own right. We’ve got a lot of ground to cover, so watch the teaser video and then let’s get going.

Continue reading “Logic Noise: Taming The Wild Shift Register”