Steel Tubes And Ground Plates Form The Skeleton Of This DIY Vertical CNC Mill

If you’re going to do it yourself, you might as well outdo yourself. That seems to be the thinking behind this scratch-built CNC mill, and it’s only just getting started.

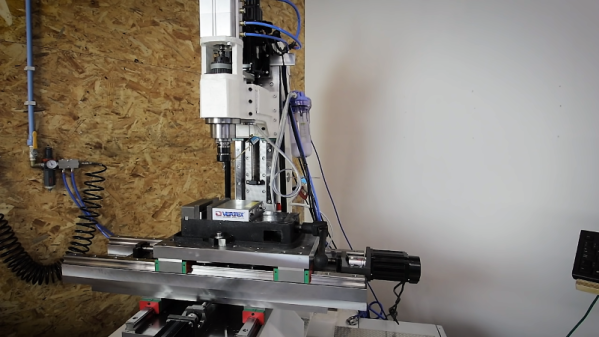
According to [Kris Temmerman], the build will cost about $10,000 by the time he’s done. So it’s not cheap, and a personal CNC from Tormach can be had for less, but that’s missing the point entirely. [Kris] built most of the structural elements for the vertical mill from cheap, readily available steel tubing, of the kind used for support columns in commercial buildings. Mounted to those are thick, precision-ground steel plates, which eat up a fair fraction of the budget. Those in turn hold 35 mm linear bearings and ball screws for the three axes, each powered by a beefy servo. The spindle is a BT30 with a power drawbar, belt-driven by an external motor that [Kris] doesn’t share the specs on, but judging from the way it flings chips during the test cut in the video below, we’d say it’s pretty powerful.

There’s still plenty to do, not least of which is stiffening the column; perhaps filling it with epoxy granite would do the trick? But it sure looks like [Kris] is building a winner here, and if he keeps the level of craftsmanship up going forward, he’ll have a top-quality machine on his hands.

Continue reading “Steel Tubes And Ground Plates Form The Skeleton Of This DIY Vertical CNC Mill”

Hackaday Links: January 3, 2016

Cx5 is a strange material that’s a favorite of model makers and prop replicators. It’s kind of like a wax, kind of like a clay, and a little bit like a plastic. Now it’s a 3D printer filament. It looks very interesting for sculpted and highly detailed models, something the 3D printing scene hasn’t had yet.

So you want a CNC machine, right? Tormach makes a good one, and here’s what it takes to put a PCNC440 in your garage. This is an incredible amount of work and a great excuse to buy an engine hoist.

[Zemnmez] could find dozens of apps and webpages that would calculate resistor color codes for him automatically. What he couldn’t find is one that would do it in reverse – i.e. type in a resistor value and return the correct color code. He made this.

[aggaz] needed a way to connect multiple MIDI devices to his computer. The MIDI spec provides a neat piece of hardware for just this occasion – the MIDI thru box. The only thing you need to build a single MIDI thru box is an opto-isolator and a buffer. It’s easy enough to build, although the DIN5 jacks used for MIDI devices are pretty expensive nowadays. (FWIW- We get an invalid certificate error when loading this page but you should still be able to load it.)

AliExpress always has some interesting stuff on it, and [Ethan] found something very cool. They’re A8 CPUs found in the latest iPhone. Are they real? Who knows. I bought one, and you’re going to get pictures in another links post in a month or so.

The Game Boy Micro was released by Nintendo in 2005 and quickly became one of the coolest and most desired handheld consoles on the planet. You need only look at the eBay listings for the Micro as evidence of its desirability. [ModPurist] took an old DS Lite and converted it into a Game Boy Micro – same idea, larger package.

DIY CNC Touch Probe

diy_cnc_touchprobe

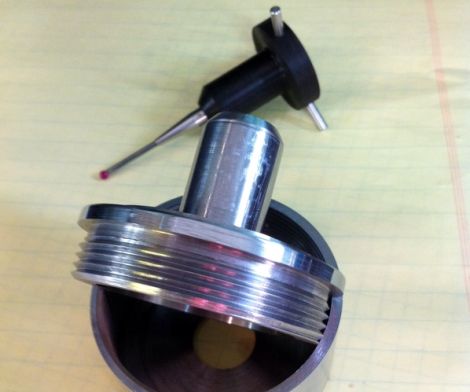
[Dennis] recently invested some money in the Tormach Tooling System for his CNC’d Sieg SX3 mill in order to make his tool changes easier. While the kit allows him to easily account for height offsets while changing tools, he has no quick, reliable means of locating the spindle in relation to his workpiece. Tired of manually finding the edges of his workpiece for each axis, he built himself a DIY touch probe to automate the process.

The theory behind the probe’s operation is pretty simple. In the probe’s housing, three conductive rods are mounted perpendicular to the probe tip. Each rod rests between two metal balls forming a complete circuit. When the probe touches the edge of his milling material, the circuit is broken, sending a signal to his CNC control box.

The probe is comprised of several different parts, milled from either aluminum or black delrin. [Dennis] says that after everything was assembled, the runout on the probe was unacceptable, so he made a few tweaks, and now the runout has been reduced to about 0.00025” – well within acceptable tolerance limits for any work he will be doing.

Be sure to check out his site, as there are plenty more pictures of the probe’s construction, as well as additional video.

In the meantime, continue reading to see a quick video of the finished probe in action.

Continue reading “DIY CNC Touch Probe”