Touchscreen Makes For A Neat Wavetable Synth

A popular tool in chiptune software like LSDJ allows the user to draw a waveform and use it as the basis for a wavetable synth. It’s fun and it can produce some great bleeps and bloops. [Kevin] has created a similar tool using an Arduino and a touchscreen.

You can draw the waveform! That’s neat.

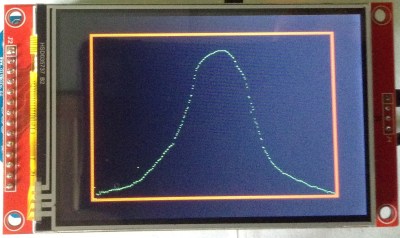
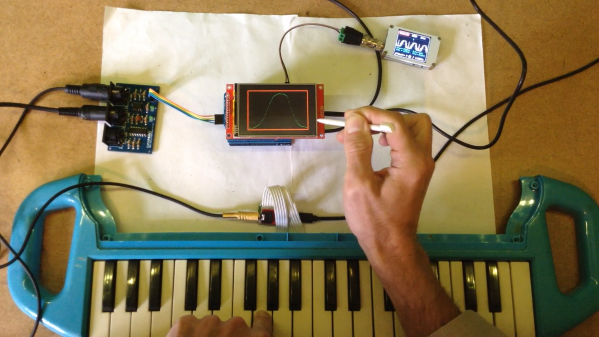
The build is based on the Arduino Uno, the humble mainstay of the Arduino line. It’s hooked up to an ILI9488 color touchscreen display, which acts as the primary user interface. Using a stylus, or presumably a finger, the user can draw directly on the screen to specify the desired waveform for the synth to produce. The Arduino reads the step-by-step amplitude values of the drawn waveform and uses them to synthesize audio according to MIDI messages received over its serial port. Audio output is via PWM, as is common in low-cost microcontroller projects.

It’s a fun build and we’re sure [Kevin] learned plenty about wavetable synthesis along the way. We’ve seen his work on other Arduino synthesis projects before, too! Video after the break.

Continue reading “Touchscreen Makes For A Neat Wavetable Synth”

This Old Korg Can’t Have Too Many Samples

The Korg DW-6000 is an entry-level synthesiser from the mid 1980s that has the classic sounds, but not enough of them. At least that was [Mateusz Kolanski]’s  view, as he hacked his model with a 16-fold increase in its wavetable memory.

At the heart of the DW-6000 is NEC’s UPD7810 16-bit microcontroller, a device stuffed with ports aplenty. The Korg doesn’t use all of those ports, so he was curious as to whether its relatively small 256 kbit ROMs could be upgraded to something much bigger with the use of four unused lines to drive their addresses. This proved to be no easy task, not least because the UPD7810 is hardly a chip with a lot of published work to learn from. A manual for it came from an unexpected source: an obscure game console used it so there is support within MAME.

A significant quantity of hardware reverse engineering and software experimenting later, and he had a ROM piggyback board to plug into his lightly-modified DW-6000. The initial model used stripboard, but naturally a decent PCB was created. That might be everything, but of course some means of working with those samples was required. Enter a Windows wavetable editor and organiser to create new ROM images, for the complete DW-6000 upgrade kit.

This project took several years, proving that persistence can pay off. If you’re not used to the way microcontrollers did their interfacing back in the 1980s then it’s definitely worth a read even if old synths aren’t your thing.

This isn’t the first bit of Korg reverse engineering we’ve brought you, either.


Building A Wavetable Synth

Every semester at one of [Bruce Land]’s electronics labs at Cornell, students team up, and pitch a few ideas on what they’d like to build for the final project. Invariably, the students will pick what they think is cool. The only thing we know about [Ian], [Joval] and [Balazs] is that one of them is a synth head. How do we know this? They built a programmable, sequenced, wavetable synthesizer for their final project in ECE4760.

First things first — what’s a wavetable synthesizer? It’s not adding, subtracting, and modulating sine, triangle, and square waves. That, we assume, is the domain of the analog senior lab. A wavetable synth isn’t a deep application of a weird reverse FFT — that’s FM synthesis. Wavetable synthesis is simply playing a single waveform — one arbitrary wave — at different speeds. It was popular in the 80s and 90s, so it makes for a great application of modern microcontrollers.

The difficult part of the build was, of course, getting waveforms out of a microcontroller, mixing them, and modulating them. This is a lab course, so a few of the techniques learned earlier in the semester when playing with DTMF tones came in very useful. The microcontroller used in the project is a PIC32, and does all the arithmetic in 32-bit fixed point. Even though the final audio output is at 12-bit resolution, the difference between doing the math at 16-bit and 32-bit was obvious.

A synthesizer isn’t useful unless it has a user interface of some kind, and for this the guys turned to a small TFT display, a few pots, and a couple of buttons. This is a complete GUI to set all the parameters, waveforms, tempo, and notes played by the sequencer. From the video of the project (below), this thing sounds pretty good for a machine that generates bleeps and bloops.

Continue reading “Building A Wavetable Synth”

DreamBlaster X2 on a Sound Blaster Sound Card

DreamBlaster X2: A Modern MIDI Synth For Your Sound Blaster Card

Back in the 90s, gamers loaded out their PCs with Creative’s Sound Blaster family of sound cards. Those who were really serious about audio could connect a daughterboard called the Creative Wave Blaster. This card used wavetable synthesis to provide more realistic instrument sounds than the Sound Blaster’s on board Yamaha FM synthesis chip.

The DreamBlaster X2 is a modern daughterboard for Sound Blaster sound cards. Using the connector on the sound card, it has stereo audio input and MIDI input and output. If you’re not using a Sound Blaster, a 3.5 mm jack and USB MIDI are provided. Since the MIDI uses TTL voltages, it can be directly connected to an Arduino or Raspberry Pi.

This card uses a Dream SAM5000 series DSP chip, which can perform wavetable synthesis with up to 81 polyphonic voices. It also performs reverb, chorus, and equalizer effects. This chip sends audio data to a 24 bit DAC, which outputs audio into the sound card or out the 3.5 mm jack.

The DreamBlaster X2 also comes with software to load wavetables, and wavetables to try out. We believe it will be the best upgrade for your 486 released in 2017. If you’re interested, you can order an assembled DreamBlaster. After the break, a review with audio demos.

Continue reading “DreamBlaster X2: A Modern MIDI Synth For Your Sound Blaster Card”

Digital Wavetable Oscillator

The tabulaRasa is a digital wave table oscillator, and features control of frequency, wave table selection, and interpolation. The device is split up into 2 parts. One is a pcb with a healthy amount of resistors, 3 potentiometers, ST TL074 JFET op amp, atmega328 and a SD socket.

The second part is software for your computer that allows you to edit or create your own waveforms. There are 3 different modes of control. Breakpoints, which allows you to set the waveform points and allows up to sixteen. Harmonic allows amplitude control over 16 harmonically-related sine waves, finally, the third mode lets you load in short sound clips.

Once you’re happy, save to a SD card and pop it into the board, and you’re ready to make some noise. The project page states at the end “tabulaRasa is in the last stages of development, and will be available soon.” so you cant get your hands on one just yet, but if you’re interested [Greg] has a kickstarter page setup where you can find out details on pricing.


Intro To Circuit Bending

Electronic musical instruments are a lot of fun for a hacker because, with a small palette of tools, know-how and curiosity, they are easily modified. As with any hack, there is always the chance that the subject will be ruined, so it’s not necessarily worth the risk to muck about inside your thousand-dollar pro synthesizer. Luckily for all of us, there are shovel-fulls of old electronic musical toys littering the curbs and second-hand shops of the world. These fun little devices provide ample opportunity to get familiar with audio electronics and circuit bending techniques.

A note on definitions: the term “circuit bending” can be synonymous with “hardware hacking” in the world of audio electronics, and we have seen some debate as to which term is better suited to a given project. We welcome you to share your viewpoints in the comments.

Keep reading to get started.
Continue reading “Intro To Circuit Bending”