3D Printed Marble Music Machine Looking Good Already

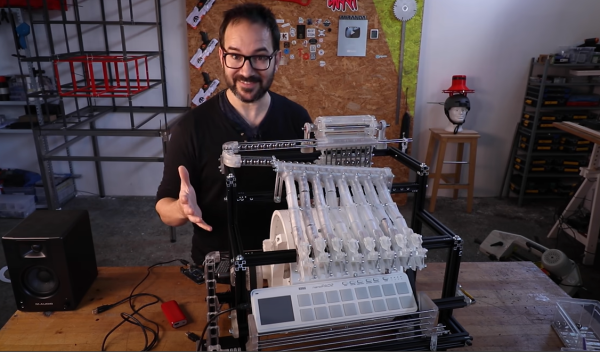
Inspired by the enormous marble music machines from the staggeringly talented [Wintergatan] and the marble run builds by [Daniel de Bruin], [Ivan Miranda] has been busy again building a largely 3D printed contraption to test his ideas around building his own marble music machine from scratch. (Video, embedded below.)

Leveraging his recent experiences with resin printing and his own giant 3D printer, he had no difficulty in producing everything he needed from his workshop, even if the design work apparently took ages.

The build shows how early in development this project is, as there are clearly quite a few issues to be dealt with, but progress looks encouraging so far. To be clear, plans are to ‘go big’ and this little eight-channel testbed is just to explore this issues around ball guiding, transport and ball release onto the first audio test device, a Korg Nano Pad 2.

Some significant teething problems were identified, such as when [Ivan] designed the ball lifter, he intended the balls to load from the rear, but then needed to switch it to load from the front. No big deal, simply reverse the motor direction to load balls on the opposite side of the mechanism. Sadly, that also meant the directly coupled note drum was now also rotating the wrong way to release the balls. Oops. A quick hack later and [Ivan] was back in business. Various parts needed shimming up with plates, but with 3D printers on the bench, knocking those out took little time or effort. This just shows how darn useful 3D printers can be, allowing you to iterate in a short time and feed your hacks back into the final version.

[Ivan] is clearly going to have a lot of ‘fun’ with this one, as [Wintergatan] will surely testify, these big musical marble machine builds are quite some undertaking. We shall definitely be tuning in later on to see where this one goes!

While we’re on the subject of the [Wintergatan] marble machines, here’s a mini homage to the latest Marble Machine X, and if you’re in the need for a 3D printed marble clock, then try this one for starters.

Continue reading “3D Printed Marble Music Machine Looking Good Already”

Raspberry Pi Plays A MIDI Tune Wherever You May Roam

MIDI controller keyboards are great because they let you control any synthesizer you plug them into. The only downside: you need a synthesizer to turn MIDI notes into actual sounds, slightly complicating some summer night campfire serenading. Not for [Geordie] though, who decided to build the nanoPi, a portable, MIDI instrument housing a Raspberry Pi.

Using a Korg nanoKEY2 USB MIDI controller as base for the device, [Geordie] took it apart and added a Raspberry Pi Zero W, a power bank to, well, power it, and a USB hub to connect a likewise added USB audio interface, as well as the controller itself. As the nanoKEY2 has a naturally slim shape, none of this would ever fit in it, so he designed and 3D printed a frame to extend its height. Rather than wiring everything up internally, he decided to route the power and data cable to the outside and connect them back to the device itself, allowing him to use both the power bank and the controller itself separately if needed.

On the software side, the Pi is running your common open source software synthesizer, Fluidsynth. To control Fluidsynth itself — for example to change the instrument — [Geordie] actually uses the Termius SSH client on his phone, allowing him also to shut down the Pi that way. While Fluidsynth’s built-in MIDI router could alternatively remap the nanoKEY2’s additional buttons, it appears the functionality is limited to messages of the same type, so the buttons’ Control Change messages couldn’t be remapped to the required Program Change messages. Well, there’s always the option to fit some extra buttons if needed. Or maybe you could do something clever in software.

As you may have noticed, the nanoPi doesn’t include any speaker — and considering its size, that’s probably for the best. So while it’s not a fully standalone instrument, it’s a nice, compact device to use with your headphones anywhere you go. And thanks to its flexible wiring, you could also attach any other USB MIDI controller to it, such as this little woodwind one, or the one that plays every pop song ever.

Continue reading “Raspberry Pi Plays A MIDI Tune Wherever You May Roam”

This Old Korg Can’t Have Too Many Samples

The Korg DW-6000 is an entry-level synthesiser from the mid 1980s that has the classic sounds, but not enough of them. At least that was [Mateusz Kolanski]’s  view, as he hacked his model with a 16-fold increase in its wavetable memory.

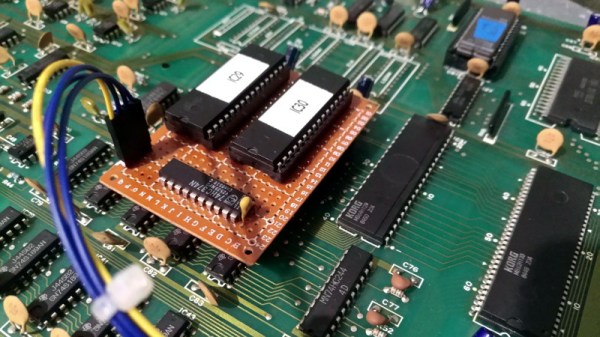
At the heart of the DW-6000 is NEC’s UPD7810 16-bit microcontroller, a device stuffed with ports aplenty. The Korg doesn’t use all of those ports, so he was curious as to whether its relatively small 256 kbit ROMs could be upgraded to something much bigger with the use of four unused lines to drive their addresses. This proved to be no easy task, not least because the UPD7810 is hardly a chip with a lot of published work to learn from. A manual for it came from an unexpected source: an obscure game console used it so there is support within MAME.

A significant quantity of hardware reverse engineering and software experimenting later, and he had a ROM piggyback board to plug into his lightly-modified DW-6000. The initial model used stripboard, but naturally a decent PCB was created. That might be everything, but of course some means of working with those samples was required. Enter a Windows wavetable editor and organiser to create new ROM images, for the complete DW-6000 upgrade kit.

This project took several years, proving that persistence can pay off. If you’re not used to the way microcontrollers did their interfacing back in the 1980s then it’s definitely worth a read even if old synths aren’t your thing.

This isn’t the first bit of Korg reverse engineering we’ve brought you, either.


Monotron Gets All The Mods

[Harry Axten] turned the diminutive Korg Monotron into a playable analog synthesizer, complete with a full-sized keyboard spanning two octaves and a MIDI interface.

Korg Introduced the Monotron analog mini-synthesizer back in 2010. They also dropped the schematics for the synth. Hackers wasted no time modifying and improving the Monotron. [Harry] incorporated several of these changes into his build. The Low-Frequency Oscillator (LFO) has been changed over to an envelope generator. The ribbon controller is gone, replaced with a CV/gate interface to sound notes.

The CV/gate interface, in turn, is connected to an ATMega328P which converts it to MIDI. MIDI data comes from one of two sources: A two-octave full-sized keyboard pulled from a scrapped MIDI controller or a MIDI connector at the back.

The user interface doesn’t stop with the keyboard. The low-cost pots on the original Monotron have been replaced with much higher quality parts on the front panel. The tuning pot is a 10-turn device, which allows for precision tuning. All the mods are mounted on a single board, which is connected to the original Monotron board.

The fruit of all hard work is an instrument that is a heck of a lot of fun to play. Check it out in the video below. Want more? You can read all about hacking about the Monotron’s bigger brother, the Monotribe.

Continue reading “Monotron Gets All The Mods”

FrankenKorg: The Modern Remote Keyboard

On a dreary night in November, [Smecher] collected the instruments of electronic life around him to infuse a musical spark into FrankenKorg — a resurrected keytar.

This hack is a “re-braining” of a RK-100 Korg Keytar, replacing the original circuits with an ATMega32 — the original functionality and appearance are preserved allowing any restored version of the original boards to be seamlessly re-integrated. In light of that, the original boards were ditched after a brief investigation, and a haphazard building process on a protoboard began. Three LS138 3-8 demuxers that accompany the ATMega handle scanning the keys since there weren’t enough pins on the ATMega alone for all the Korg’s features. Check out [Smecher]’s breakdown of his process in the video after the break!

Continue reading “FrankenKorg: The Modern Remote Keyboard”

Dumping Synth ROMs And Avoiding Bitrot

Bitrot is setting in, and our digital legacy is slowly turning to dust. Efforts preserve our history are currently being undertaken numerous people around the Internet, and [Jason Scott] just got an automated CD ripper, so everything is kinda okay.

However, there is one medium that’s being overlooked. ROMs, and I don’t mean video game cartridges. In the 80s, mask ROMs were everywhere, found in everything from talking cars to synthesizers.

[Ali] bought a Korg i5m workstation from eBay a few years ago, but this unit had a problem. Luckily, he had a similar synth with the same samples stored on board. There was only one way to find out if bitrot was the cause: desoldering the chips and dumping all the information.

After fiddling around with his broken synth, [Ali] still had a problem with the sound output. Deciding the ROM chips had to be the issue, [Ali] desoldered the chips and ordered a breadboard SOP44 adapter after deciding soldering wires to each lead of the chip was a bad idea. This adapter was connected to an Arduino Mega — still the best tool for weird tasks like this — and the contents of the ROM were dumped to a PC with the help of a helpful Arduino sketch.

Dumping the ROMs took about 15 minutes, and that’s if he was able to maintain a good connection between the chip and Arduino for that long. [Ali] wrote an improved ROM reader after much trial and error, and was eventually able to get the same data out of the same chip eventually.

While the broken synth hasn’t been repaired yet, at least [Ali] has the important bits off of this antique instrument. That’s good enough for now, but [Ali] intends to take this project to completion and get those vintage samples playing out of this great old synth.


Now Is The Golden Age Of Artisanal, Non-Traditional Tube Amps

Earlier in the month, [Elliot Williams] quipped that it had been far too long since we saw a VFD-based amplifier build. Well, that dry spell is over. This week, [kodera2t] started showing off his design for a VFD headphone amp.

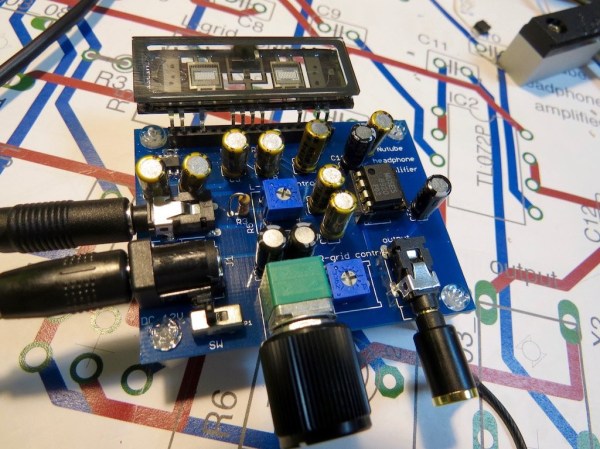
Here’s the thing, this isn’t using old surplus vacuum fluorescent displays. This is actually a new part. We first covered it about 18 months ago when Korg and Noritake announced the NuTube. It’s the VFD form factor you would find in old stereo and lab equipment, but housed in the familiar glass case is a triode specifically designed for that purpose.

Check out [kodera2t’s] video below where he walks through the schematic for his amplifier. Since making that video he has populated the boards and taken it for a spin — no video of that yet but we’re going to keep a watchful eye for a follow-up. Since these parts can be reliably sourced he’s even planning to sell it in his Tindie store. If you want to play around with this new tube that’s a pretty easy way to get the tube and support hardware all in one shot. This is not a hack, it’s being used for exactly what Korg and Noritake designed it to do, but we hope to see a few of these kits hacked for specific tastes in amp design. If you do that (or any other VFD hacking) we want to hear about it!

And now for the litany of non-traditional VFD amps we’ve grown to love. There is the Nixie amp where [Elliot] made the quip I mentioned above, here’s an old radio VFD amp project, in this one a VCR was the donor, and this from wayback that gives a great background on how this all works.

Continue reading “Now Is The Golden Age Of Artisanal, Non-Traditional Tube Amps”