Time Lapse Rig Puts GoPro Into Orbit – In Your Shop

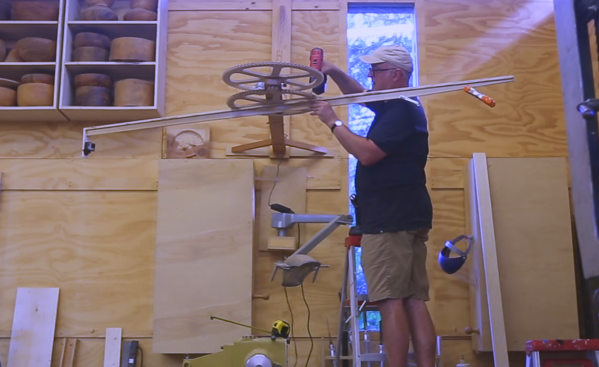
The combination of time-lapse photography and slow camera panning can be quite hypnotic – think of those cool sunset to nightfall shots where the camera slowly pans across a cityscape with car lights zooming by. [Frank Howarth] wanted to replicate such shots in his shop, and came up with this orbiting overhead time-lapse rig for his GoPro.

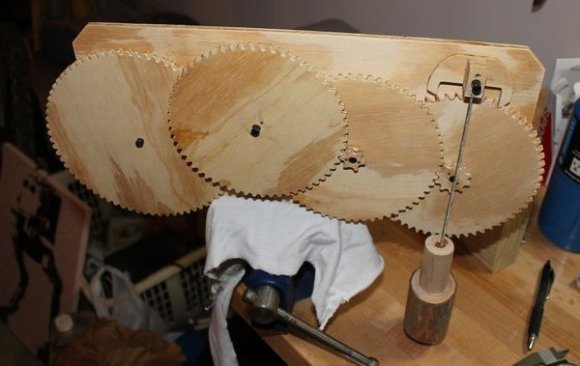
[Frank] clearly cares about the photography in his videos. Everything is well lit, he uses wide-open apertures for shallow depth of field shots, and the editing and post-production effects are top notch. So a good quality build was in order for this rig, which as the video below shows, will be used for overhead shots during long sessions at the lathe and other machines. The gears for this build were designed with [Matthias Wandel]’s gear template app and cut from birch plywood with a CNC router. Two large gears and two small pinions gear down the motor enough for a slow, smooth orbit. The GoPro is mounted on a long boom and pointed in and down; the resulting shots are smooth and professional looking, with the money shot being that last look at [Frank]’s dream shop.

If you haven’t seen [Frank]’s YouTube channel, you might want to check it out. While his material of choice is dead tree carcasses, his approach to projects and the machines and techniques he employs are great stuff. We featured his bamboo Death Star recently, and if you check out his CNC router build, you’ll see [Frank] is far from a one-trick pony.

Continue reading “Time Lapse Rig Puts GoPro Into Orbit – In Your Shop”

DIY plastic shredder with gears and safety

Scratch-Fabricated Plastic Gobbling Shredder Brings Recycling Home

[Jason Knight], an intern at FabLab RUC, has worked hard for 9 months to make a sheet plastics shredder for HDPE and LDPE from things like plastic bags, bubble wrap and air cushion packaging with the goal of recycling the shredded plastic. Why shred these things? When broken down to smaller pieces they can be melted in a consumer grade oven (like where you cook your frozen pizzas) then molded into new objects or extruded into 3D printing filament.

We especially like his big homemade 1.1 inch (30mm) thick wooden gears, for transferring the rotation from the motor to the cutting shafts while giving a step up in torque. As you can see in the video below, the gears definitely add an extra look of power to the machine.

The blades are the shape you most often see in shredders, gear-like disks side-by-side with teeth cut from them that pull the plastic in while shredding it (in contrast to this lower-throughput experimental DIY shredder made with two steel pipes). [Jason’s] multiple teeth are a bit of work to fabricate — not only were all the teeth milled from sheet metal but they then had to be individually sanded to remove burrs from the edges. It was worth it, as this has no problem chewing waste plastics to pieces.

Shredders can be dangerous machines for wandering fingers so [Jason] added a few safety features. Those include a drawer that you open to insert your plastic into the shredding area and a guard that completely surrounds the gears. And both features include transparent plastic areas so that you can still watch the impressive working parts in action.

Continue reading “Scratch-Fabricated Plastic Gobbling Shredder Brings Recycling Home”

Designing And Building A Wooden Mechanical Clock

wooden-clock-prototype

Electronics are undoubtedly the basis for our modern society. Leaving out transistor-based devices, and a mechanical clock would be one of the most intricate devices man has come up with. As a Mechanical Engineer, I thought it would be a fun challenge to design and build my own gear-driven clock.

Because clocks have obviously been invented, I wouldn’t be starting from scratch, and I don’t think I could have figured out an escapement on my own. I explain my initial clock escapement and gear reduction design thoughts in this post, and originally getting the escapement to work was my biggest fear.

As seen in the first video after the break, the escapement gear is still a big problem, but not really for the reason I expected. The shaft that the gear sits on seems to be bent, so it allows the escapement to “go free” for part of it’s cycle, losing any sense of accurate timekeeping. Be sure to also check out the second video, especially around 1:50 when I show what happens when an escapement gear goes much faster than a normal clock. Continue reading “Designing And Building A Wooden Mechanical Clock”