A Lightweight Two Metre Carbon Fibre Yagi Antenna

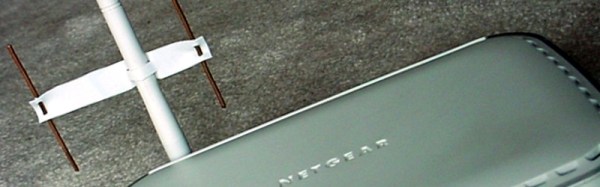
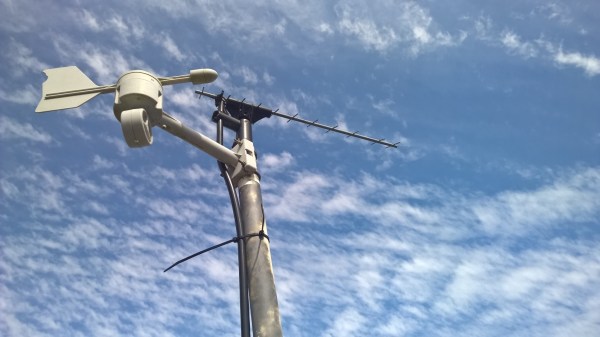
If you’ve ever cast your eye towards the rooftops, you’ll be familiar with the Yagi antenna. A dipole radiator with a reflector and a series of passive director elements in front of it, you’ll find them in all fields of radio including in a lot of cases the TV antenna on your rooftop.

In the world of amateur radio they are used extensively, both in fixed and portable situations. One of their most portable uses comes from the amateur satellite community, who at the most basic level use handheld Yagi antennas to manually track passing satellites. As you can imagine, holding up an antenna for the pass of a satellite can be a test for your muscles, so a lot of effort has gone into making Yagis for this application that are as lightweight as possible.

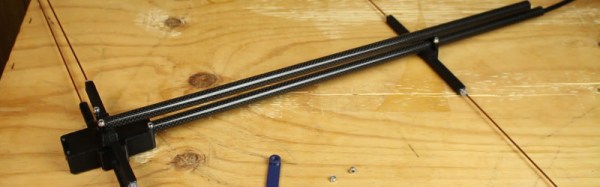
[Tysonpower] has a contribution to the world of lightweight Yagis, he’s taken a conventional design with a PVC boom and updated it with a stronger and lighter boom made from carbon fibre composite pipe. The elements are copper-coated steel welding rods, some inexpensive aluminium clamps came from AliExpress, and all is held together by some 3D-printed parts. As a result the whole unit comes in at a claimed bargain price of under 20 Euros.

This antenna is for the 2 M (144 MHz) amateur band, but since it’s based on the [WB0CMT] “7 dB for 7 bucks”  (PDF) design it should be easily modified for other frequencies. The 3D printed parts can be found on Thingiverse,  and he’s also posted a couple of videos in German. We’ve posted the one showing the build below the break, you can find the other showing the antenna being tested at the link above.

Continue reading “A Lightweight Two Metre Carbon Fibre Yagi Antenna”

A Simple Yagi Antenna For Your Wi-Fi Router

When we take a new Wi-Fi router from its box, the stock antenna is a short plastic stub with a reverse SMA plug on one end. More recent and more fancy routers have more than one such antenna for clever tricks to extend their range or bandwidth, but even if the manufacturer has encased it in mean-looking plastic the antenna inside is the same. It’s a sleeve dipole, think of it as a vertical dipole antenna in which the lower radiator is hollow, and through which the feeder is routed.

These antennas do a reasonable job of covering a typical home, because a vertical sleeve dipole is omnidirectional. It radiates in all horizontal directions, or if you are a pessimist you might say it radiates equally badly in all horizontal directions. [Brian Beezley, K6STI] has an interesting modification which changes that, he’s made a simple Yagi beam antenna from copper wire and part of a plastic yoghurt container, and slotted it over the sleeve dipole to make it directional and improve its gain and throughput in that direction.

Though its construction may look rough and ready it has been carefully simulated, so it’s as good a design as it can be in the circumstances. The simulation predicts 8.6 dB of gain, though as any radio amateur will tell you, always take antenna gain figures with a pinch of salt. It does however provide a significant improvement in range, which for the investment put in you certainly can’t complain at. Give it a try, and bring connectivity back to far-flung corners of your home!

We’ve covered quite a few WiFi Yagis here over the years, such as this rather extreme wardriving tool. But few have been this cheap.

Thanks to London Hackspace Radio Club for the tip.

$25 Satellite Tracker Boasts “Usefulness Optional”

[Paul] is very up-front about the realities of his $25 Satellite Tracker, which aims a tape measure yagi antenna at a satellite of choice and keeps it tracking the satellite as it moves overhead. Does it work? Yes! Is it cheap? Of course! Is it useful? Well… did we mention it works and it’s cheap?

When [Paul] found himself wanting to see how cheaply he could make a satellite tracker he already had an RTL-SDR (which we have seen used for satellite communication before) and a yagi antenna made out of a tape measure, but wanted some way to automatically point the antenna at a satellite as it moved across the sky. He also wanted to see just how economically it could be done. Turns out that with some parts from China and code from SatNOGS (open-source satellite tracking network project and winner of the 2014 Hackaday Prize) you have most of what you need! A few modifications were still needed, and [Paul] describes them all in detail.

Satellite Tracker In Parking Lot ThumbnailSo is a $25 Satellite Tracker useful? As [Paul] says, “Probably not.” He explains, “Most people want satellite trackers so that they can put them outside and then control the antenna from inside, which someone probably can’t do with mine unless they live in a really nice place or build a radome. […] Driving somewhere, setting it up correctly (which involves reprogramming the Arduino for every satellite), and then sitting around is pretty much the opposite of useful.”

It might not be the most practical but it works, it’s cool, he learned a lot, and he wrote up the entire process for others to learn from or duplicate. If that’s not useful, we don’t know what is.

Satellite tracking is the focus of some interesting projects. We’ve even seen a project that points out satellite positions by shining a laser into the sky.

Solving ISP Problem With A Homebrew LTE Yagi

We’ve heard reports that internet connectivity in Australia can be an iffy proposition, and [deandob] seems to back that up. At the limit of a decent DSL connection and on the fringe of LTE, [deandob] decided to optimize the wireless connection with this homebrew Yagi antenna.

Officially known as the Yagi-Uda after its two Japanese inventors from the 1920s, but generally shortened to the name of its less involved but quicker to patent inventor, the Yagi is an antenna that provides high gain in one direction. That a homebrew antenna was even necessary at all is due to [deandob]’s ISP using the 2300MHz band rather than the more popular 2400MHz – plenty of cheap 2.4GHz antennas out there, but not so much with 2.3GHz. With multiple parallel and precisely sized and spaced parasitic elements, a Yagi can be a complicated design, but luckily for [deandob] the ham radio community has a good selection of Yagi design tools available. His final design uses an aluminum rod for a boom, 2mm steel wire for reflectors and directors, and a length of coax as the driven element. The result? Better connectivity that pushes his ISP throttling limit, and no more need to mount the modem high enough in his house to use the internal antenna.

People on the fringes of internet coverage go to great lengths to get connections, like this off-grid network bridge. Or if you’d rather use a homebrew Yagi to listen to meteors, that’s possible too.

Listen To Meteors Live

When the big annual meteor showers come around, you can often find us driving up to a mountaintop to escape light pollution and watching the skies for a while. But what to do when it’s cloudy? Or when you’re just too lazy to leave your computer monitor? One solution is to listen to meteors online! (Yeah, it’s not the same.)

Meteors leave a trail of ionized gas in their wake. That’s what you see when you’re watching the “shooting stars”. Besides glowing, this gas also reflects radio waves, so you could in principle listen for reflections of terrestrial broadcasts that bounce off of the meteors’ tails. This is the basis of the meteor burst communication mode.

[Ciprian Sufitchi, N2YO] set up his system using nothing more than a cheap RTL-SDR dongle and a Yagi antenna, which he describes in his writeup (PDF) on meteor echoes. The trick is to find a strong signal broadcast from the earth that’s in the 40-70 MHz region where the atmosphere is most transparent so that you get a good signal.

This used to be easy, because analog TV stations would put out hundreds of kilowatts in these bands. Now, with the transition to digital TV, things are a lot quieter. But there are still a few hold-outs. If you’re in the eastern half of the USA, for instance, there’s a transmitter in Ontario, Canada that’s still broadcasting analog on channel 2. Simply point your antenna at Ontario, aim it up into the ionosphere, and you’re all set.

We’re interested in anyone in Europe knows of similar powerful emitters in these bands.

As you’d expect, we’ve covered meteor burst before, but the ease of installation provided by the SDR + Yagi solution is ridiculous. And speaking of ridiculous, how about communicating by bouncing signals off of passing airplanes? What will those ham radio folks think of next?

Fishing For Radio Signals With The Moxon Antenna

mox-antenna

[Bill Meara] has finished his latest project, a Moxon antenna for HF on 17 meters. [Bill] is well-known here on Hackaday. When not building awesome radios, he can be found ranting about ham radio. His new antenna turned out to be a true hack. He even used a hacksaw to build it!

The Moxon antenna is named for the late [Les Moxon, G6XN] who first described it in “Two-Element Driven Arrays”, a QST magazine article published in July of 1952.  [Bill] built his Moxon loosely based on [Jim/AE6AC’s] excellent instructions. The design is incredibly simple – a two element directional antenna using crappie fishing poles as spreaders. That’s crappie as in the fish, not the quality of the pole. Crappie poles are typically made up of telescoping sections of graphite or fiberglass  in common lengths of 14, 16, and 20 feet. The poles can be bought for under $20 at sporting goods stores. [Bill] used 16 foot poles purchased from Amazon.

The antenna is created by connecting all four poles at their bases in an X shape. The wire elements are stretched across the ends of the poles. The entire antenna bends up as the stiff poles hold the driven and reflector elements in tension. [Bill] used some scrap wood and U-bolts to attach the fishing poles, and bungee cord ends at the tips. Since the antenna is directional, [Bill] added a TV antenna rotor to spin the beam around. The antenna is so light that one could get by with a couple of cords and the “Armstrong method” of antenna rotation.

Once up on the roof, [Bill] found his antenna really performed. He was easily able to cross the Atlantic from his Northern Virginia home to France, Belgium, and Latvia. The mostly horizontal antenna makes it a bit more unobtrusive than other directional designs. [Bill] mentions that his neighbors haven’t revolted yet, so he’s continuing to enjoy the fruits of his antenna labors.

TDOA (Time Difference Of Arrival) Directional Antenna

tdoa-antenna-tutorial

We have posted articles in the past on directional antennas such as Yagi antennas used for transmitter hunting otherwise known as fox hunting. Those types of antennas and reception suffer from one major drawback, which is as you get close to the transmitter the S meter will go full scale. At which time the transmitted signal appears to be coming from all directions. To correct for this problem you need to use clever signal attenuators or change to a poor receiving antenna as well as tuning off frequency effectively making your receiver hard of hearing so that only the direct path to the transmitter is loudest.

There is another popular type of antenna that you can build yourself called a TDOA which stands for Time Difference of Arrival. [Byon Garrabrant N6BG]  shared a short video tutorial on the functionality of his home built TDOA antenna. Effectively this is an active antenna that uses a 555 chip or, in [Byon’s] case, a PIC chip to quickly shift between two receiving dipole antennas at either end of a shortened yardstick. In his explanation you learn that as the antenna ends move closer or farther from the source a 640 Hz generated audio tone will go from loud to very soft as the antennas become equal distance from the source. This type of directional reception is not affected by signal strength. This means you can be very close to a powerful transmitter and it will still function as a good directional antenna.

The current circuit diagram, BOM and source code are all available on [Byon’s] TDOA page.

The reason [Byon] used a programmable PIC instead of the 555 for his design is because he wants to add a few more modifications such as feeding back the audio output to the PIC in order to programmatically turn on a left or right LED indicating the direction of the transmitter. Furthermore, he plans on adding a third antenna in a triangular configuration to programmatically control a circle of 6 LEDs indicating the exact direction of the signal. When he finishes the final modifications he can drive around with the antenna array on his vehicle and the circle of LEDs inside indicating the exact direction to navigate.

We look forward to seeing the rest of the development which might even become a kit someday. You can watch [Byon’s] TDOA video after the break.

Continue reading “TDOA (Time Difference Of Arrival) Directional Antenna”