Rapid Fire Update Brings Many New Features

[Shawn McCombs] has been spending some time refining his Xbox 360 rapid fire hack. This time around he’s got a lot more features, many of which we haven’t really seen before.

When we looked at the original project he had added an ATtiny85 which read a potentiometer to set the rapid fire speed for one of the buttons. This time around he’s opened up settings for individual weapons in the game. For instance, if you have a hand-gun and a rifle, you can set different rapid fire rates for each to account for the reload speed for those guns. He patched into the ring of LEDs on the controller in order to indicate which preset is currently chosen. There are three tactile switches on the underside of the controller too. One of them is a reset button which gets you back to your primary weapon and the default rapid fire rate. Settings for each weapon are saved to the EEPROM so you won’t lose them when the controller goes to sleep. Check out [Shawn’s] description of the project in the video after the break.

Continue reading “Rapid Fire Update Brings Many New Features”

384-LED Ball Receives Animation Wirelessly And Knows Its Orientation

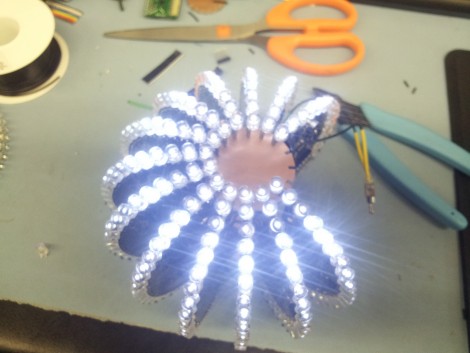
We get a ton of tips about Kickstarter projects. Here is a great example of what we need to see in order to feature one of them. This LED Blinky Ball developed by Null Space Labs is the target of a rather ambitious fundraising campaign. But in addition to the fundraising write-up they’ve shared extensive details about the prototype.

The ball is made up of sixteen slices; each is its own circuit board hosting an LED driver. All slices use the same PCB design, but one of them has an ATmega328 populated on the board to act as master. Optional components on the master board include an accelerometer, and a Bluetooth module to receive animation data. To get the full effect of the most recent prototype you’re going to want to see the video on their Kickstarter page.

Think this ball looks familiar to you? The original design was developed by [Nikolai] as a performance piece for a friend. This version was inspired by our feature of that earlier project.

So, use this as a template if you’re planning to submit your Kickstarter links to Hackaday’s tips line. We want to juicy details on the project!

Microswitch Keyboard Gives Those Lazy Thumbs A Workout

Upon first sight there will be no doubt in anyone’s mind that this is a hacker’s keyboard. [Tim Tyler] built the odd-looking conglomeration of keys a few years ago with the goal of improving the man-machine interface. Why waste all that thumb space with just one long keyboard when you can have at least nine keys per thumb?

After some additional consideration this isn’t all that unorthodox. We’ve seen keyboards that split the hands; in fact you can buy them. This just adds the thumb matrices and that rack of programmable keys above the alpha-numeric portion. It’s rather organ-like with its multiple ranks, don’t you think? Check out the demonstration video after the break. It certainly has a keystroke sound that is all its own. The sound is different from the clackity “M” keyboard and its modern relatives thanks to the microswitches that make up each key.

Continue reading “Microswitch Keyboard Gives Those Lazy Thumbs A Workout”

Arduino Saves You A Bundle When It Comes To Guitar Pedal Effects

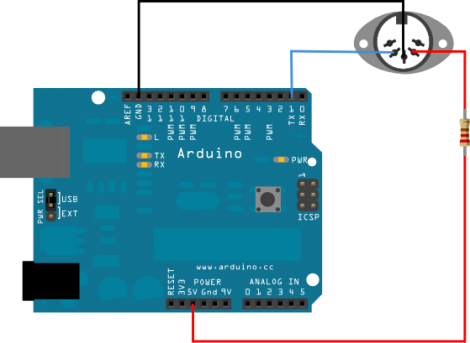
[Deadbird] wanted to recreate some guitar pedal effects that he heard on a music video. The thing is, you can end up spending a bundle on hardware unless you’re crafty like he was. He grabbed a Whammy 4 pedal, but decided to forego using a $125 MIDI controller and sourced an Arduino to perform MIDI-based alterations instead.

The Whammy 4 was chosen for its ability to perform the sound processing he desired, but also because it can be MIDI controller. By hooking up the Arduino to that port (as seen in the diagram above) he’s able to program changes that would be difficult or impossible with just the pedal. For instance, [Deadbird] illustrates a command which jumps from the lowest to highest setting of an effect without hitting any of the values in the middle. With that under his belt he goes about programming loops of changes with delays in between them. The best part is, you’re only limited by your ability to craft the MIDI commands as Arduino code.

Build An Electric Motorcycle

On the list of things we’ll build ‘when we get a few free weekends,’ an electric motorcycle is right at the top. With a 20-mile range, they may not be as  versatile as a car or truck, but we can’t imagine a vehicle better suited for making a quick jaunt around town. [Ben Nelson] just finished his electric motorcycle and put up a great Instructable on converting an ’81 Kawasaki KZ440 to battery power.

After going over the rarely mentioned aspects of license, registration, and insurance, [Ben] started his build by pulling the engine from his bike and installing an electric motor. The batteries used weren’t insanely expensive LiPo cells, but instead cheap lead-acid units. The calculated range with the lead-acid batteries was 26 miles – perfect for a trip to the next town over and back.

After everything was cabled up, chain wrapped around sockets, and an awesome yellow paint job applied, [Ben] finally took his bike for a test drive. Check out the videos after the break for an idea of how fast [Ben]’s bike can go.

Continue reading “Build An Electric Motorcycle”

Happy Late Lit Acrylic Valentines Day

Although [Danman] was right on time with his home-hacked Valentines day gift, this article comes to you a little late. With the message on the heart changed, however, it could be a perfect “Sorry I forgot Valentines Day again” gift, so it may still be useful.

The concept isn’t that complicated, simply a strip of LED lights around a piece of acrylic. A battery holder and switch rounds out this build. It’s a neat way to light things up, but what we thought was especially interesting was the way it was engraved and cut out with a minimum of traditional tools.

Sure, [Danman] had access to a bandsaw, but as for actually engraving the outline he used a modified electric toothbrush! We’d love to see that build written up. If that wasn’t enough, the lettering was “ghetto blasted”, as he puts it, using a compressed air nozzle, a pen tube, and a styrofoam cup full of ceramic dust! Macgyver would be proud!